# Welcome!

Welcome to **PRISM Live Studio**.\
This all-in-one program empowers content creators to live stream, record, and customize their broadcast screens seamlessly. PRISM Live Studio offers all the essential tools for streaming on major platforms.

**Find everything you need to get started with PRISM Live Studio right here.**

### Featured&#x20;

<table data-view="cards"><thead><tr><th></th><th></th><th data-hidden data-card-cover data-type="files"></th><th data-hidden></th><th data-hidden data-card-target data-type="content-ref"></th></tr></thead><tbody><tr><td><strong>Introducing PRISM Plus Subscription</strong></td><td>Mobile, Desktop</td><td><a href="https://1019928184-files.gitbook.io/~/files/v0/b/gitbook-x-prod.appspot.com/o/spaces%2FlISC5rfB4Hnmbsjf8phq%2Fuploads%2Fp7ZuCwc3z0rNIYF15a8N%2F11.png?alt=media&amp;token=02569b90-66eb-4fa1-93ce-5303a8ec9c23">11.png</a></td><td></td><td><a href="/subscriptions-and-credits/prism-plus">PRISM Plus</a></td></tr><tr><td><strong>Streaming to YouTube</strong></td><td>Mobile(Android, iOS)</td><td><a href="https://1019928184-files.gitbook.io/~/files/v0/b/gitbook-x-prod.appspot.com/o/spaces%2FlISC5rfB4Hnmbsjf8phq%2Fuploads%2FXtX3tPWWBKzx06YQToSV%2F01.png?alt=media&amp;token=3581fc43-2865-4e50-a4ca-4205c3ff6809">01.png</a></td><td></td><td><a href="/mobile/guides/streaming/youtube-streaming/streaming-to-youtube">Streaming to YouTube</a></td></tr><tr><td><strong>Using Custom RTMP</strong></td><td>Mobile(Android, iOS)</td><td><a href="https://1019928184-files.gitbook.io/~/files/v0/b/gitbook-x-prod.appspot.com/o/spaces%2FlISC5rfB4Hnmbsjf8phq%2Fuploads%2F3Gmq07aXOp3PhrFlW5O9%2F02.png?alt=media&amp;token=bc035e76-b16a-4d03-9311-87c441e1525b">02.png</a></td><td></td><td><a href="/mobile/guides/streaming/rtmp/using-custom-rtmp">Using Custom RTMP</a></td></tr><tr><td><strong>How to Connect PRISM Mobile to Desktop</strong></td><td>Mobile, Desktop</td><td><a href="https://1019928184-files.gitbook.io/~/files/v0/b/gitbook-x-prod.appspot.com/o/spaces%2FlISC5rfB4Hnmbsjf8phq%2Fuploads%2FKjVVWPSCyXTQRiUSjr8t%2F03.png?alt=media&amp;token=333431d7-4d93-4016-a9da-5cf4822cd977">03.png</a></td><td></td><td><a href="/desktop/guides/sources/prism-mobile-source/connecting-camera-from-prism-mobile-app">Connecting Camera from PRISM Mobile App</a></td></tr><tr><td><strong>Using OBS plugins</strong></td><td>Desktop(Windows)</td><td><a href="https://1019928184-files.gitbook.io/~/files/v0/b/gitbook-x-prod.appspot.com/o/spaces%2FlISC5rfB4Hnmbsjf8phq%2Fuploads%2FSCR4uwJNwcx9WRHUSnGE%2F05.png?alt=media&amp;token=6f86318b-7cb0-4e01-8bb6-abc0d3954054">05.png</a></td><td></td><td><a href="/desktop/guides/features/obs-plugins/using-obs-plugins">Using OBS Plugins</a></td></tr><tr><td><strong>Improving Phone Overheating for Streaming</strong></td><td>Mobile(Android, iOS)</td><td><a href="https://1019928184-files.gitbook.io/~/files/v0/b/gitbook-x-prod.appspot.com/o/spaces%2FlISC5rfB4Hnmbsjf8phq%2Fuploads%2FVEM46M4Mzf6BkWMC58C2%2F06.png?alt=media&amp;token=2772891d-2e73-4d04-b36b-d519cd2fd070">06.png</a></td><td></td><td><a href="/mobile/guides/error-solution/performance/improving-smartphone-overheating-for-better-streaming">Improving Smartphone Overheating for Better Streaming</a></td></tr></tbody></table>

### Getting Started with PRISM

<table data-view="cards"><thead><tr><th></th><th data-hidden></th><th data-hidden></th><th data-hidden data-card-cover data-type="files"></th><th data-hidden data-card-target data-type="content-ref"></th></tr></thead><tbody><tr><td><strong>Mobile App</strong></td><td></td><td></td><td><a href="https://1019928184-files.gitbook.io/~/files/v0/b/gitbook-x-prod.appspot.com/o/spaces%2FlISC5rfB4Hnmbsjf8phq%2Fuploads%2FQjQmZDv8ajlpsJIJEy1G%2Fmobileapp.png?alt=media&amp;token=f0feee68-3fdb-4cd1-97d7-5f69a6ceddce">mobileapp.png</a></td><td><a href="/mobile/guides/getting-started-with-prism-mobile">Getting Started with PRISM Mobile</a></td></tr><tr><td><strong>Desktop App</strong></td><td><h3></h3></td><td></td><td><a href="https://1019928184-files.gitbook.io/~/files/v0/b/gitbook-x-prod.appspot.com/o/spaces%2FlISC5rfB4Hnmbsjf8phq%2Fuploads%2FREtAxqHZIgHX3qSUwSq7%2Fpcapp.png?alt=media&amp;token=c35ed90c-f4d5-4a42-9f6b-243201ad5652">pcapp.png</a></td><td><a href="/desktop/guides/getting-started-with-prism-desktop">Getting Started with PRISM Desktop</a></td></tr><tr><td><strong>Lens App</strong></td><td></td><td></td><td><a href="https://1019928184-files.gitbook.io/~/files/v0/b/gitbook-x-prod.appspot.com/o/spaces%2FlISC5rfB4Hnmbsjf8phq%2Fuploads%2F9FVZRcFn9AhN9vOhnnMp%2Flensapp.png?alt=media&amp;token=97d26858-a53e-406c-8bb4-7f1b805f1a0a">lensapp.png</a></td><td><a href="/lens/guides/getting-started-with-prism-lens">Getting Started with PRISM Lens</a></td></tr></tbody></table>

#### Answering Your Questions About PRISM Live Studio

{% embed url="<https://www.youtube.com/watch?t=45s&v=TrObKwEY7tU>" %}


# Overview

## Live Broadcasting Made Easy

<figure><img src="https://1019928184-files.gitbook.io/~/files/v0/b/gitbook-x-prod.appspot.com/o/spaces%2FlISC5rfB4Hnmbsjf8phq%2Fuploads%2FPfdZ133pSdP1KOzRE7O3%2F%E1%84%89%E1%85%B3%E1%84%8F%E1%85%B3%E1%84%85%E1%85%B5%E1%86%AB%E1%84%89%E1%85%A3%E1%86%BA%202024-11-14%20%E1%84%8B%E1%85%A9%E1%84%92%E1%85%AE%202.47.48.png?alt=media&amp;token=f3e5ca98-a013-413a-8809-6b4c42821dba" alt=""><figcaption></figcaption></figure>

### <mark style="color:blue;">Multistream</mark>

**Stream to live platforms simultaneously.**

Connect with YouTube, Twitch, Facebook, SOOP, and NAVER Shopping Live to stream multiple channels. Increase you viewers with just one stream.

<figure><img src="https://1019928184-files.gitbook.io/~/files/v0/b/gitbook-x-prod.appspot.com/o/spaces%2FlISC5rfB4Hnmbsjf8phq%2Fuploads%2FpecuA9zkh4mV2vJhksbe%2Fimage%20(1).png?alt=media&amp;token=8eb7ad88-20c9-47af-ac84-aa3b84fbcffb" alt=""><figcaption></figcaption></figure>

## <mark style="color:blue;">Screencast</mark>

**Share your screen in real-time**

Stream on Twitch and YouTube without a PC or video game screen capturing. Enhance your gameplay screen with VTuber, images, and web sources.

<figure><img src="https://1019928184-files.gitbook.io/~/files/v0/b/gitbook-x-prod.appspot.com/o/spaces%2FlISC5rfB4Hnmbsjf8phq%2Fuploads%2FLWXcfsGCyCg6WMIjZfgW%2F%E1%84%89%E1%85%B3%E1%84%8F%E1%85%B3%E1%84%85%E1%85%B5%E1%86%AB%E1%84%89%E1%85%A3%E1%86%BA%202024-11-14%20%E1%84%8B%E1%85%A9%E1%84%92%E1%85%AE%202.51.11.png?alt=media&amp;token=50025ca4-2e24-416f-9feb-89d833df7e49" alt=""><figcaption></figcaption></figure>

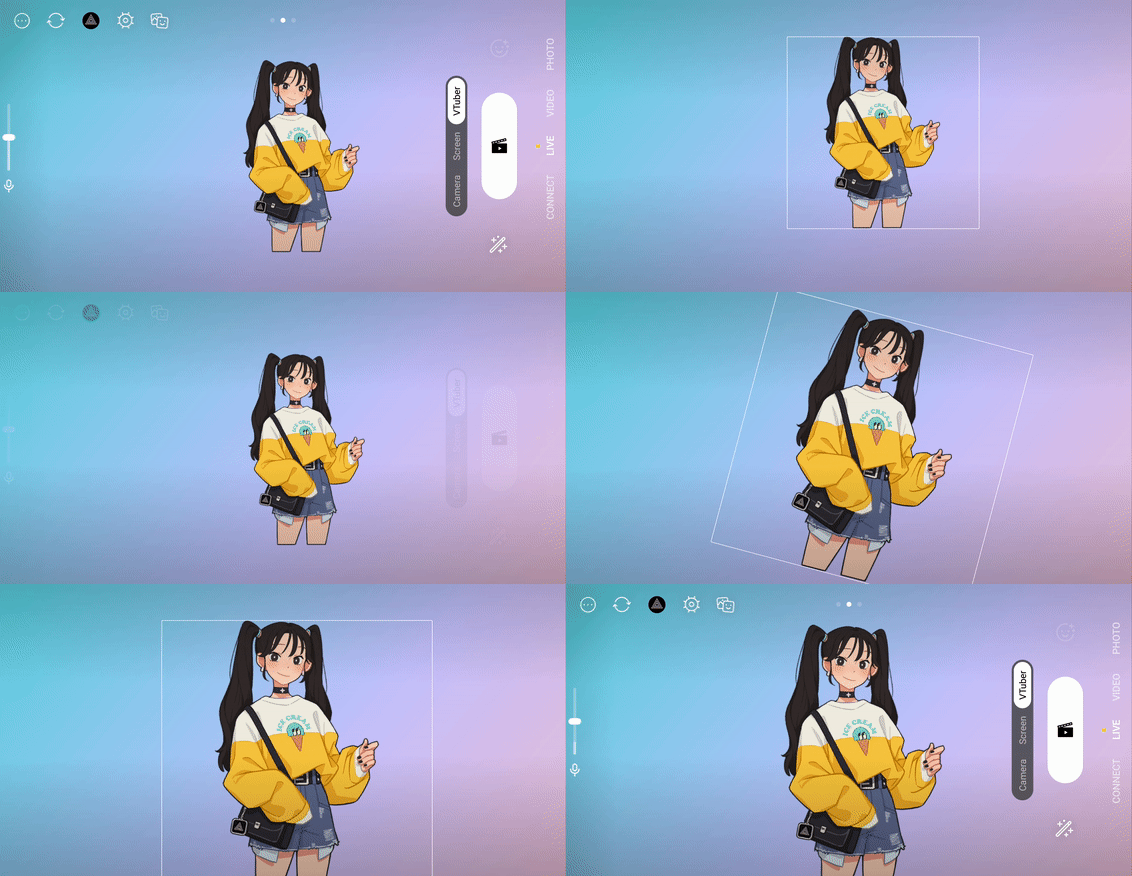
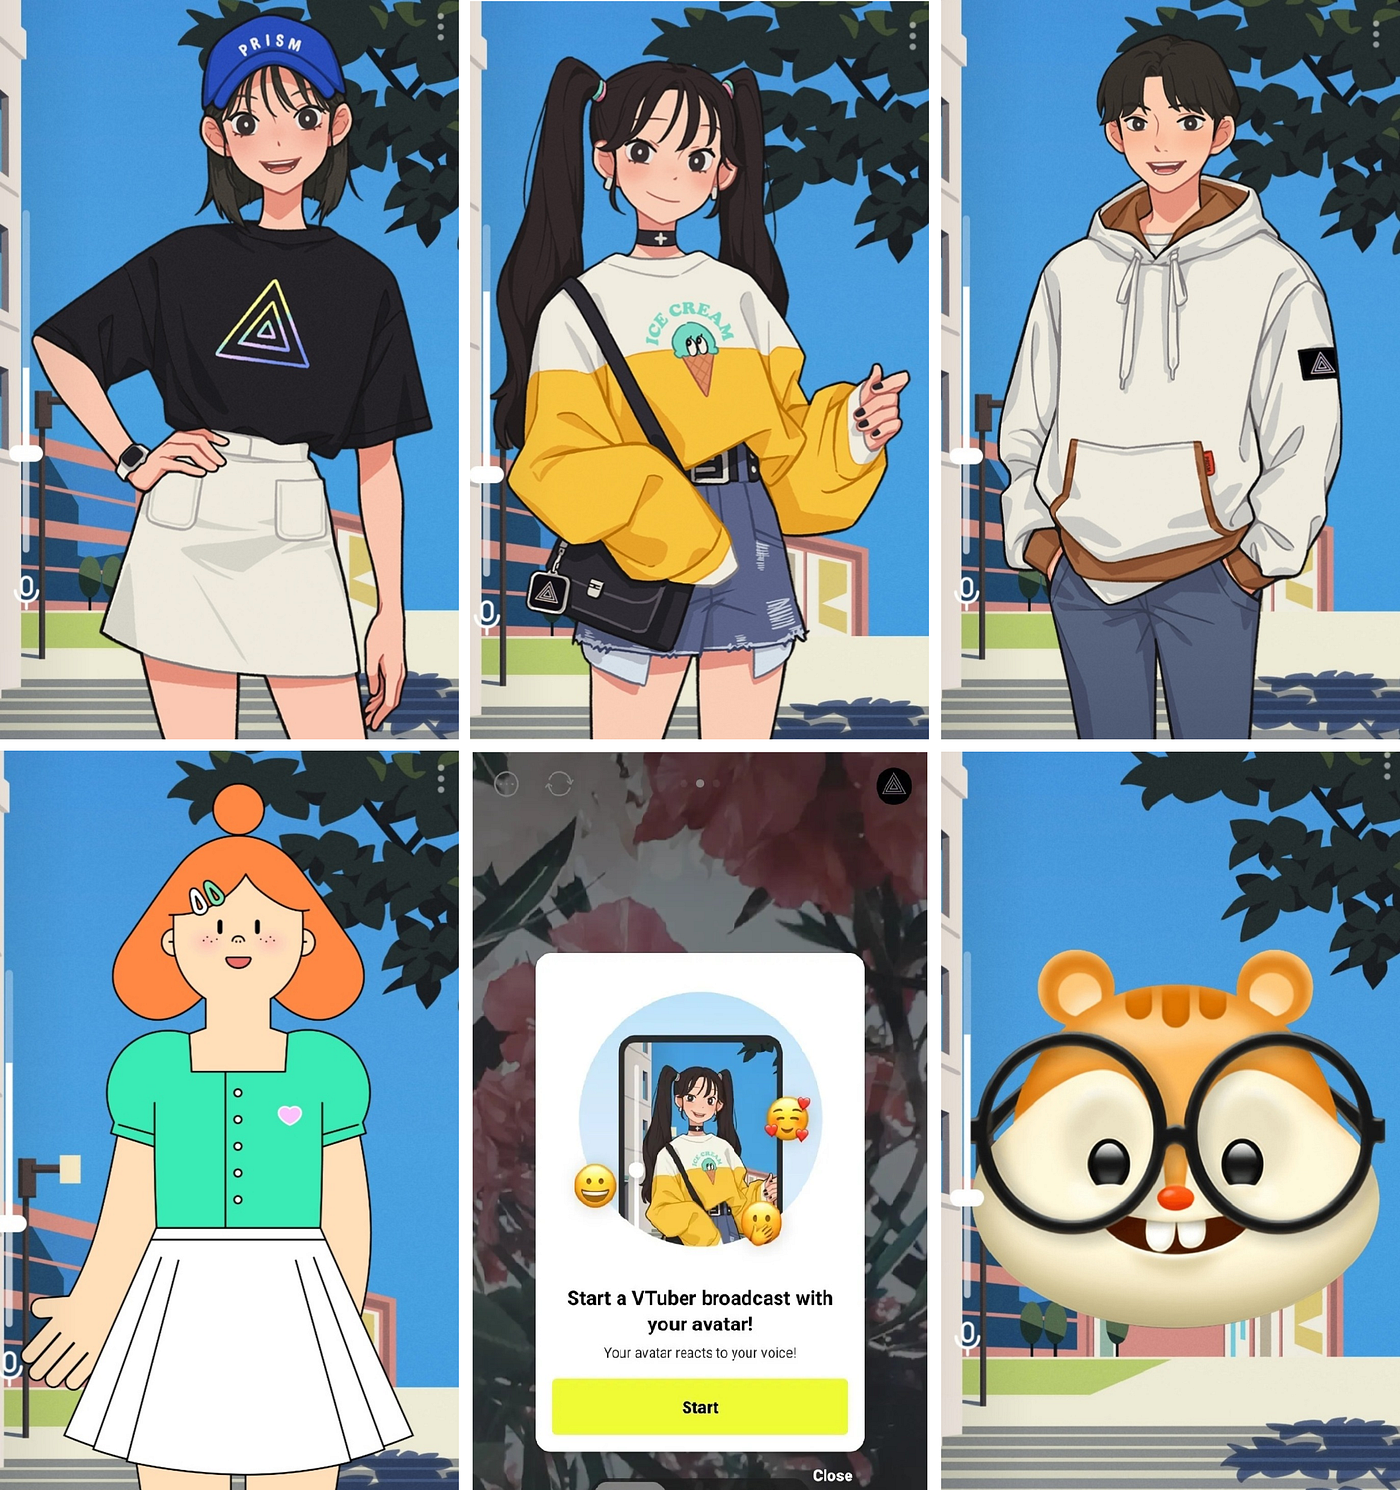
### <mark style="color:blue;">VTuber</mark>

#### Avatar Live without showing your face.

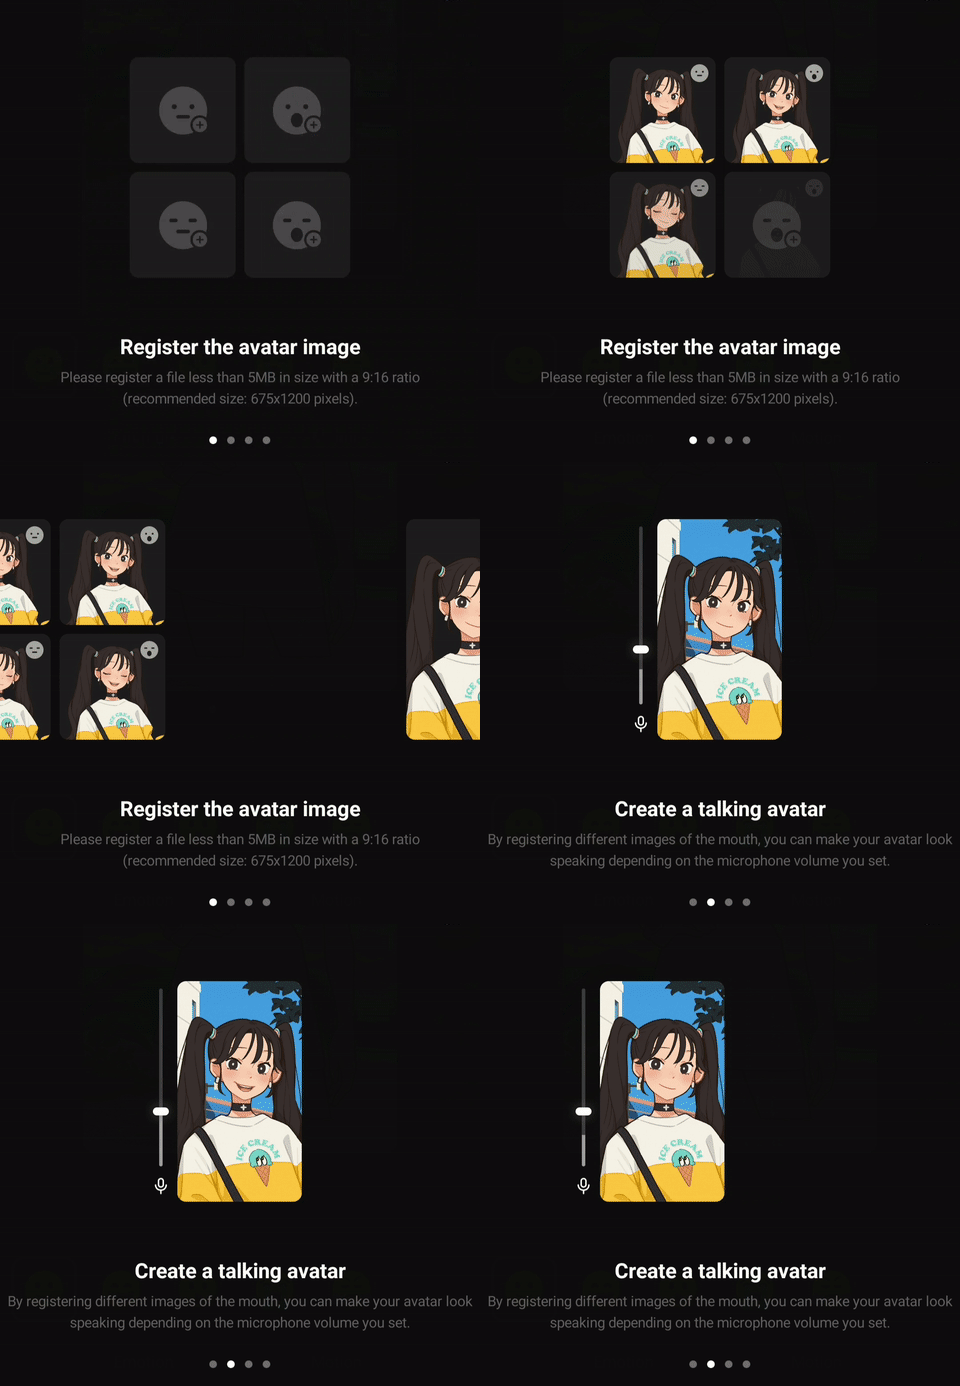
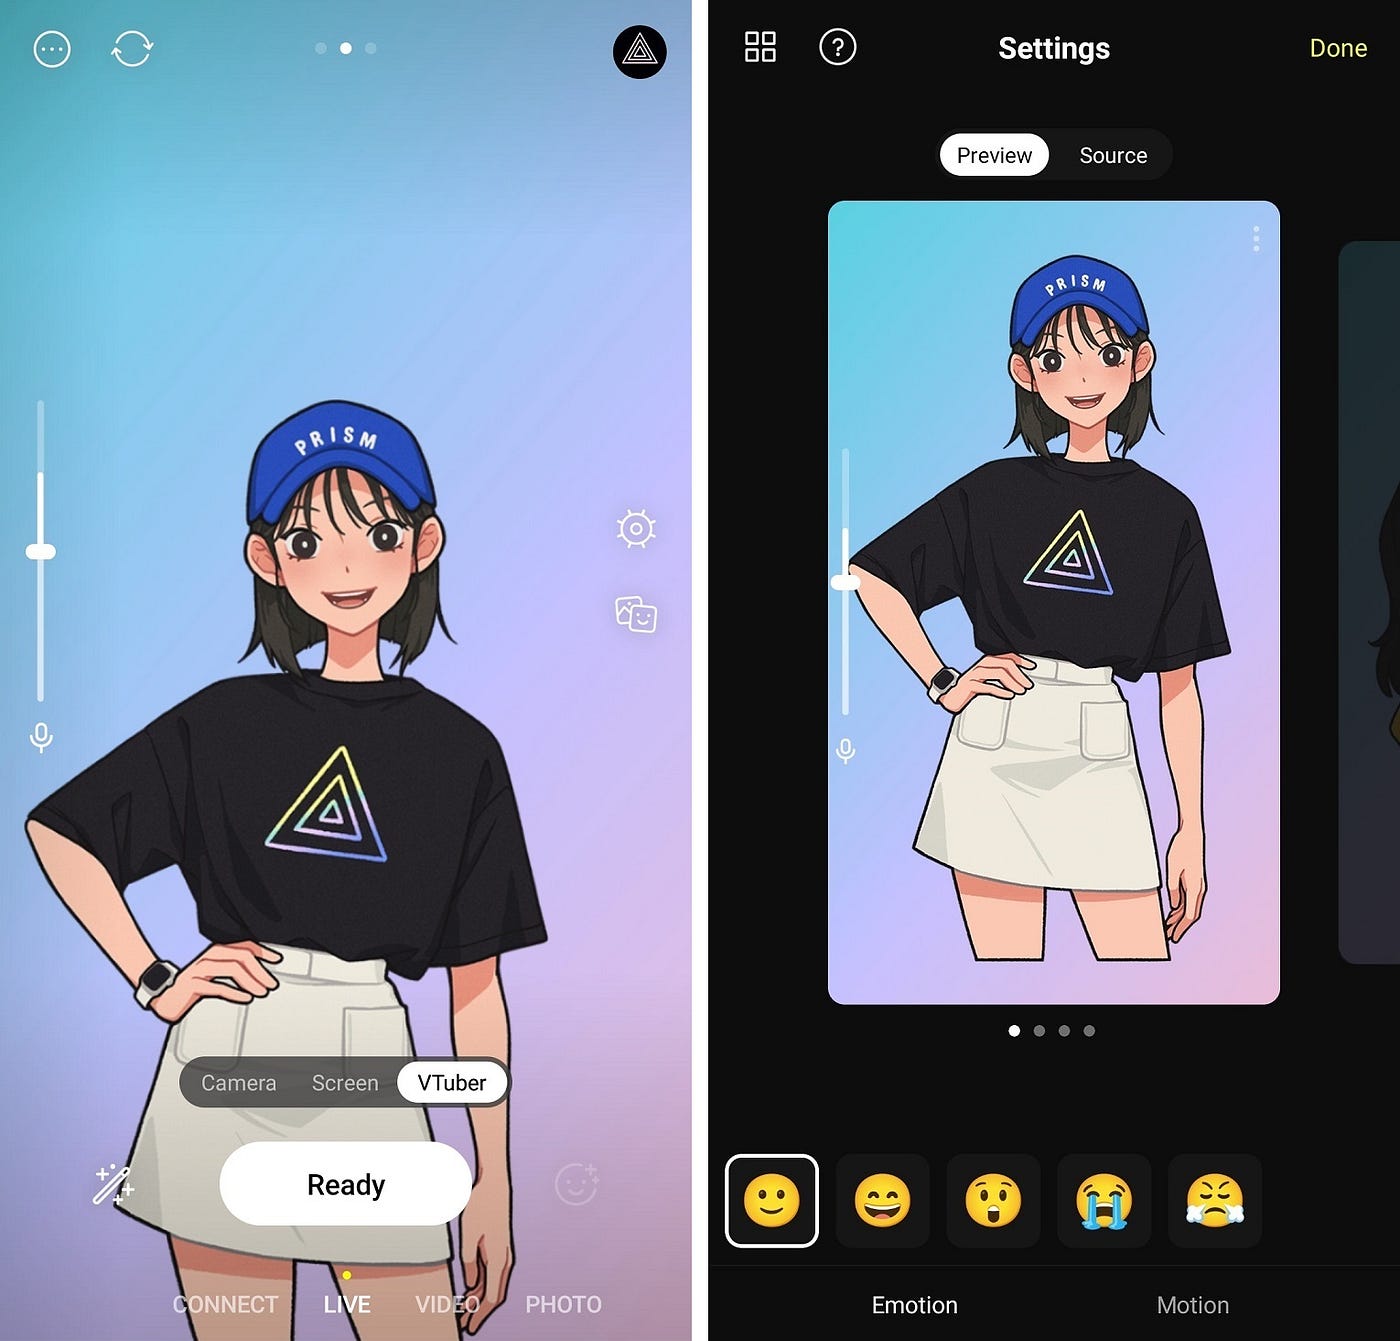
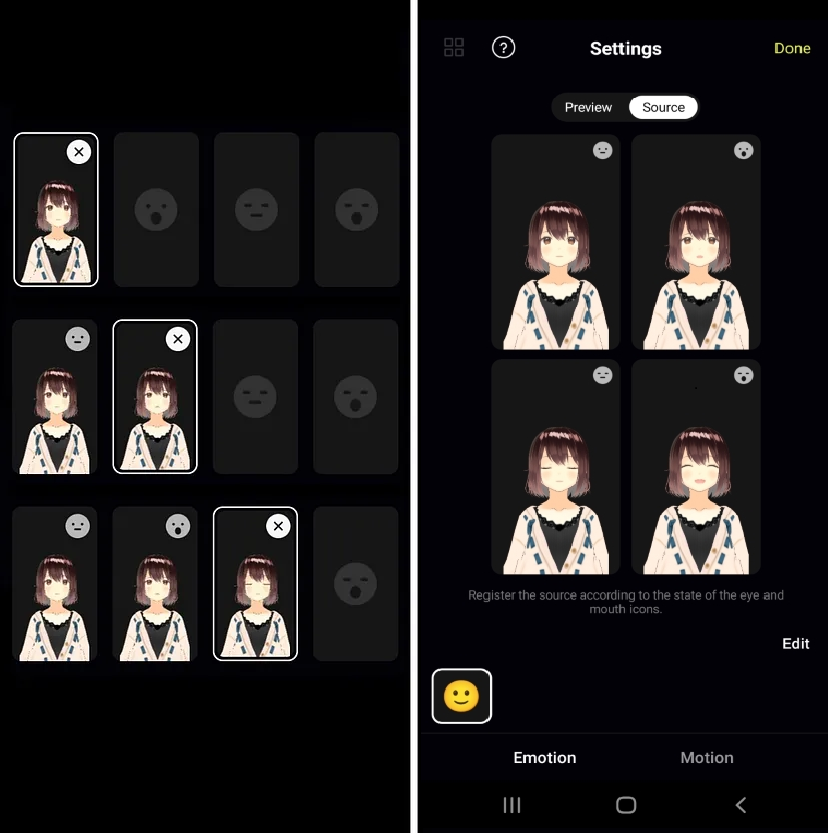
Live stream with a voice-responsive character without showing your face. All you need is a few images you’ve created. \*pngtuber format supported

<figure><img src="https://1019928184-files.gitbook.io/~/files/v0/b/gitbook-x-prod.appspot.com/o/spaces%2FlISC5rfB4Hnmbsjf8phq%2Fuploads%2FK0RknGakofy0OAahaQ4J%2F%E1%84%89%E1%85%B3%E1%84%8F%E1%85%B3%E1%84%85%E1%85%B5%E1%86%AB%E1%84%89%E1%85%A3%E1%86%BA%202024-11-14%20%E1%84%8B%E1%85%A9%E1%84%92%E1%85%AE%202.51.20.png?alt=media&amp;token=a7793ca2-b777-4f6c-9ac2-fbe552615f3a" alt=""><figcaption></figcaption></figure>

### <mark style="color:blue;">Live Chat</mark>

**Real-time live chat with viewers.**

Engage with viewers using the PRISM Chat widget on your streaming screen. Enjoy chat and Superchat features without needing access to platforms.

<figure><img src="https://1019928184-files.gitbook.io/~/files/v0/b/gitbook-x-prod.appspot.com/o/spaces%2FlISC5rfB4Hnmbsjf8phq%2Fuploads%2F75CeE0cp767j0zRpap7A%2F%E1%84%89%E1%85%B3%E1%84%8F%E1%85%B3%E1%84%85%E1%85%B5%E1%86%AB%E1%84%89%E1%85%A3%E1%86%BA%202024-11-15%20%E1%84%8B%E1%85%A9%E1%84%92%E1%85%AE%205.05.04.png?alt=media&amp;token=b74c0fd1-dbd5-442c-8ac6-23b03bc6bba1" alt=""><figcaption></figcaption></figure>

### <mark style="color:blue;">Camera Modes</mark>

**Go live, record videos, or take photos as you desire.**

Choose between Connect or Live, Video or Photo mode, before starting.\
Create a spontaneous live stream, (or) a recorded video with a special\
atmosphere, with a webcam source, or a remote control for your PC app.&#x20;

<figure><img src="https://1019928184-files.gitbook.io/~/files/v0/b/gitbook-x-prod.appspot.com/o/spaces%2FlISC5rfB4Hnmbsjf8phq%2Fuploads%2FsBb4pVNV0Z7VaQsnVmHU%2F%E1%84%89%E1%85%B3%E1%84%8F%E1%85%B3%E1%84%85%E1%85%B5%E1%86%AB%E1%84%89%E1%85%A3%E1%86%BA%202024-12-02%20%E1%84%8B%E1%85%A9%E1%84%92%E1%85%AE%203.00.38.png?alt=media&amp;token=e8132bfa-5e06-4761-9bf2-066a1f97ec1e" alt="" width="563"><figcaption></figcaption></figure>

### <mark style="color:blue;">Camera Effects</mark>

**Enhance emotional expression with interactive effects.**

Employ a range of effects to engage with viewers and craft narratives. Fun GIPHY GIF stickers are readily available for immediate use during your streaming.

<figure><img src="https://1019928184-files.gitbook.io/~/files/v0/b/gitbook-x-prod.appspot.com/o/spaces%2FlISC5rfB4Hnmbsjf8phq%2Fuploads%2FO6LCtoBotrtqpl5LMXhy%2F%E1%84%89%E1%85%B3%E1%84%8F%E1%85%B3%E1%84%85%E1%85%B5%E1%86%AB%E1%84%89%E1%85%A3%E1%86%BA%202024-12-02%20%E1%84%8B%E1%85%A9%E1%84%92%E1%85%AE%203.05.59.png?alt=media&amp;token=32e4f348-bfb3-4740-a133-8e41453fd339" alt="" width="563"><figcaption></figcaption></figure>

### <mark style="color:blue;">Animated Text</mark>

**Utilize versatile motion text templates in various ways.**

Effortlessly incorporate text to elevate your streams. Utilize Motion Text Templates to brand your live channel or convey diverse information to your viewers.

<figure><img src="https://1019928184-files.gitbook.io/~/files/v0/b/gitbook-x-prod.appspot.com/o/spaces%2FlISC5rfB4Hnmbsjf8phq%2Fuploads%2F0UnxklYnUrYBXha9Bja0%2F%E1%84%89%E1%85%B3%E1%84%8F%E1%85%B3%E1%84%85%E1%85%B5%E1%86%AB%E1%84%89%E1%85%A3%E1%86%BA%202024-12-02%20%E1%84%8B%E1%85%A9%E1%84%92%E1%85%AE%203.07.36.png?alt=media&amp;token=8fb319fd-2032-4b48-893c-784d94679cc1" alt="" width="563"><figcaption></figcaption></figure>

### <mark style="color:blue;">My Studio</mark>

**Easily add handy overlays.**

Enhance your streaming screen in My Studio with free music, chat windows, widgets, dynamic text, videos, and photos, delighting your viewers. You can even create intros with various media.

<figure><img src="https://1019928184-files.gitbook.io/~/files/v0/b/gitbook-x-prod.appspot.com/o/spaces%2FlISC5rfB4Hnmbsjf8phq%2Fuploads%2FbeO2ivec6IAGAmjKiJqJ%2F%E1%84%89%E1%85%B3%E1%84%8F%E1%85%B3%E1%84%85%E1%85%B5%E1%86%AB%E1%84%89%E1%85%A3%E1%86%BA%202024-12-02%20%E1%84%8B%E1%85%A9%E1%84%92%E1%85%AE%203.07.42.png?alt=media&amp;token=225840fc-f235-41c9-b521-ee52457db845" alt="" width="563"><figcaption></figcaption></figure>

### <mark style="color:blue;">Connect</mark>

**A remote control sometimes, a webcam other times. Endless utility.**

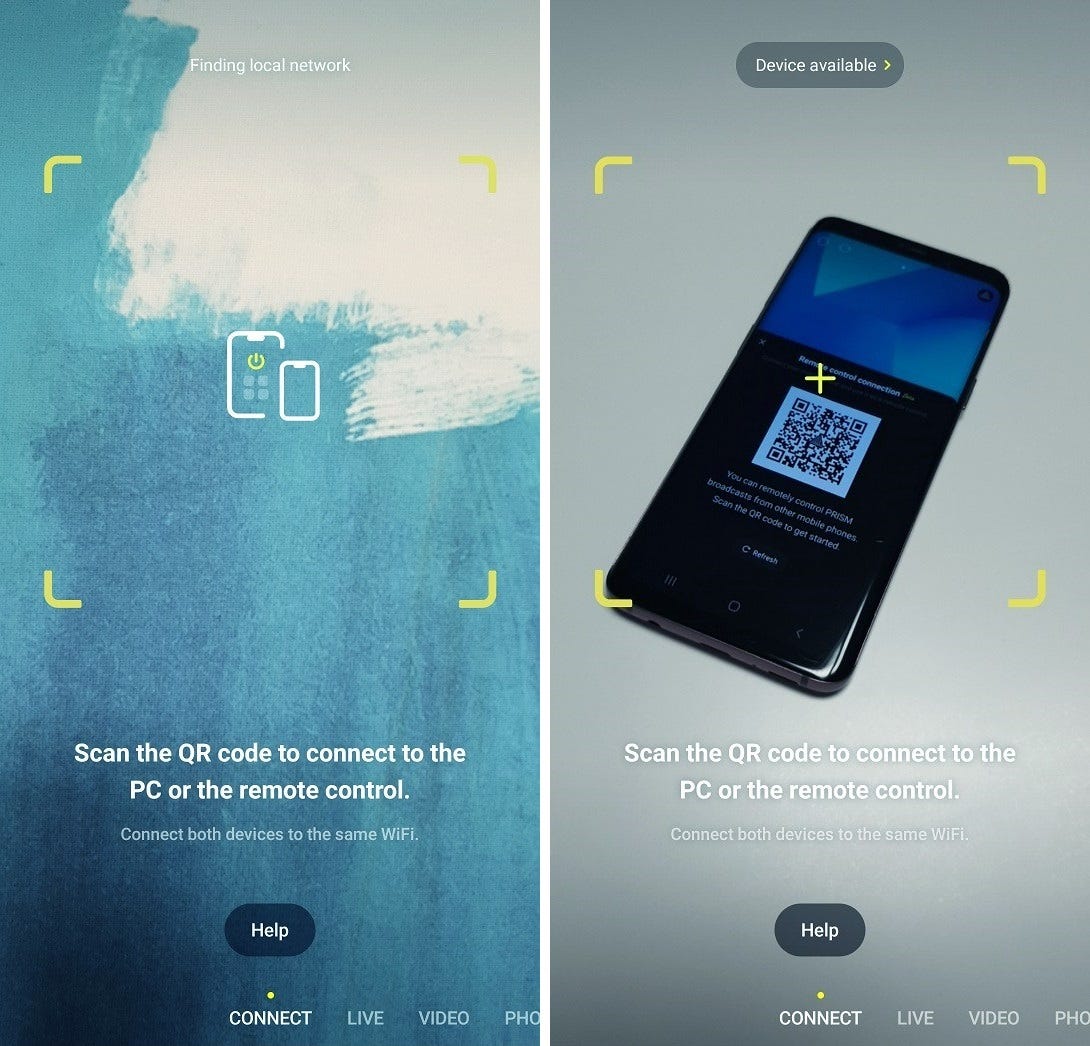
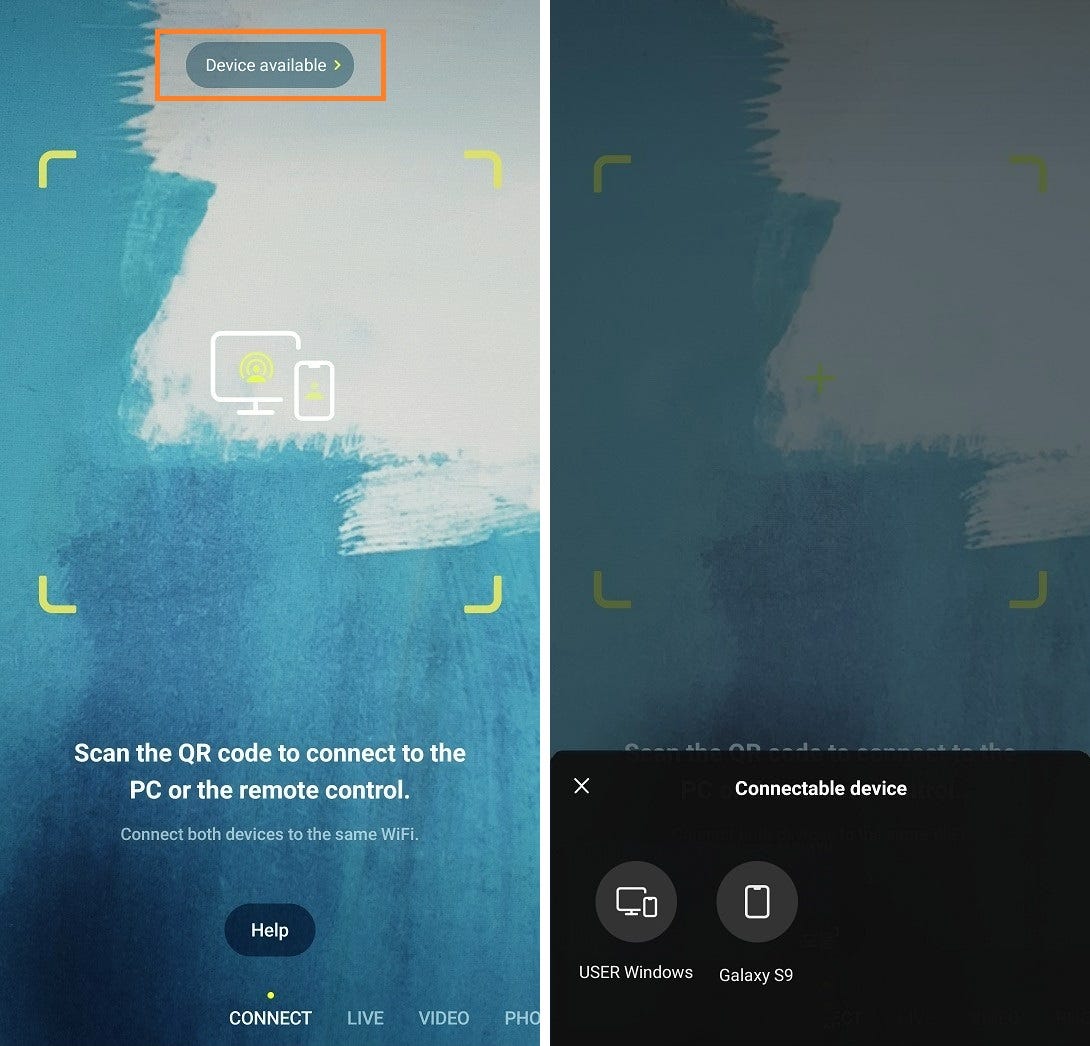
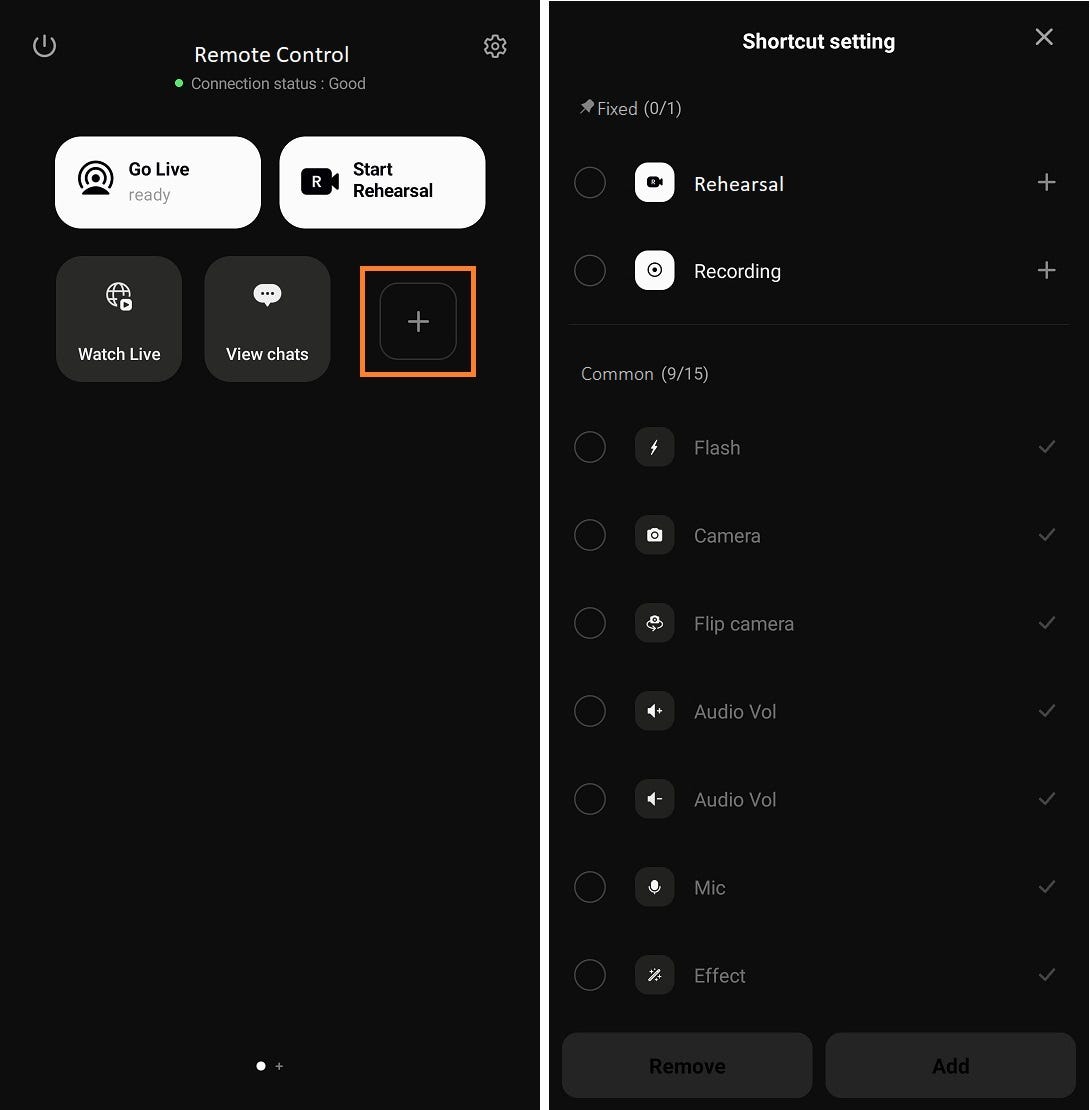
Connect with your PC and mobile devices. Utilize as a webcam at times, as a remote controller at times to remote control PRISM Live beyond transmission.

<figure><img src="https://1019928184-files.gitbook.io/~/files/v0/b/gitbook-x-prod.appspot.com/o/spaces%2FlISC5rfB4Hnmbsjf8phq%2Fuploads%2FaJaqA6S0PUlpGO4EiP9s%2F%E1%84%89%E1%85%B3%E1%84%8F%E1%85%B3%E1%84%85%E1%85%B5%E1%86%AB%E1%84%89%E1%85%A3%E1%86%BA%202024-12-02%20%E1%84%8B%E1%85%A9%E1%84%92%E1%85%AE%203.07.49.png?alt=media&amp;token=5c3f2634-c98a-433c-8d66-289643484fce" alt="" width="563"><figcaption></figcaption></figure>


# Guides


# Getting Started with PRISM Mobile

Android, iOS

## Guidelines on How to Start Using PRISM Mobile

The PRISM Mobile app is a powerful tool that helps you to easily film and edit live streams, videos, and photos.&#x20;Try using different effects and features to make your live content more special.

<figure><img src="https://1019928184-files.gitbook.io/~/files/v0/b/gitbook-x-prod.appspot.com/o/spaces%2FlISC5rfB4Hnmbsjf8phq%2Fuploads%2FNdehM0qkpWwEN4Boxt8N%2FGetting%20Started%2001.png?alt=media&amp;token=6605cbe9-9ce4-41a4-bf11-035291d182bc" alt=""><figcaption></figcaption></figure>

**Live stream**: Show off what you are doing in real-time on various platforms including YouTube, Facebook, Twitch and so on. Have fun communicating and interacting with your viewers.

**Game streaming**: Stream your favorite games live and share the excitement of gameplay with your audience.

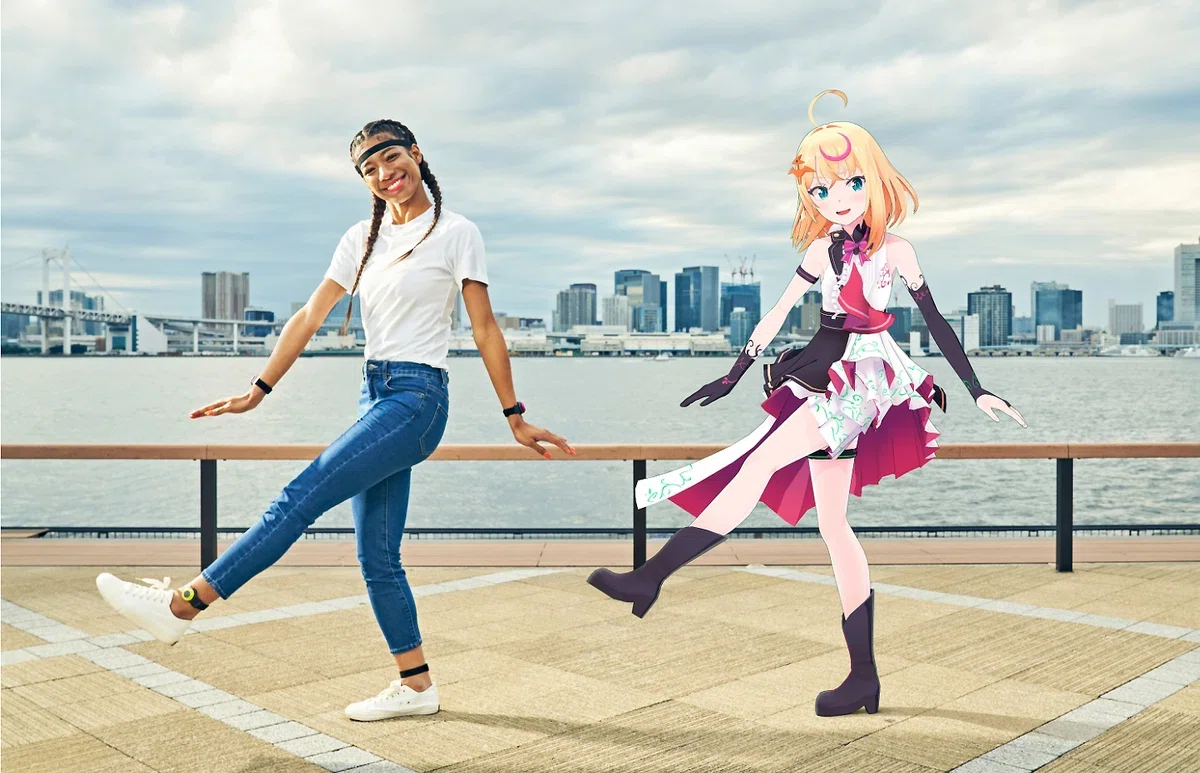
**Virtual streaming**: Use your own virtual characters to start live streaming. You can share your facial expressions and movements even without a webcam – use your unique virtual character to spend special moments communicating with your viewers.

**PC connectivity**: Use both your mobile and PC apps to make your experience even more convenient. Use your mobile app as a webcam to film your content, and use the virtual characters on your devices right away. Connect two devices to freely utilize broadcasting features to their fullest.

#### Download the app

* [Download PRISM Mobile on Android](https://play.google.com/store/apps/details?id=com.prism.live\&pli=1)
* [Download PRISM Mobile on iOS](https://apps.apple.com/us/app/prism-live-streaming-app/id1319056339)

#### Content

* [Key Features](#key-features)
* [Getting Ready to Go Live](#getting-ready-to-go-live)
* [More Features](#more-features)
  * [Multi-streaming](#multi-channel-streaming)
  * [High-quality Streaming](#high-quality-streaming)
  * [Beauty Filters](#beauty-filters)
  * [Effects](#effects)
  * [My Studio](#my-studio)
  * [Screencast](#screencast)
  * [3D Facial Tracking](#vtuber)
  * [Remote Control](#remote-control)

## Key Features

When you open the PRISM Mobile app, you’ll see the following buttons at the bottom. Choose your desired shooting mode and explore your creativity with various assets and features!

<figure><img src="https://1019928184-files.gitbook.io/~/files/v0/b/gitbook-x-prod.appspot.com/o/spaces%2FlISC5rfB4Hnmbsjf8phq%2Fuploads%2FtNSPqIVtksvkms0xv0c4%2FGetting%20Started%2002.png?alt=media&amp;token=8d43a7b1-3430-4c76-abd7-02bd6f55b88a" alt=""><figcaption></figcaption></figure>

* **CONNECT**: Connect the PRISM Lens app for live streaming or filming.
* **LIVE**: Start real-time live streaming. Various live streaming modes, including camera, screencast, and virtual live streaming are offered.
* **VIDEO**: Start filming videos.
* **PHOTO**: Start taking photos.
* **My Studio**: Overlay assets to be used for the app screen are provided. Swipe right on the main page to go to My Studio.

## Prepare for Live Streaming

<figure><img src="https://1019928184-files.gitbook.io/~/files/v0/b/gitbook-x-prod.appspot.com/o/spaces%2FlISC5rfB4Hnmbsjf8phq%2Fuploads%2FQiTXreJ1Zq3Ic2btPfQA%2FGetting%20Started%2003.png?alt=media&amp;token=b0656714-fb2a-4315-9d05-a4f16b7eb956" alt=""><figcaption></figcaption></figure>

1. Select the mode you want, and click Ready.
2. Select the live stream summary to display live stream information.
3. From the live stream information page, check the items and settings that need to be entered.
4. Enter, set, and save the required fields.
5. Press the Go Live button to start live streaming.

## More Features

PRISM Mobile offers many more features for your convenience.

### Multi-channel Streaming

<figure><img src="https://1019928184-files.gitbook.io/~/files/v0/b/gitbook-x-prod.appspot.com/o/spaces%2FlISC5rfB4Hnmbsjf8phq%2Fuploads%2FzPysNqt9ey44FgFihkaB%2FGetting%20Started%2004.png?alt=media&amp;token=b45171e6-2e42-4cda-a493-d0ea1ae2abab" alt=""><figcaption></figcaption></figure>

Stream on multiple platforms to reach more viewers.

* Go to my list of channels from the live streaming preparation page.
* Turn on the toggle switch next to the channel you wish to select from the list of channels.
* The multi-streaming icon will be turned on when you turn on the switches for 2 or more platforms, and the multi-streaming mode will be automatically turned on. \ <sub>\*NAVER Shopping Live does not support multi-channel streaming.</sub>
* Select the X button at the bottom of the screen to go to the streaming preparation page.
* Press Go Live to start streaming from multiple channels.

### High-quality Streaming

<figure><img src="https://1019928184-files.gitbook.io/~/files/v0/b/gitbook-x-prod.appspot.com/o/spaces%2FlISC5rfB4Hnmbsjf8phq%2Fuploads%2FgpH6sBKtcVpGvu1NboPI%2FGetting%20Started%2005.png?alt=media&amp;token=4d435eab-ad40-4dfc-a5c3-ca5c8efc2429" alt=""><figcaption></figcaption></figure>

Adjust the video quality and encoding settings in more detail to go live in the highest resolution.

[10 Tips for Better Stability and Quality](/mobile/guides/error-solution/performance/10-tips-for-better-stability-and-quality)

### Beauty Filters

<figure><img src="https://1019928184-files.gitbook.io/~/files/v0/b/gitbook-x-prod.appspot.com/o/spaces%2FlISC5rfB4Hnmbsjf8phq%2Fuploads%2FDzb8gUd3St0Mo7qjssI8%2FGetting%20Started%2006.png?alt=media&amp;token=9c852dc9-479b-455f-8b6f-2a5f16427359" alt=""><figcaption></figcaption></figure>

Use real-time beauty filters that add a natural glow, and boost your confidence as you go live.

[Using Beauty Effects](/mobile/guides/widgets-and-effects/beauty-effects/using-beauty-effects)

### Effects

<figure><img src="https://1019928184-files.gitbook.io/~/files/v0/b/gitbook-x-prod.appspot.com/o/spaces%2FlISC5rfB4Hnmbsjf8phq%2Fuploads%2FJbCxvCXECv5oKenYbweG%2FGetting%20Started%2007.png?alt=media&amp;token=ce0eb09a-19bf-4385-873a-22ef8e4e143c" alt=""><figcaption></figcaption></figure>

Stickers that add a special touch to your broadcasts will be updated every week.

[Using Emotion Effect](/mobile/guides/widgets-and-effects/emotion-effect/using-emotion-effect)

[Using GIPHY Effect](/mobile/guides/widgets-and-effects/giphy-effect/using-giphy-effect)

### My Studio

<figure><img src="https://1019928184-files.gitbook.io/~/files/v0/b/gitbook-x-prod.appspot.com/o/spaces%2FlISC5rfB4Hnmbsjf8phq%2Fuploads%2FALQos7IuSOnTWRPplD67%2FGetting%20Started%2008.png?alt=media&amp;token=e3baba09-bd19-4501-850b-cc76f5fc9983" alt=""><figcaption></figcaption></figure>

Use various widgets to freely decorate your broadcast. (Blue screen, media files, texts, music and video playlist, PRISM chat, RTMP video source, QR code, web page, and more)

* **Media**: Use this feature to retrieve images and videos from the photo gallery of your mobile device and add them to My Studio.
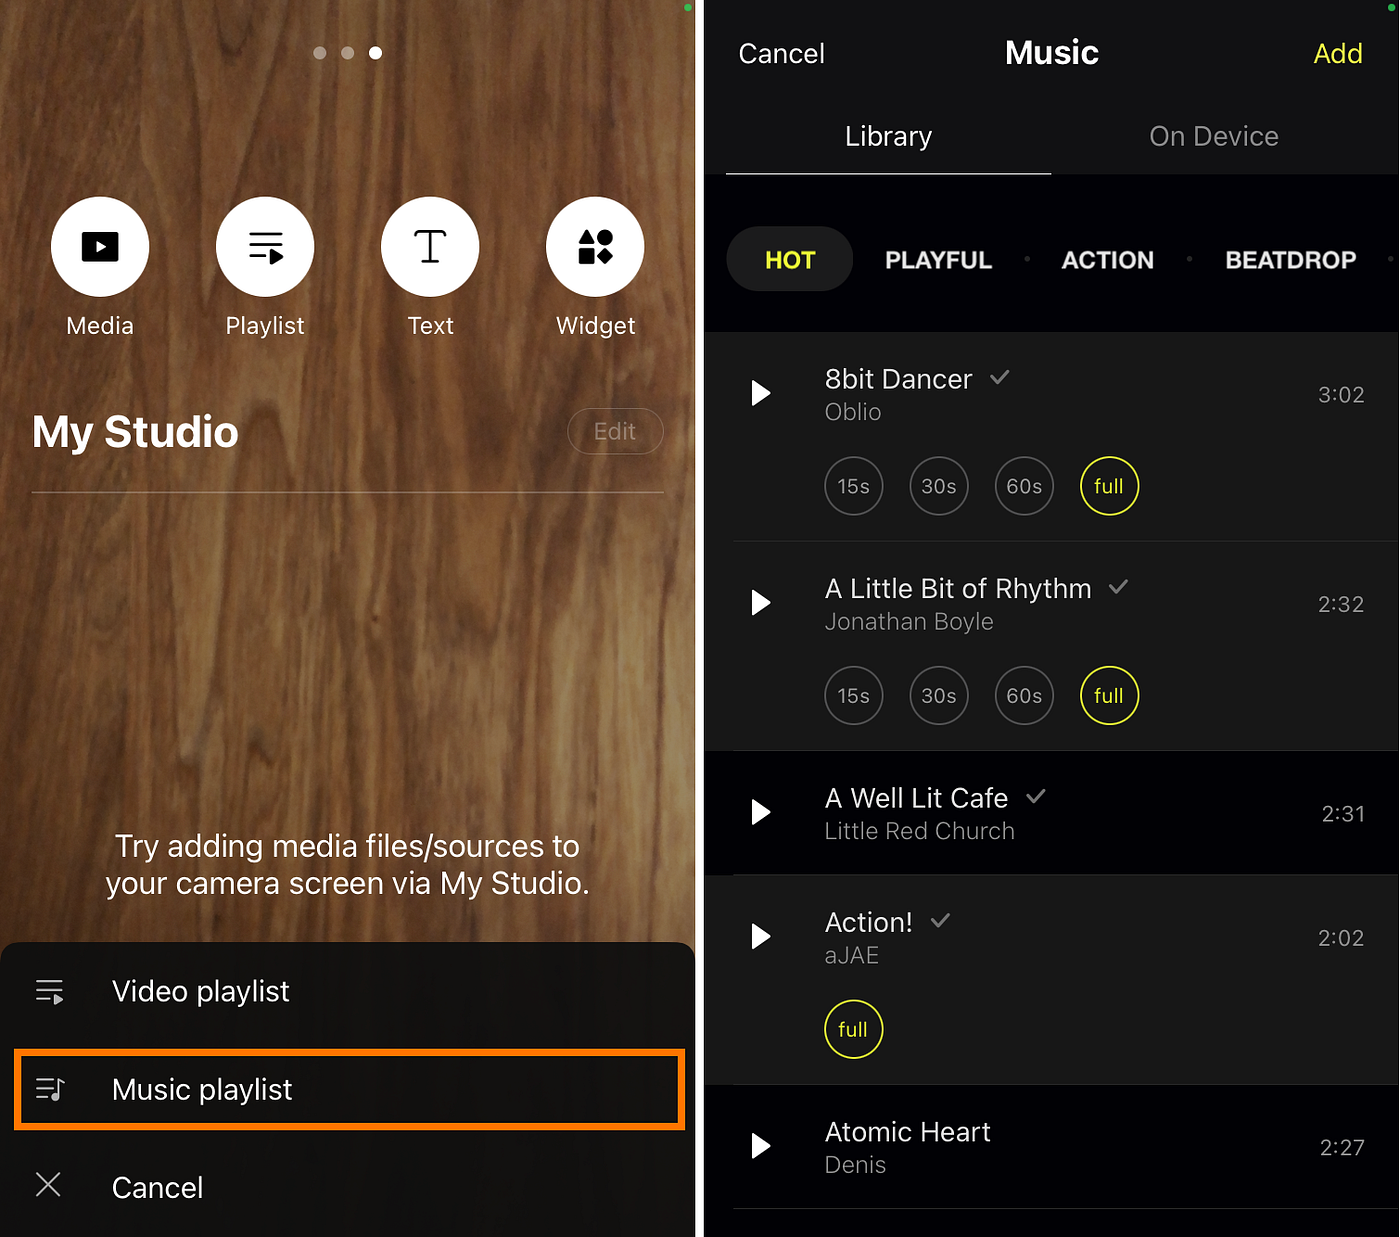
* **Media > Music**: Use this feature to retrieve unique music available only on the PRISM Mobile app, as well as music from your mobile device, and add it to My Studio.
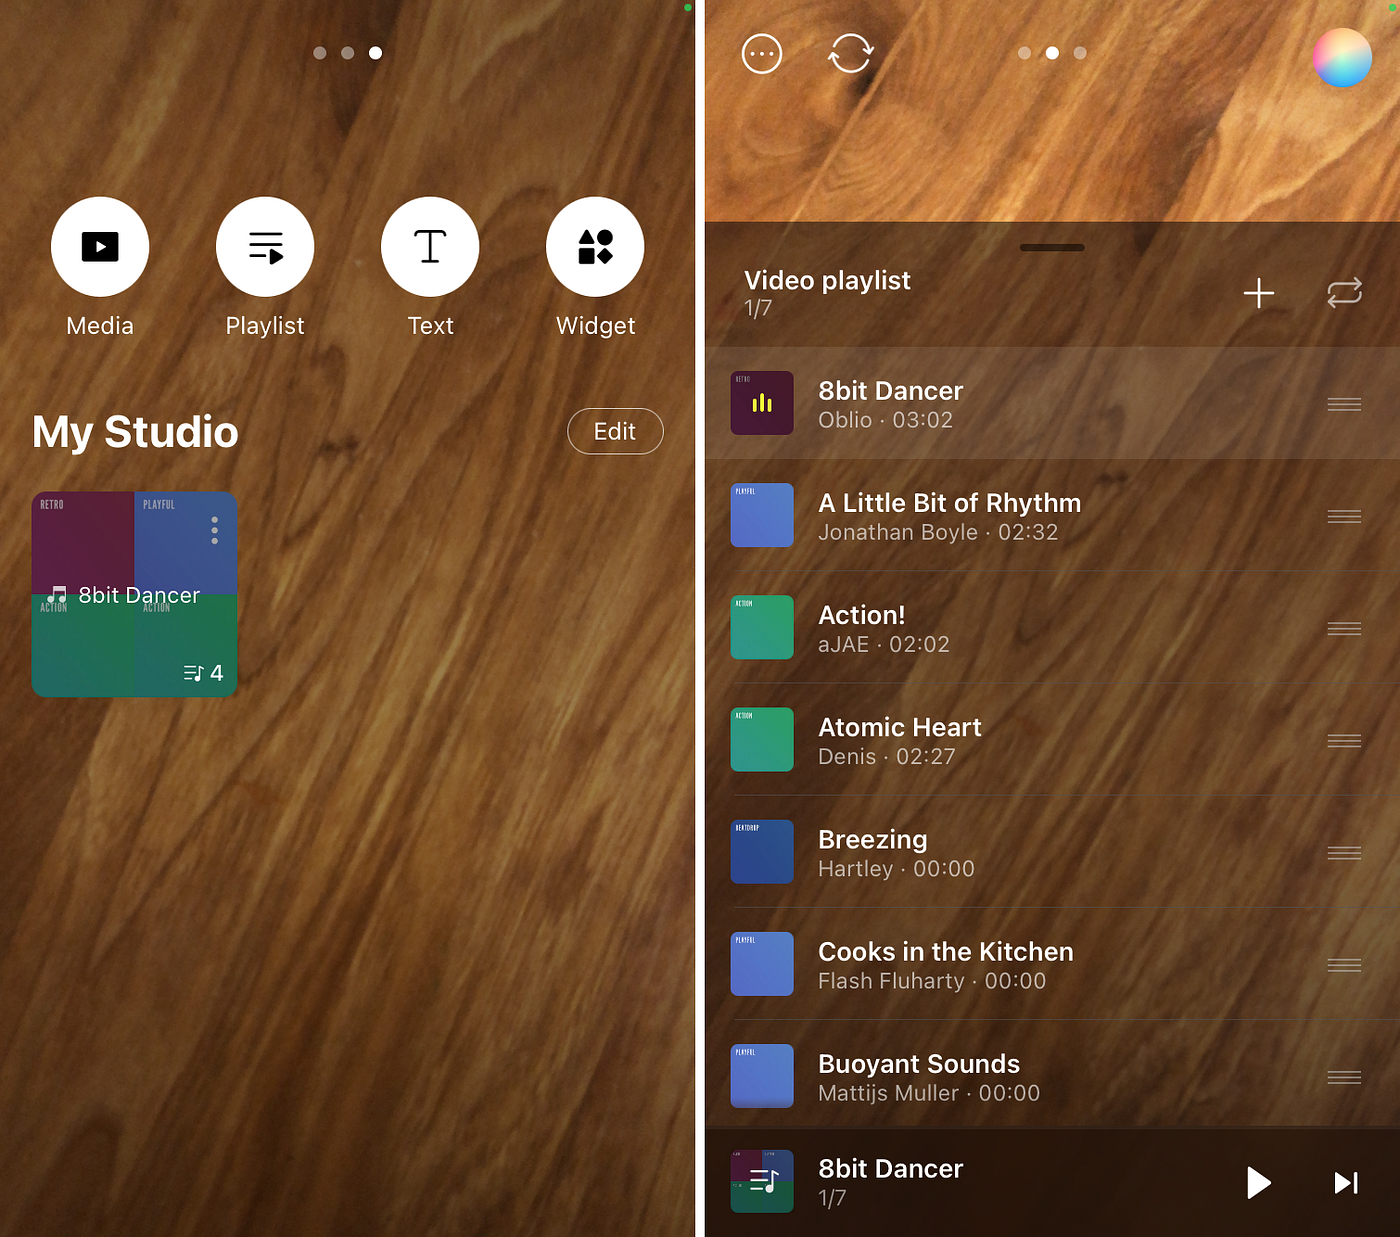
* **Playlist**: Use this feature to create your video playlist and music playlist, and add it to My Studio.
* **Text**: Use different motion templates available on the PRISM Mobile app, including announcements, titles, or social media accounts.
* **Widget > PRISM Chat**: Use this feature to add to My Studio a chat widget that gathers all viewer chats to be displayed on the screen.
* **Widget > RTMP Video Source**: Use the RTMP URL to display videos from other devices on the PRISM app.
* **Widget > QR Code**: Use this feature to generate a QR code for the URL of your choice.
* **Widget > Web Page**: Use this feature to enter a web page address for a donation service or website to My Studio.\
  [Using Web Browser Widget](/mobile/guides/widgets-and-effects/web-widget/using-web-browser-widget)

### Screencast

<figure><img src="https://1019928184-files.gitbook.io/~/files/v0/b/gitbook-x-prod.appspot.com/o/spaces%2FlISC5rfB4Hnmbsjf8phq%2Fuploads%2FZfiRy7xHbW2VBNct61Xm%2FGetting%20Started%2009.png?alt=media&amp;token=b3bc345c-579a-45e7-abaa-146d05049833" alt=""><figcaption></figcaption></figure>

<figure><img src="https://1019928184-files.gitbook.io/~/files/v0/b/gitbook-x-prod.appspot.com/o/spaces%2FlISC5rfB4Hnmbsjf8phq%2Fuploads%2FZAp6rdD4hjXp1Rf4MTVu%2FGetting%20Started%2010.png?alt=media&amp;token=d775a9b6-9394-4ebc-8388-e2b44920ec29" alt=""><figcaption></figcaption></figure>

* Horizontal, vertical video game screen capture: Display proportions can be adjusted in line with streamers’ preference, such as 16:9 or 9:16, as they livestream their video game plays.
* Screen customization: Various assets, including chat, image, web page, 2D/3D avatar, and QR, can be used to create scenes that lead to vibrant and dynamic broadcasts.
* A stable streaming environment suitable for video game streaming.

[Using Screencast](/mobile/guides/features/screencast/using-screencast)

### VTuber

<figure><img src="https://1019928184-files.gitbook.io/~/files/v0/b/gitbook-x-prod.appspot.com/o/spaces%2FlISC5rfB4Hnmbsjf8phq%2Fuploads%2FuK2pCHaaBKyjSS8jfN1X%2FGetting%20Started%2011.png?alt=media&amp;token=51ed0416-2482-42c8-87f2-d8770279d8cf" alt=""><figcaption></figcaption></figure>

2D PngTuber: Go live even without a camera, with only 1 to 2 images.

[Adopting PNG Tuber](/mobile/guides/vtuber/adopting-png-tuber)

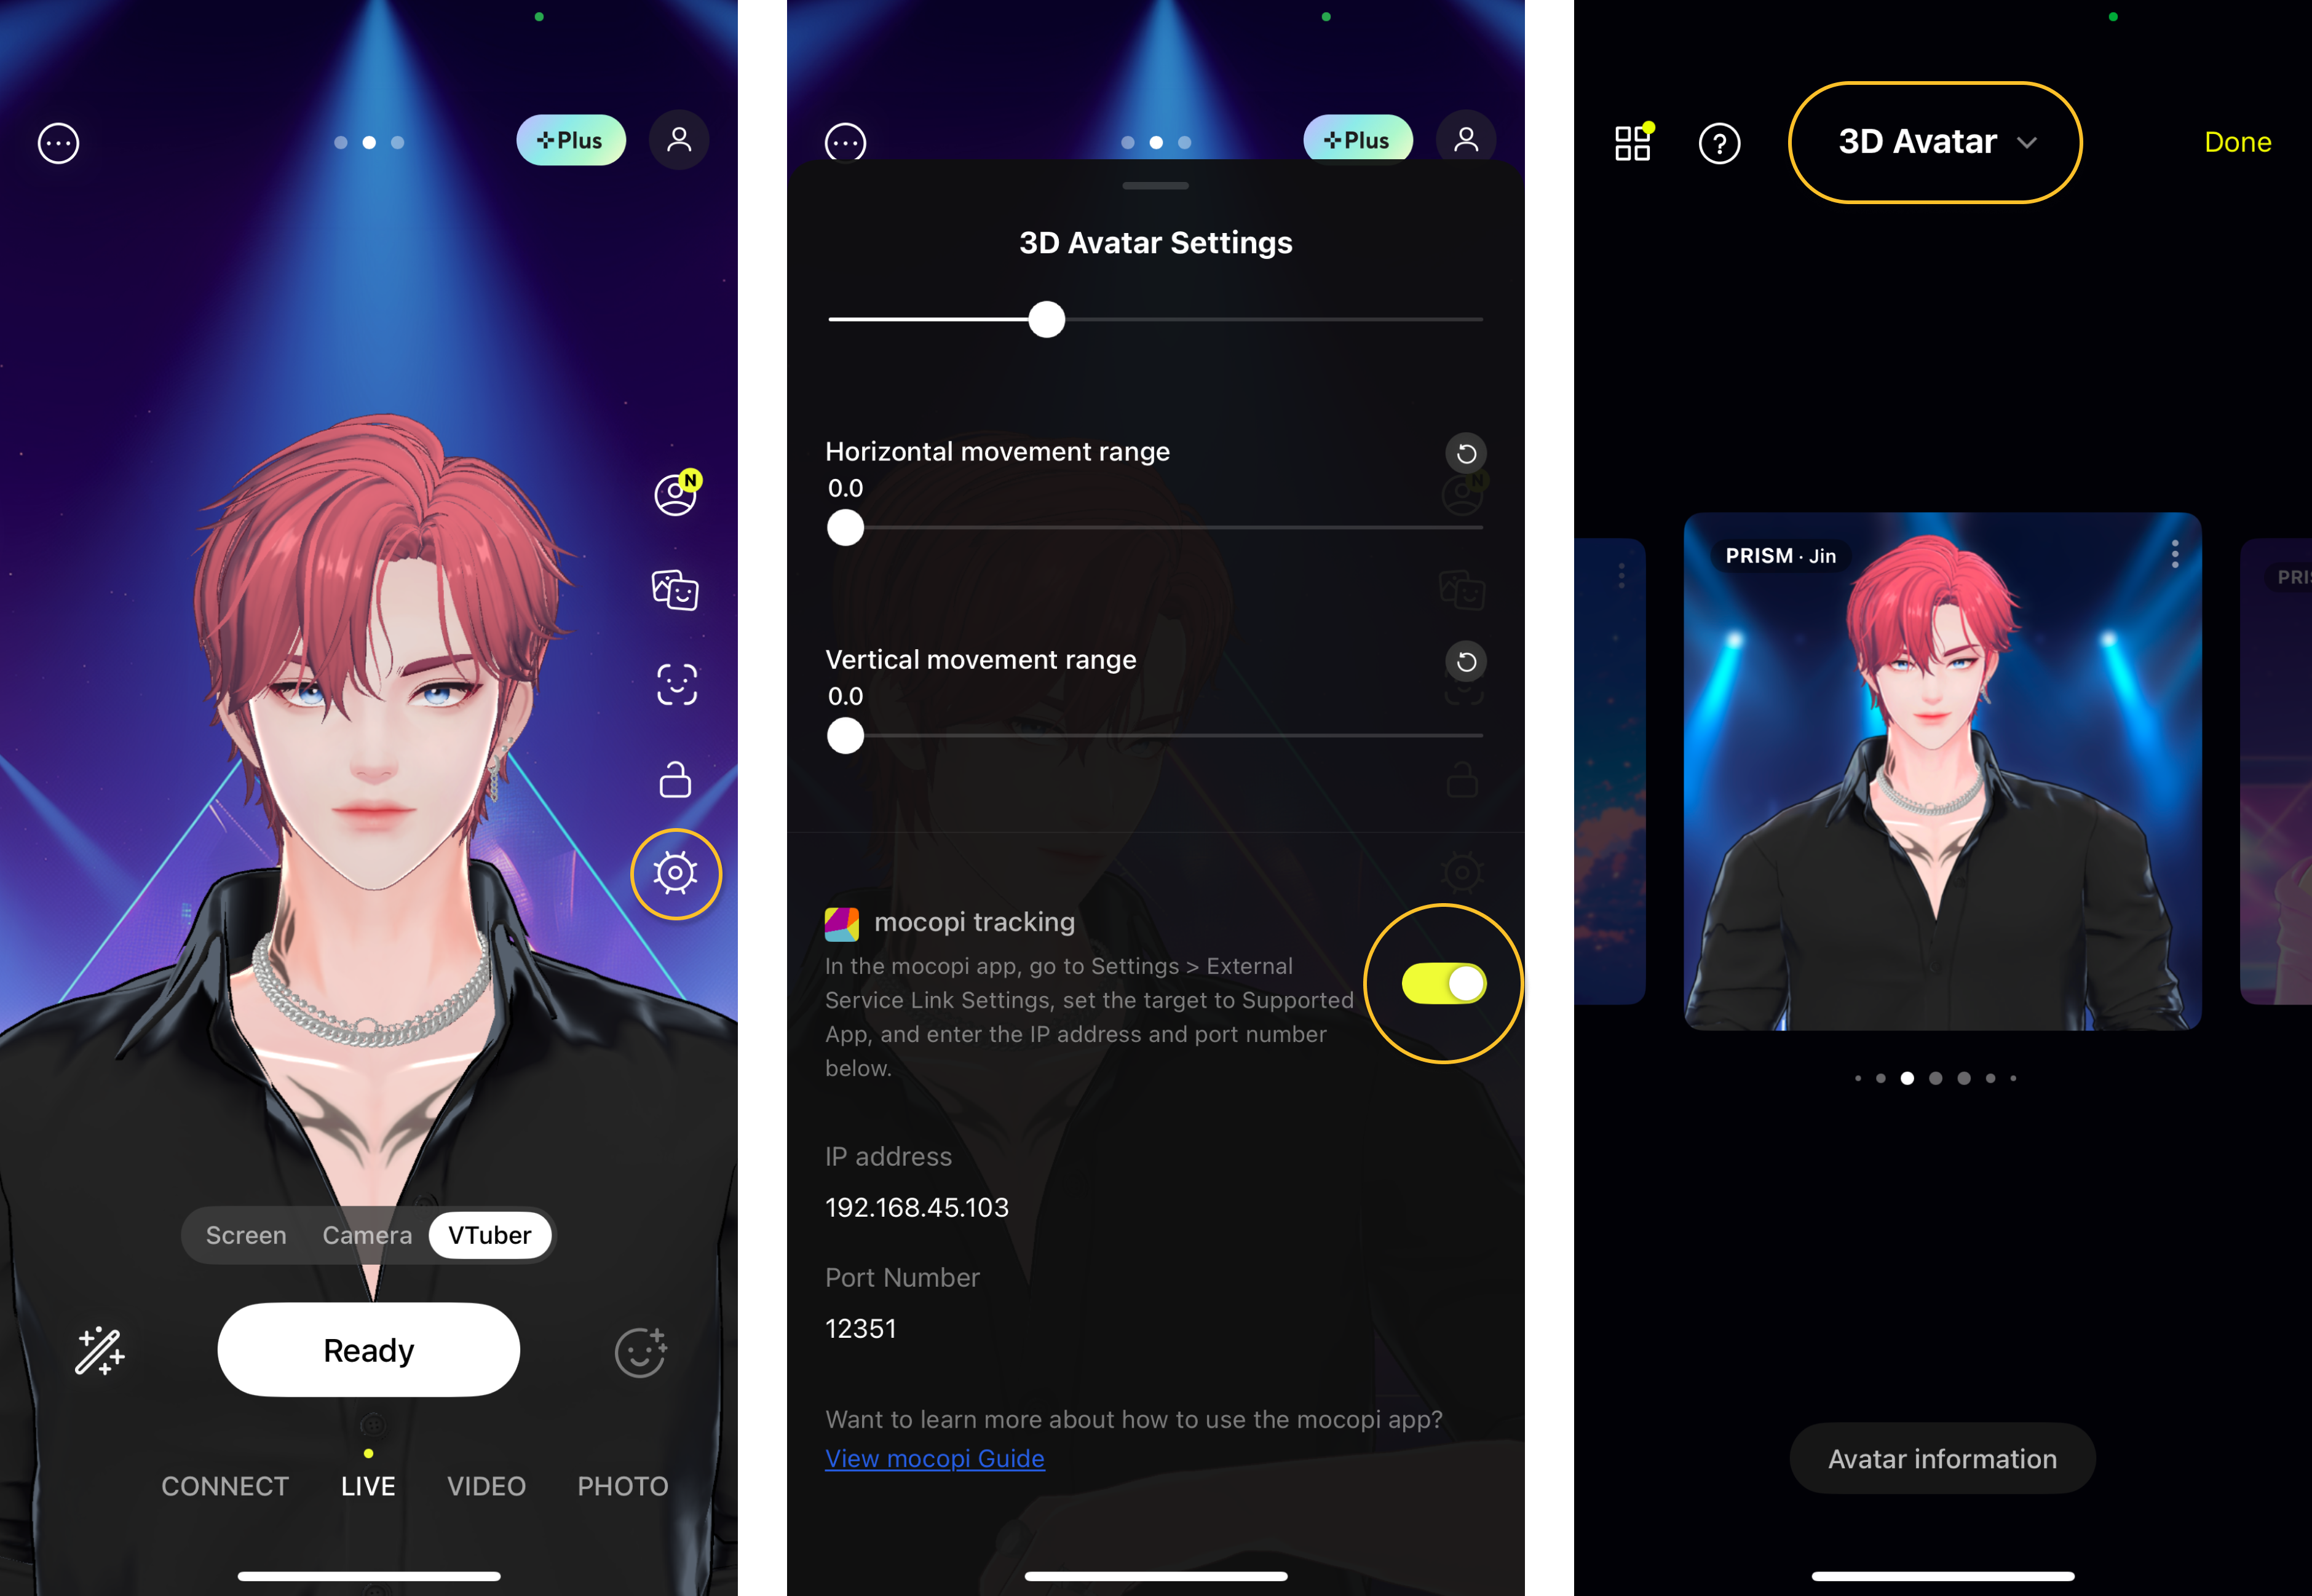
A VRM-based 3D avatar can be used to go live even without using a camera. The PRISM Mobile app provides 3D avatars, backgrounds, and items that can be used free of charge.

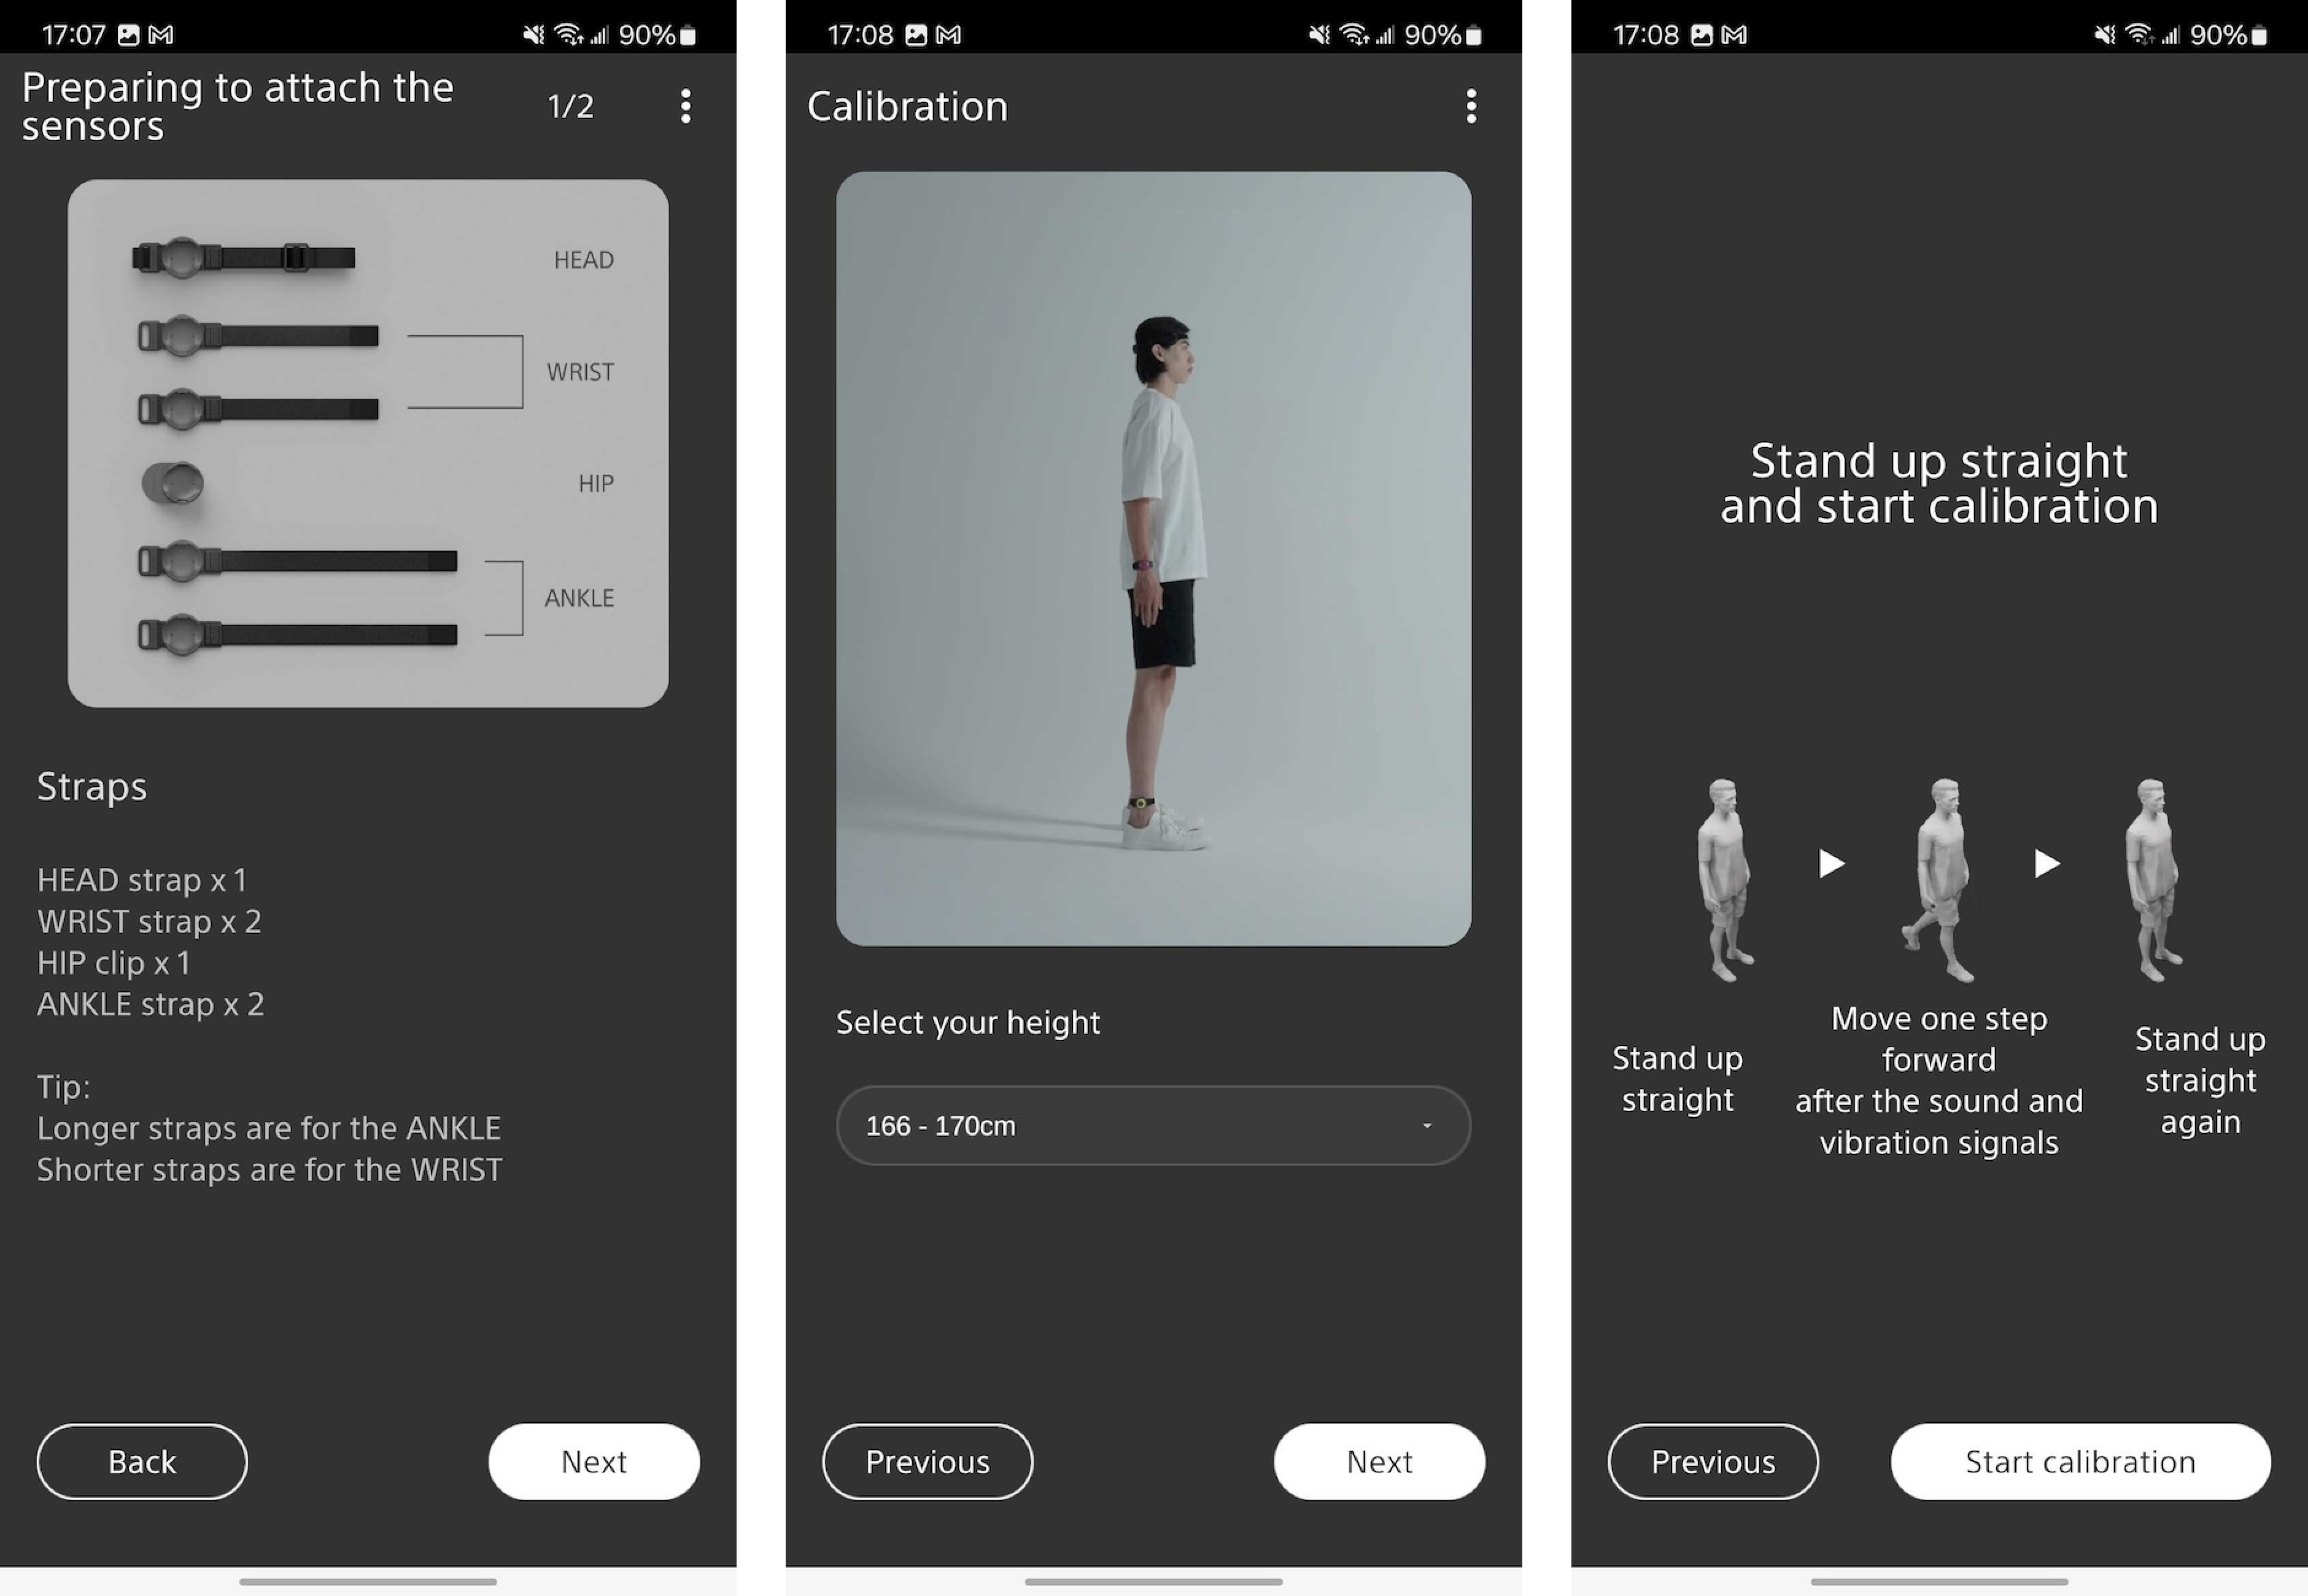
3D facial tracking: Your avatar can move in sync with your own facial expressions and movements. \ <sub>\*Body tracking and pose to be updated by the end of 2025</sub>

[Adopting 3D VRM VTuber](/mobile/guides/vtuber/adopting-3d-vrm-vtuber)

### Remote Control

<figure><img src="https://1019928184-files.gitbook.io/~/files/v0/b/gitbook-x-prod.appspot.com/o/spaces%2FlISC5rfB4Hnmbsjf8phq%2Fuploads%2FrjZVX4ho4uvQ1dP4PcZa%2FGetting%20Started%2012.png?alt=media&amp;token=1562d443-c1c4-4ad4-8f8c-192ab3fb0be5" alt=""><figcaption></figcaption></figure>

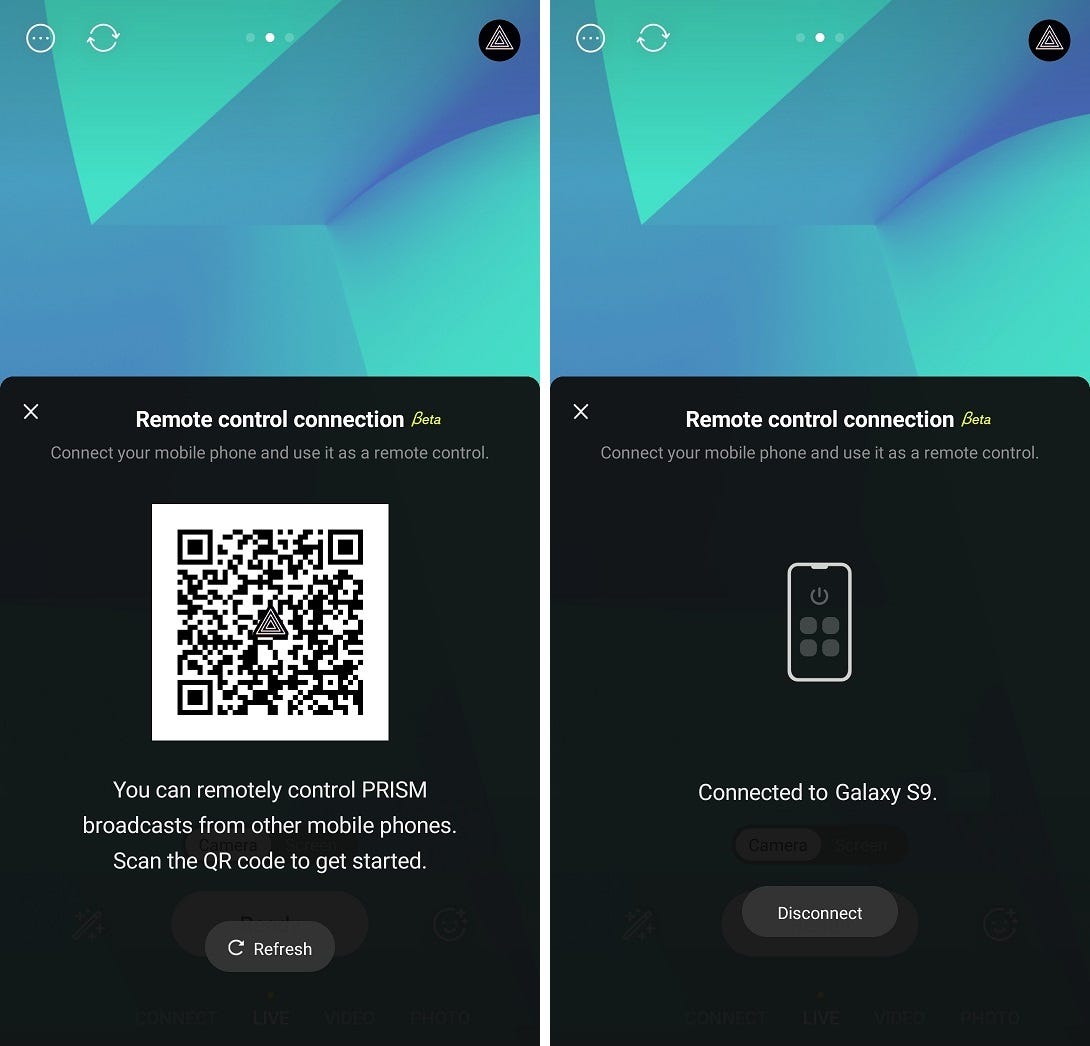
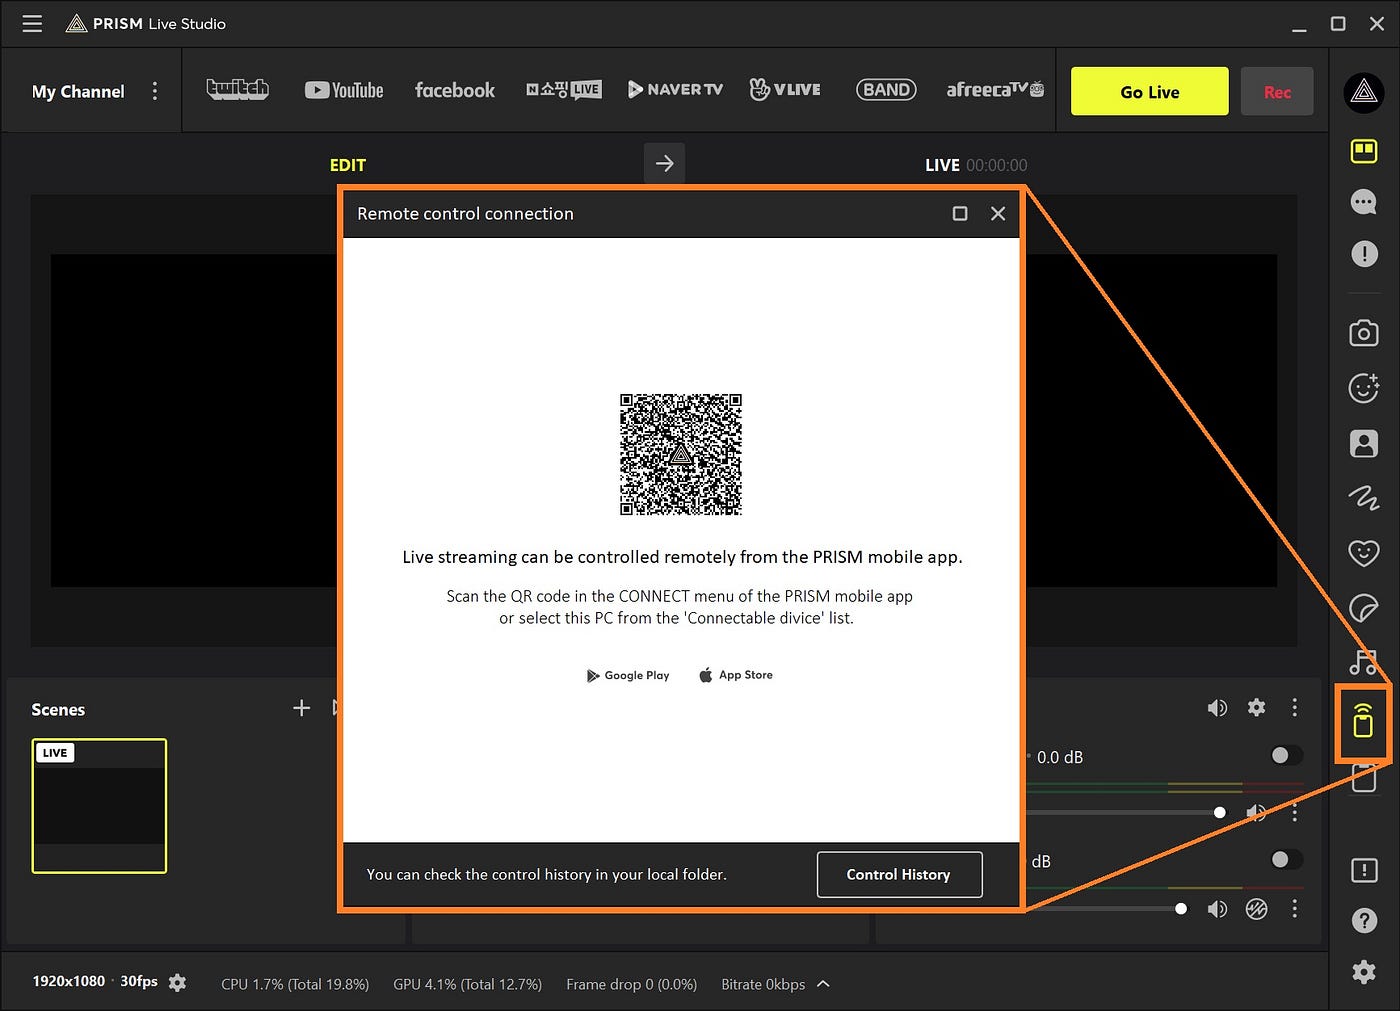
Going beyond a simple tool for transmission, sometimes your webcam or PRISM Live can be controlled remotely.

[Using Remote Control for Another PRISM App](/mobile/guides/features/remote-control/using-remote-control-for-another-prism-app)

## Minimum/Recommended System Requirements

{% tabs %}
{% tab title=" EN" %}
The minimum and recommended system requirements for using the PRISM Live Studio mobile app are as follows.

Last Updated: 3, July, 2025

| Device       | Minimum                                                                       | Recommended                                                                                          |
| ------------ | ----------------------------------------------------------------------------- | ---------------------------------------------------------------------------------------------------- |
| iOS          | <ul><li>iPhone iOS 16.0 or later </li><li>iPad iPadOS 16.0 or later</li></ul> | -                                                                                                    |
| Android      | <ul><li>Android OS 10 or later</li></ul>                                      | <ul><li>Android OS 13 or later</li><li>Performance may vary based on device specifications</li></ul> |
| {% endtab %} |                                                                               |                                                                                                      |

{% tab title="한국어" %}
PRISM Live Studio 모바일앱 사용을 위한 최소/권장 사양은 아래와 같습니다.

마지막 업데이트: 25년 7월 3일

| 기기            | 최소 사양                                                             | 권장 사양                                                                      |
| ------------- | ----------------------------------------------------------------- | -------------------------------------------------------------------------- |
| iOS           | <ul><li>iPhone iOS 16.0 이상 </li><li>iPad iPadOS 16.0 이상</li></ul> |                                                                            |
| Android       | <ul><li>Android OS 10 이상</li></ul>                                | <ul><li>Android OS 13 이상</li><li>단, 기기 세부 성능에 따라 차이가 발생할 수 있습니다.</li></ul> |
| {% endtab %}  |                                                                   |                                                                            |
| {% endtabs %} |                                                                   |                                                                            |


# Streaming


# YouTube Streaming


# Streaming to YouTube

Android, iOS

Today many people are streaming to YouTube. Accordingly, we made videos that walk you through how to start streaming to YouTube from the PRISM app.\
\
This is a two video part series, where the first part talks about what needs to be prepared before live streaming and the second part is about actually going live on Youtube.

&#x20;

***

## Streaming to YouTube with the PRISM Mobile App. (Part 1) <a href="#id-1ed5" id="id-1ed5"></a>

{% embed url="<https://www.youtube.com/watch?v=sy3vEKl9GI0>" %}

## Streaming to YouTube with the PRISM Mobile App. (Part 2) <a href="#d57a" id="d57a"></a>

{% embed url="<https://www.youtube.com/watch?v=JFAnU7AhXMg>" %}

[Mobile](/mobile/overview),  [Guides](/mobile/guides),  [Streaming](/mobile/guides/streaming), [YouTube Streaming](/mobile/guides/streaming/youtube-streaming)


# Enabling YouTube HEVC (H.265) Streaming

iOS

YouTube live platform supports receiving H.265 (HEVC) encoded streams, allowing for higher-quality video with the same data usage when streaming to YouTube.

H.265 (HEVC) encoding is automatically applied only for single streaming to YouTube.

{% hint style="info" %}
For multi-streaming, H.264 encoding is automatically applied.
{% endhint %}

<figure><img src="https://1019928184-files.gitbook.io/~/files/v0/b/gitbook-x-prod.appspot.com/o/spaces%2FlISC5rfB4Hnmbsjf8phq%2Fuploads%2FhtELrhz91XRzL2XNaDZ1%2Fimage.png?alt=media&amp;token=acf8424b-ad03-4f3c-864f-77861776c529" alt=""><figcaption><p>If you multi-streaming to Youtube and Facebook, H.264 is applied.</p></figcaption></figure>

The following images illustrate the quality differences between H.264 and H.265 (HEVC) encoding. By enlarging the images to their original size, you can make detailed comparisons, such as examining the patterns in the couch fabric.

<figure><img src="https://1019928184-files.gitbook.io/~/files/v0/b/gitbook-x-prod.appspot.com/o/spaces%2FlISC5rfB4Hnmbsjf8phq%2Fuploads%2F8VyvK2BmOyzDnWwymp5D%2Fh264.png?alt=media&amp;token=498c73d1-b1f8-45cd-953f-c240a5e9bea0" alt=""><figcaption><p>H.264 encoding streaming</p></figcaption></figure>

<figure><img src="https://1019928184-files.gitbook.io/~/files/v0/b/gitbook-x-prod.appspot.com/o/spaces%2FlISC5rfB4Hnmbsjf8phq%2Fuploads%2FRFyVQExWTnoHMPM91fMq%2Fh265.png?alt=media&amp;token=e7c3d896-fdda-435c-9dc5-9c8c945aece1" alt=""><figcaption><p>H.265 (HEVC) encoding streaming</p></figcaption></figure>

You can find more detailed information about the H.265 (HEVC) encoding standard at the link below.

* [HEVC(High Efficiency Video Coding)](https://en.wikipedia.org/wiki/High_Efficiency_Video_Coding)

[Mobile](/mobile/overview), [Guides](/mobile/guides), [Streaming](/mobile/guides/streaming), [YouTube Streaming](/mobile/guides/streaming/youtube-streaming)


# Resuming YouTube Streams

Android, iOS

If the YouTube channel has more than 50 subscribers, the feature to resume your previous live streaming to YouTube is supported. Resuming a live stream means starting a new live stream using the same link as the live stream that viewers are currently participating in.​

***

When you try to end your live stream, a dialog will appear asking whether to keep the YouTube live session active. To keep the current live session active after ending the stream, click the “Keep Session” button.

<figure><img src="https://1019928184-files.gitbook.io/~/files/v0/b/gitbook-x-prod.appspot.com/o/spaces%2FlISC5rfB4Hnmbsjf8phq%2Fuploads%2Fh5kyNdecqJmosrRNapZE%2FYouTube%20live%20session%201.png?alt=media&amp;token=61303f5d-eafd-4b70-a751-65e198713c90" alt=""><figcaption></figcaption></figure>

And then, when you enter the live preparation screen, a pop-up will appear for the active live session. After reviewing the details, tap the ‘**Check**’ button.

* List of live streams maintaining the YouTube session (possible to resume with the previous steam link)
* List of scheduled live streams set in the YouTube Live Dashboard

From the schedule screen, select the live item marked with a yellow ‘**Active**’ label and tap ‘**OK**’. On the live preparation screen, check the date and time of the active live session, and then start streaming. The PRISM app will use the Resume feature to continue the previous live stream.

<figure><img src="https://1019928184-files.gitbook.io/~/files/v0/b/gitbook-x-prod.appspot.com/o/spaces%2FlISC5rfB4Hnmbsjf8phq%2Fuploads%2FK3mxe5tZMGoyAZ7EcULG%2FYouTube%20live%20session%202.png?alt=media&amp;token=7d49014a-46fe-4988-bdef-5e3d74a29167" alt=""><figcaption></figcaption></figure>

[Mobile](/mobile/overview), [Guides](/mobile/guides), [Streaming](/mobile/guides/streaming), [YouTube Streaming](/mobile/guides/streaming/youtube-streaming)


# Ending Process of YouTube Streaming

Android, iOS

The YouTube platform supports a resume feature for live streaming. In other words, even in situations where live streaming ends on a streaming device such as a smartphone, the live can remain in OnAir status on YouTube.

This feature is usually used to keep the link of a live stream alive for a long time. Viewers no longer need to obtain a link to a new live stream from the streamer or platform.

You can keep your live on OnAir by clicking **KEEP** in the second of the two-step dialogs of the PRISM app.

<figure><img src="https://1019928184-files.gitbook.io/~/files/v0/b/gitbook-x-prod.appspot.com/o/spaces%2FlISC5rfB4Hnmbsjf8phq%2Fuploads%2FIHzRaghVE837kA3P5EQs%2FYouTube%20ending%20process%201.png?alt=media&amp;token=b3a728d7-0700-4237-82ed-f5820bba0078" alt=""><figcaption></figcaption></figure>

If there is an OnAir live stream remaining on your channel, the PRISM app provides a slightly different dialog like the image below.

You can resume the stream by selecting it, or you can stop the stream completely using the **End the live session** button.

<figure><img src="https://1019928184-files.gitbook.io/~/files/v0/b/gitbook-x-prod.appspot.com/o/spaces%2FlISC5rfB4Hnmbsjf8phq%2Fuploads%2FhSUzHaGZOPUF3e7KnvAs%2FYouTube%20ending%20process%201.png?alt=media&amp;token=73968062-f047-48a1-b01f-c882117923bb" alt=""><figcaption></figcaption></figure>

[Mobile](/mobile/overview), [Guides](/mobile/guides), [Streaming](/mobile/guides/streaming), [YouTube Streaming](/mobile/guides/streaming/youtube-streaming)


# Managing YouTube Ad Monetization

## Managing YouTube Ad Monetization

{% tabs %}
{% tab title="English" %}

### Control YouTube ads from PRISM

If your YouTube channel is in the **YouTube Partner Program**, you can manage ad monetization and mid-roll ads right inside PRISM — no need to open YouTube Studio. Changes are saved instantly.

> **Supported versions**: Android 5.3.0 · iOS 3.12.0 or later The **Monetization** menu appears only for YouTube broadcasts on channels eligible for the YouTube Partner Program.

### Opening monetization settings

1. Open the **broadcast info** panel for your YouTube stream.
2. Tap **Monetization** (below the category menu).
3. The **Monetization settings** screen opens.

### Turning on monetization

* Turn on **Monetize with ads** to let pre-roll and display ads run automatically.
* When it is off, the mid-roll ad options below are hidden.

### Choosing a mid-roll ad mode

Under **Mid-roll ads**, pick a **Mode**:

* **Automatic (recommended)** — YouTube decides when to show ads. Choose a **frequency**:
  * **Low** — fewer ads, better viewing experience, lower revenue potential.
  * **Medium** — a balance of viewing experience and revenue (default).
  * **High** — more ads, highest revenue potential.
* **Scheduled** — ads run at a set **interval** (6 / 12 / 18 / 24 / 30 minutes). You can also enable *Show at different times per viewer* to maximize revenue.
* **Manual** — no automatic ads; you insert them yourself during the live stream.

### Inserting and delaying ads during your live

When monetization is on, extra buttons appear in the live view:

* **Insert Ad** — plays an ad break immediately.
* **Delay Ads** *(Automatic / Scheduled modes only)* — postpones the next ad break. A countdown with a **Resume Ads** button appears; tap **Resume Ads** to run the ad right away, or tap **Delay Ads** again to extend the delay.

### Kids content

If your broadcast is set as **made for kids**, a notice is shown and personalized ads are not available, per YouTube policy.

### Good to know

* If your channel is found to be **not in the YouTube Partner Program**, a notice appears and the monetization options are hidden.
* Monetization settings are saved automatically and kept for your next broadcast.
  {% endtab %}

{% tab title="Korean" %}

### PRISM에서 YouTube 광고를 제어하세요

YouTube 채널이 **YouTube 파트너 프로그램**에 가입되어 있다면, YouTube 스튜디오에 따로 접속하지 않고도 PRISM 안에서 광고 수익 창출과 중간 광고를 관리할 수 있습니다. 변경 사항은 즉시 저장됩니다.

> **지원 버전**: Android 5.3.0 · iOS 3.12.0 이상 **수익 창출** 메뉴는 YouTube 파트너 프로그램 자격이 있는 채널의 YouTube 방송에서만 표시됩니다.

### 수익 창출 설정 열기

1. YouTube 방송의 **방송 정보** 창을 엽니다.
2. **수익 창출**을 탭합니다(카테고리 메뉴 아래).
3. **수익 창출 설정** 화면이 열립니다.

### 수익 창출 켜기

* **광고로 수익 창출**을 켜면 프리롤 및 디스플레이 광고가 자동으로 삽입됩니다.
* 끄면 아래의 중간 광고 옵션이 모두 숨겨집니다.

### 중간 광고 모드 선택하기

**중간 광고**에서 **모드**를 선택합니다:

* **자동 (권장)** — YouTube가 광고 시점을 결정합니다. **빈도**를 선택하세요:
  * **낮음** — 광고가 적어 시청 경험이 좋지만 수익 잠재력은 낮습니다.
  * **보통** — 시청 경험과 수익의 균형을 맞춘 설정입니다(기본값).
  * **높음** — 광고가 많아 수익 잠재력이 가장 높습니다.
* **예약** — 정해진 **간격**(6 / 12 / 18 / 24 / 30분마다)으로 광고가 노출됩니다. *시청자별로 다른 시점에 광고 게재* 옵션을 켜면 수익을 극대화할 수 있습니다.
* **수동** — 자동 광고 없이, 방송 중에 직접 광고를 삽입합니다.

### 방송 중 광고 삽입·지연하기

수익 창출이 켜져 있으면 라이브 화면에 버튼이 추가로 표시됩니다:

* **광고 삽입** — 즉시 광고를 재생합니다.
* **광고 지연** *(자동 / 예약 모드에서만)* — 다음 광고를 미룹니다. 카운트다운과 **광고 재개** 버튼이 표시되며, **광고 재개**를 탭하면 바로 광고가 나가고, **광고 지연**을 다시 탭하면 지연 시간이 연장됩니다.

### 아동용 방송

방송이 **아동용**으로 설정된 경우, YouTube 정책에 따라 안내가 표시되며 개인 맞춤 광고를 사용할 수 없습니다.

### 알아두면 좋아요

* 채널이 **YouTube 파트너 프로그램 미가입**으로 확인되면 안내가 표시되고 수익 창출 옵션이 숨겨집니다.
* 수익 창출 설정은 자동으로 저장되며 다음 방송에도 유지됩니다.
  {% endtab %}
  {% endtabs %}


# Adding Extra Delay to Your YouTube Stream

## Adding Extra Delay to Your YouTube Stream

{% tabs %}
{% tab title="English" %}

### Add a short delay before your YouTube stream

When streaming to YouTube, you can add an extra delay of **30 seconds** or **1 minute** on top of YouTube's stream latency. During the added delay a **black screen** is broadcast, giving you a brief buffer before your live content appears — useful for moderation or last-minute prep.

> **Supported versions**: Android 5.3.0 · iOS 3.12.0 or later This option applies to **YouTube only**. In multistreaming, other platforms are not delayed.

### Setting the added delay

1. Open the **broadcast info** sheet for your YouTube stream (this also works when creating a scheduled live).
2. Find **Add delay**, located below **Stream latency**.
3. Choose **None**, **30 seconds**, or **1 minute**. The default is **None**.

Once you go live, the setting is shown but can no longer be changed (it appears dimmed).

### When the option is unavailable

**Add delay** works only when **Stream latency** is set to **Normal latency**.

* If stream latency is **Low latency** or **Ultra-low latency**, Add delay is fixed to **None** and dimmed.
* If you switch stream latency back to **Normal latency**, Add delay resets to **None**.

### During your live

If an added delay is set, a short notice appears at the start of the broadcast, for example: *"Using a 30-second broadcast delay on YouTube."*
{% endtab %}

{% tab title="Korean" %}

### YouTube 방송에 짧은 지연을 더하세요

YouTube로 방송할 때, YouTube의 스트림 지연 시간에 더해 **30초** 또는 **1분**의 추가 지연을 설정할 수 있습니다. 추가된 지연 시간 동안에는 **검은색 화면**이 송출되어, 라이브 콘텐츠가 나가기 전 잠깐의 여유가 생깁니다 — 모더레이션이나 막바지 준비에 유용합니다.

> **지원 버전**: Android 5.3.0 · iOS 3.12.0 이상 이 옵션은 **YouTube에만** 적용됩니다. 다중 송출 시 다른 플랫폼은 지연 없이 송출됩니다.

### 추가 지연 설정하기

1. YouTube 방송의 **방송 정보** 시트를 엽니다(예약 라이브를 만들 때도 동일하게 설정할 수 있습니다).
2. **스트림 지연 시간** 아래의 **지연 시간 추가**를 찾습니다.
3. **없음**, **30초**, **1분** 중에서 선택합니다. 기본값은 **없음**입니다.

라이브를 시작하면 설정값은 표시되지만 더 이상 변경할 수 없습니다(딤드로 표시됨).

### 옵션을 사용할 수 없는 경우

**지연 시간 추가**는 **스트림 지연 시간**이 **기본 지연 시간**으로 설정된 경우에만 사용할 수 있습니다.

* 스트림 지연 시간이 **짧은 지연 시간** 또는 **매우 짧은 지연 시간**이면 지연 시간 추가는 **없음**으로 고정되고 딤드 처리됩니다.
* 스트림 지연 시간을 다시 **기본 지연 시간**으로 바꾸면 지연 시간 추가는 **없음**으로 초기화됩니다.

### 방송 중

추가 지연이 설정되어 있으면 방송 시작 시 짧은 안내가 표시됩니다. 예: *"YouTube 30초 송출 지연을 사용 중입니다."*
{% endtab %}
{% endtabs %}


# Sharing Your YouTube Link Before You Go Live

## Sharing Your YouTube Link Before You Go Live

{% tabs %}
{% tab title="English" %}

### Share your live link ahead of time

Want to give your audience the YouTube live link *before* you start, so they can save it and join the moment you go live? PRISM lets you do this even when your broadcast hasn't started yet.

> **Android only**: This feature is available on **Android 5.3.0 or later**.

### Why a scheduled broadcast is created

A YouTube link only exists once there is a broadcast for it on YouTube. So if you don't have an upcoming YouTube broadcast yet, PRISM offers to create a **scheduled broadcast** for you automatically — that is what gives you a link you can share in advance.

### How to share your link

1. On the broadcast prep screen, tap the **Share** button on your channel card.
2. Choose **Copy link** or **Share link**.
3. What happens next depends on your situation:
   * **You already have a shareable YouTube broadcast** — the link is shared right away, and you'll see a "Link copied" message.
   * **You don't have one yet** — a message appears: *"A YouTube scheduled broadcast will be created automatically so you can share the link in advance."*
     * Tap **OK** to create the scheduled broadcast and share the link.
     * Tap **Cancel** to stop. Nothing is created.

### Good to know

* This works only when you are **signed in to YouTube**, have **live streaming permission**, and are **connected to the internet**.
* If the connection fails while the broadcast is being created, you'll see *"Failed to connect to the network."* and nothing changes — just try again.
* If you don't actually go live with the auto-created scheduled broadcast, PRISM reuses it next time instead of making a new one, so your channel doesn't fill up with unused broadcasts.
* Applies to YouTube, in both single and multistreaming.
  {% endtab %}

{% tab title="Korean" %}

### 라이브 링크를 미리 공유하세요

방송을 시작하기 *전에* 시청자에게 YouTube 라이브 링크를 미리 알려주고 싶으신가요? 그러면 팬들이 링크를 저장해 두었다가 방송이 열리는 순간 바로 들어올 수 있어요. PRISM은 아직 방송을 시작하지 않았어도 링크를 미리 공유할 수 있게 도와줍니다.

> **Android 전용**: 이 기능은 **Android 5.3.0 이상**에서 사용할 수 있습니다.

### 예약 방송이 자동으로 만들어지는 이유

YouTube 링크는 YouTube에 해당 방송이 있어야 생깁니다. 그래서 아직 예정된 YouTube 방송이 없다면, PRISM이 **예약 방송**을 자동으로 만들어 드릴지 먼저 물어봅니다. 이 예약 방송 덕분에 미리 공유할 수 있는 링크가 생기는 것이죠.

### 링크를 공유하는 방법

1. 방송 준비 화면에서 채널 카드의 **공유하기** 버튼을 탭합니다.
2. **링크 복사** 또는 **링크 공유**를 선택합니다.
3. 이후 동작은 상황에 따라 달라집니다:
   * **공유할 수 있는 YouTube 방송이 이미 있는 경우** — 링크가 바로 공유되고 "링크가 복사되었습니다" 안내가 표시됩니다.
   * **아직 없는 경우** — 다음 안내가 표시됩니다: *"방송 링크를 미리 공유할 수 있도록 YouTube 예약 방송이 자동 생성됩니다."*
     * **확인**을 탭하면 예약 방송이 만들어지고 링크가 공유됩니다.
     * **취소**를 탭하면 중단되며, 아무것도 만들어지지 않습니다.

### 알아두면 좋아요

* 이 기능은 **YouTube에 로그인**되어 있고, **라이브 송출 권한**이 있으며, **인터넷에 연결**되어 있을 때만 동작합니다.
* 방송을 만드는 도중 연결에 실패하면 *"네트워크 연결에 실패했습니다."* 안내가 표시되고 아무것도 바뀌지 않아요. 잠시 후 다시 시도하세요.
* 자동으로 만들어진 예약 방송으로 실제 방송을 하지 않았다면, PRISM이 다음에 새로 만들지 않고 그 예약 방송을 다시 사용합니다. 그래서 채널에 사용하지 않은 방송이 쌓이지 않습니다.
* YouTube에 적용되며, 단일 송출과 다중 송출 모두에서 동작합니다.
  {% endtab %}
  {% endtabs %}


# Using a Brand Account

Android, iOS

## Using a Brand Account

{% tabs %}
{% tab title="English" %}
To stream from a company or group YouTube channel, you first need permission for that channel. But sometimes the channel still does not appear in the PRISM app, even after you have been given permission. This page explains why, and how to fix it.

### Read this if

* You need to stream from a company or group channel, but that channel does not appear in the PRISM app.
* You own the channel, and you want to let someone else stream from it.

Only the channel owner can change these settings. If you are not the owner, please ask the owner to follow the steps on this page.

***

### Two things to check

Many people tell us the channel does not appear even though they have permission. Usually one of these two is the cause.

**First, the permission must come from the right place.**

YouTube channel permission can be given in two different places. The two do not work the same way.

| Where the permission was given          | Does the channel appear in PRISM? |
| --------------------------------------- | --------------------------------- |
| YouTube Studio → Settings → Permissions | **It does not appear**            |
| Google Account → Brand Accounts page    | **It appears**                    |

Permission given in YouTube Studio only works **inside YouTube Studio**. In other apps such as PRISM, the channel will not show up.

**Second, the permission must be set to the right role.**

A role is chosen at the same time the permission is given. To stream, the role must be **Manager** or **Owner**.

{% hint style="warning" %}
A **Communications manager** cannot start a stream. The name ends with "manager", so it is easy to choose by mistake.
{% endhint %}

***

### What is a brand account

A brand account is a channel that **several people can manage together**, rather than a channel owned by one Google account. Company and group channels are usually brand accounts. With a brand account, you can invite people and share management rights with them.

### Before you start

* **The channel owner's account** — only the owner can change this setting. If you are not the owner, please ask the owner to do it.
* **The email address of the account you will stream with**
* **A web browser** — a computer or a phone is fine.

***

### Step 1. Open the Brand Accounts page

Sign in with the channel owner's account. Then type the address below into your browser.

```
https://myaccount.google.com/brandaccounts
```

The **Brand Accounts** page opens. Scroll down and you will find the **Your brand accounts** list. Tap the channel you want to stream with.

{% hint style="info" %}
If you cannot find the channel in the list, that channel is not a brand account. A channel created with a personal account cannot share permission this way. In that case, sign in with the channel owner's account and stream directly.
{% endhint %}

### Step 2. Click "Manage permissions"

When you tap the channel, the **Brand account details** page opens.

In the middle of the page, under the word **Users**, there is a blue **Manage permissions** button. Click this button.

{% hint style="danger" %}
Further down the same page there is a **Delete account** button. If you press it, the channel and all of its videos are deleted. Never press it.
{% endhint %}

### Step 3. Invite the account you will stream with

A list of people who have permission appears. At the top right of the dialog, click the **invite icon** — a person shape with a **+** on it. The **Add new user** window opens.

1. In the **Add name or email** field, type the email address of the account you will stream with.
2. Where you choose the role, select **Manager**.
3. Click **Invite**.

The roles are shown as these three. Be sure to choose **Manager**, the one in the middle.

| Role                   | Can it stream? |
| ---------------------- | -------------- |
| Owner                  | Yes            |
| **Manager**            | **Yes**        |
| Communications manager | No             |

### Step 4. Click "Accept invitation" in the email

An invitation email is sent to the mailbox of the account you invited. Open that email and click **Accept invitation**.

{% hint style="warning" %}
This is the step people miss most often. If you only send the invitation and nobody accepts it, the permission is not applied. The channel will not appear in the app either.
{% endhint %}

### Step 5. Check it in the PRISM app

1. Open the PRISM app and choose **YouTube** as the place to stream.
2. Sign in with your Google account.
3. The **Choose an account or brand account** screen appears.
4. The channel you were given permission for appears in the list. Select it, and you are ready.

{% hint style="success" %}
If the channel appears in the list, the setup is correct. You can now stream with that channel.
{% endhint %}

***

### If the channel still does not appear

Please check the following in order, from the top.

**1. Sign out of the app, then sign in again.**

If you were already signed in before the permission was given, the app may not reload the channel list. Signing out and back in refreshes the list.

**2. Check that live streaming is available on that channel.**

When a channel applies for live streaming on YouTube for the first time, it can take **up to 24 hours** before it can actually be used. Until then the channel does not appear in the app. Please wait about a day and check again.

**3. Check that the invitation was accepted.**

Open the mailbox of the invited account, and check that **Accept invitation** in the invitation email was clicked. If it was not clicked, the permission is not applied.

***

### Common misunderstandings

| If you thought this                                                    | Please check this                                                                                                                                                                                                         |
| ---------------------------------------------------------------------- | ------------------------------------------------------------------------------------------------------------------------------------------------------------------------------------------------------------------------- |
| "I was given Manager permission in YouTube Studio"                     | Permission given in Studio only works inside Studio. You need to be invited again from the Brand Accounts page.                                                                                                           |
| "My role is Manager, but it still does not work"                       | The role name **Manager** exists in both **YouTube Studio** and the **Google Brand Accounts page**. Only a Manager role given on the Brand Accounts page can stream. Please check which screen your permission came from. |
| "A Communications manager is a manager too, so it should work, right?" | It cannot stream. The role must be **Manager** or **Owner**.                                                                                                                                                              |
| "I gave permission, but the channel does not appear right away"        | The invitation has to be accepted, and you need to sign out and back in. A channel that has just applied for live streaming can take up to 24 hours.                                                                      |
| {% endtab %}                                                           |                                                                                                                                                                                                                           |

{% tab title="Korean" %}
회사나 단체의 YouTube 채널로 방송하려면, 그 채널의 권한을 먼저 받아야 합니다. 그런데 권한을 받았는데도 PRISM 앱에 채널이 보이지 않는 경우가 있습니다. 이 문서에서 그 이유와 해결 방법을 알려드립니다.

### 이런 경우에 읽어 주세요

* 회사나 단체의 채널로 방송해야 하는데, PRISM 앱에 그 채널이 보이지 않습니다.
* 내가 채널 주인인데, 다른 사람이 이 채널로 방송할 수 있게 해 주려고 합니다.

설정은 채널 주인만 할 수 있습니다. 주인이 아니라면 이 문서의 내용을 주인이 처리할 수 있도록 유도해주세요.

***

### 채널을 보이게 하려면 두 가지를 확인해야 합니다

많은 분들이 권한을 받았는데도 채널이 안 보인다고 문의하십니다. 원인은 대부분 아래 두 가지 중 하나입니다.

**첫째, 권한을 받은 경로가 올바른 경로여야 합니다.**

YouTube 채널 권한은 서로 다른 두 곳에서 줄 수 있습니다. 그런데 두 곳의 효력이 다릅니다.

| 권한을 준 곳                | PRISM 앱에서 채널이 보이나요? |
| ---------------------- | ------------------- |
| YouTube 스튜디오 → 설정 → 권한 | **보이지 않습니다**        |
| Google 계정 → 브랜드 계정 페이지 | **보입니다**            |

YouTube 스튜디오에서 준 권한은 **YouTube 스튜디오 안에서만** 쓸 수 있습니다. PRISM처럼 YouTube가 아닌 다른 앱에서는 그 채널이 나타나지 않습니다.

**둘째, 받은 권한이 올바르게 설정되어야 합니다.**

권한을 줄 때 역할을 함께 정합니다. 방송을 하려면 **관리자** 또는 **소유자** 여야 합니다.

{% hint style="warning" %}
**커뮤니케이션 관리자**는 방송을 시작할 수 없습니다. 이름이 '관리자'로 끝나서 잘못 고르기 쉬운 부분입니다.
{% endhint %}

***

### 브랜드 계정이란

한 사람의 Google 계정으로 만든 채널이 아니라, **여러 사람이 함께 관리할 수 있는 채널**을 말합니다. 회사나 단체의 채널이 보통 브랜드 계정으로 되어 있습니다. 브랜드 계정은 관리할 사람을 초대해서 권한을 나눠 줄 수 있습니다.

### 시작하기 전에 준비할 것

* **채널 주인(소유자) 계정** — 이 설정은 채널 주인만 할 수 있습니다. 주인이 아니라면 주인에게 부탁해 주세요.
* **방송에 사용할 계정의 이메일 주소**
* **웹 브라우저** — 컴퓨터나 휴대폰 어느 쪽이든 괜찮습니다.

***

### 1단계. 브랜드 계정 페이지 열기

채널 주인 계정으로 로그인한 상태에서, 브라우저 주소창에 아래 주소를 입력해 주세요.

```
https://myaccount.google.com/brandaccounts
```

**브랜드 계정** 화면이 열립니다. 아래로 내려가면 **내 브랜드 계정** 목록이 있습니다. 여기서 방송에 사용할 채널을 눌러 주세요.

{% hint style="info" %}
목록에 찾는 채널이 없다면, 그 채널은 브랜드 계정이 아닙니다. 개인 계정으로 만든 채널은 이 방법으로 권한을 나눠 줄 수 없습니다. 이때는 채널 주인 계정으로 직접 로그인해서 방송해 주세요.
{% endhint %}

### 2단계. '권한 관리' 누르기

채널을 누르면 **브랜드 계정 세부정보** 화면이 열립니다.

화면 가운데 **사용자** 라고 적힌 부분 아래에 **권한 관리** 파란 버튼이 있습니다. 이 버튼을 눌러 주세요.

{% hint style="danger" %}
같은 화면 아래쪽에 **계정 삭제** 버튼이 있습니다. 이 버튼을 누르면 채널과 그동안의 영상이 모두 지워집니다. 절대 누르지 마세요.
{% endhint %}

### 3단계. 방송할 계정 초대하기

권한을 가진 사람들의 목록이 나옵니다. 다이얼로그 우상단에서 사람 모양에 **+** 가 붙은 **초대 아이콘**을 눌러 주세요. **새 사용자 추가** 창이 열립니다.

1. **이름 또는 이메일 주소 추가** 칸에, 방송에 사용할 계정의 이메일 주소를 입력합니다.
2. 역할을 고르는 곳에서 **관리자** 를 선택합니다.
3. **초대** 를 누릅니다.

역할은 이렇게 세 가지로 표시됩니다. 반드시 가운데 **관리자** 를 고르세요.

| 역할         | 방송할 수 있나요?   |
| ---------- | ------------ |
| 소유자        | 할 수 있습니다     |
| **관리자**    | **할 수 있습니다** |
| 커뮤니케이션 관리자 | 할 수 없습니다     |

### 4단계. 초대 메일에서 '초대 수락' 누르기

초대한 계정의 메일함으로 초대 메일이 갑니다. 그 메일을 열어 **초대 수락** 을 눌러 주세요.

{% hint style="warning" %}
이 단계를 빠뜨리는 분이 가장 많습니다. 초대만 보내고 수락하지 않으면 권한이 적용되지 않습니다. 앱에도 채널이 나타나지 않습니다.
{% endhint %}

### 5단계. PRISM 앱에서 확인하기

1. PRISM 앱을 열고, 방송할 곳으로 **YouTube** 를 선택합니다.
2. Google 계정으로 로그인합니다.
3. **계정 또는 브랜드 계정 선택** 화면이 나옵니다.
4. 목록에 권한을 받은 채널이 함께 보입니다. 그 채널을 선택하면 준비가 끝납니다.

{% hint style="success" %}
채널이 목록에 보이면 설정이 잘 된 것입니다. 이제 그 채널로 방송할 수 있습니다.
{% endhint %}

***

### 채널이 아직 안 보인다면

아래를 위에서부터 차례대로 확인해 주세요.

**1. 앱에서 로그아웃한 뒤 다시 로그인해 주세요.**

권한을 받기 전에 이미 로그인해 둔 상태라면, 앱이 채널 목록을 새로 불러오지 않을 수 있습니다. 로그아웃하고 다시 로그인하면 목록이 새로 채워집니다.

**2. 그 채널에서 라이브 방송을 쓸 수 있는 상태인지 확인해 주세요.**

YouTube에서 라이브 방송을 처음 신청한 채널은, 실제로 쓸 수 있게 되기까지 **최대 24시간**이 걸립니다. 그동안은 앱에 채널이 보이지 않습니다. 하루 정도 기다린 뒤 다시 확인해 주세요.

**3. 초대 수락을 했는지 확인해 주세요.**

초대받은 계정의 메일함을 열어, 초대 메일의 **초대 수락** 을 눌렀는지 확인합니다. 누르지 않았다면 권한이 적용되지 않습니다.

***

### 자주 헷갈리는 점

| 이렇게 생각하셨다면                    | 이렇게 확인해 주세요                                                                                                                         |
| ----------------------------- | ----------------------------------------------------------------------------------------------------------------------------------- |
| "YouTube 스튜디오에서 관리자 권한을 받았어요" | 스튜디오에서 준 권한은 스튜디오 안에서만 쓸 수 있습니다. 브랜드 계정 페이지에서 다시 초대받아야 합니다.                                                                         |
| "관리자 권한이 맞는데 안 돼요"            | '관리자'라는 역할 이름은 **YouTube 스튜디오**와 **Google 브랜드 계정 페이지** 두 곳에 모두 있습니다. 이 중 브랜드 계정 페이지에서 받은 관리자여야 방송할 수 있습니다. 어느 화면에서 받은 권한인지 확인해 주세요. |
| "커뮤니케이션 관리자도 관리자니까 되겠죠?"      | 방송은 할 수 없습니다. **관리자** 또는 **소유자** 여야 합니다.                                                                                            |
| "권한을 줬는데 바로 안 보여요"            | 초대 수락과 앱 재로그인이 필요합니다. 라이브 방송을 처음 신청한 채널은 최대 24시간이 걸립니다.                                                                             |
| {% endtab %}                  |                                                                                                                                     |
| {% endtabs %}                 |                                                                                                                                     |


# Configuration


# Facebook App Tracking Transparency Permission

iOS

Starting on May 1, 2024, Apple mandated a Privacy Manifest for all apps registering on the App Store. This specification focuses on user privacy by detailing the reasons for data collection by both the app itself and any third-party SDKs it utilizes.

The Facebook SDK used by the PRISM app also had to adhere to this Privacy Manifest specification. As a result, PRISM app may display **Facebook App Tracking Transparency Permission Request**.

This is also known as App Tracking Transparency (ATT), which is aimed at protecting user privacy. Depending on the user’s operating system version, the PRISM iOS app can request permissions within the app with the following guidance:

<figure><img src="https://miro.medium.com/v2/resize:fit:1400/1*m2YYoSgHMQm91AQG3vPUGA.png" alt=""><figcaption></figcaption></figure>

PRISM app may request permissions with the following guidance within the app based on the user’s OS version. If you see these guides, please carefully review each of them to grant permissions so that PRISM app can start streaming to Facebook properly.

[Mobile](/mobile/overview), [Guides](/mobile/guides), [Streaming](/mobile/guides/streaming), [Configuration](/mobile/guides/streaming/configuration)


# Setting Detailed Options for YouTube, Twitch, and Facebook

Android, iOS

A significant number of options offered by the platforms are integrated into the PRISM app. Please make use of the PRISM app for more detailed live streaming settings.

***

## Detailed options for YouTube <a href="#id-886d" id="id-886d"></a>

You can schedule live streams and configure various options provided by the YouTube platform, including category setting, enable DVR setting, stream latency setting, license setting, and more.

<figure><img src="https://miro.medium.com/v2/resize:fit:1400/1*C5v3iRztuOW6QCylBQnJpA.jpeg" alt=""><figcaption><p>Scroll the sheet to explore more options.</p></figcaption></figure>

<figure><img src="https://1019928184-files.gitbook.io/~/files/v0/b/gitbook-x-prod.appspot.com/o/spaces%2FlISC5rfB4Hnmbsjf8phq%2Fuploads%2F59GXbhSeu7JYlJNBofHn%2Fschedule.png?alt=media&amp;token=7b76049c-6326-4cdb-80d1-b2f3d429890d" alt=""><figcaption><p>You can view, create, or edit a schedule.</p></figcaption></figure>

The above image are the live stream scheduling screens for the Youtube platform. You can select a schedule and configure various options for the live stream.

Upon scheduling the live stream, you can immediately copy the link for that specific live stream to secure it. By sharing this link with your audience in advance, you can boost participation in the live broadcast.

***

## Detailed options for Facebook <a href="#c40f" id="c40f"></a>

The following image are the live streaming setting screens for the Facebook platform. You can set the title and choose the location where the live stream will be published, such as the timeline and page.

<figure><img src="https://miro.medium.com/v2/resize:fit:1400/1*q6rA2W71be6HQU3hJFBFRg.jpeg" alt=""><figcaption><p>You can set the title of the live stream.</p></figcaption></figure>

<figure><img src="https://1019928184-files.gitbook.io/~/files/v0/b/gitbook-x-prod.appspot.com/o/spaces%2FlISC5rfB4Hnmbsjf8phq%2Fuploads%2F1p15n02YLUQuU6qrPemh%2Fimage7.png?alt=media&amp;token=ffdfec80-b320-4c98-80ef-79c9ca475d20" alt=""><figcaption><p>You can choose timeline, page, and groups.</p></figcaption></figure>

If you have many pages, the list will be paginated and displayed sequentially as you scroll.

If the list of pages for live streaming is not appearing, please refer to the following post to ensure that the necessary permissions are properly set and granted.

* [Permissions settings for the PRISM app or additional settings within Facebook may be required for Facebook streaming (medium)](https://prismliveofficial.medium.com/4602-en-749cbf9e9a1e)

Additionally, PRISM app no longer supports streaming to Facebook groups due to the policy changes in Facebook’s API. For more information, please check the following article:

* [Facebook Group Streaming Discontinued](/mobile/announcement/service-disruption/facebook-group-streaming-discontinued)

***

## Detailed options for Twitch <a href="#e27e" id="e27e"></a>

The following image are the live streaming setting screens for the Twitch platform. You can configure various options provided by the Twitch platform, including game and category setting, stream language setting, content classification setting, branded content setting, emotes-only chat setting, and Followers-Only Chat setting, and more.

<figure><img src="https://miro.medium.com/v2/resize:fit:1400/1*2iKAWRlHXvICIseLRR6WvA.jpeg" alt=""><figcaption><p>Scroll the sheet to explore more options.</p></figcaption></figure>

<figure><img src="https://miro.medium.com/v2/resize:fit:1400/1*_bbRPMCwKKvsBYt34GnzhQ.jpeg" alt=""><figcaption><p>You can set games and categories, and Followers-Only Chat.</p></figcaption></figure>

The images above show the games and categories search screen as well as the Followers-Only Chat settings screen. You can enable Followers-Only Chat, which allows you to restrict chat to all or some of your followers. You can also set how long a follower must have been following before they can join the chat.

[Mobile](/mobile/overview), [Guides](/mobile/guides), [Streaming](/mobile/guides/streaming), [Configuration](/mobile/guides/streaming/configuration)


# Broadcasting Live Stream in Background

Android

At times, you may need to answer a phone call or open another app during a broadcast, or perhaps you accidentally pressed a button to open another app. The PRISM app can continue broadcasting live even when running in the background.

{% hint style="warning" %}
Due to platform OS policies, iOS apps do not support background live broadcasting.
{% endhint %}

***

For Android devices, you need to toggle a setting to activate the background broadcasting feature, as shown in the image below. Simply go to Settings, then enable the following option: **Allow display over other apps**. This will allow the live broadcast to continue uninterrupted in the background while you use other apps on your device.

<figure><img src="https://miro.medium.com/v2/resize:fit:1400/1*Yng7UqpK2BOiccxQwUpeFg.jpeg" alt=""><figcaption><p>Activating background live casting feature on Android</p></figcaption></figure>

[Mobile](/mobile/overview), [Guides](/mobile/guides), [Streaming](/mobile/guides/streaming), [Configuration](/mobile/guides/streaming/configuration)


# Setting Adaptive Bitrate

Android, iOS

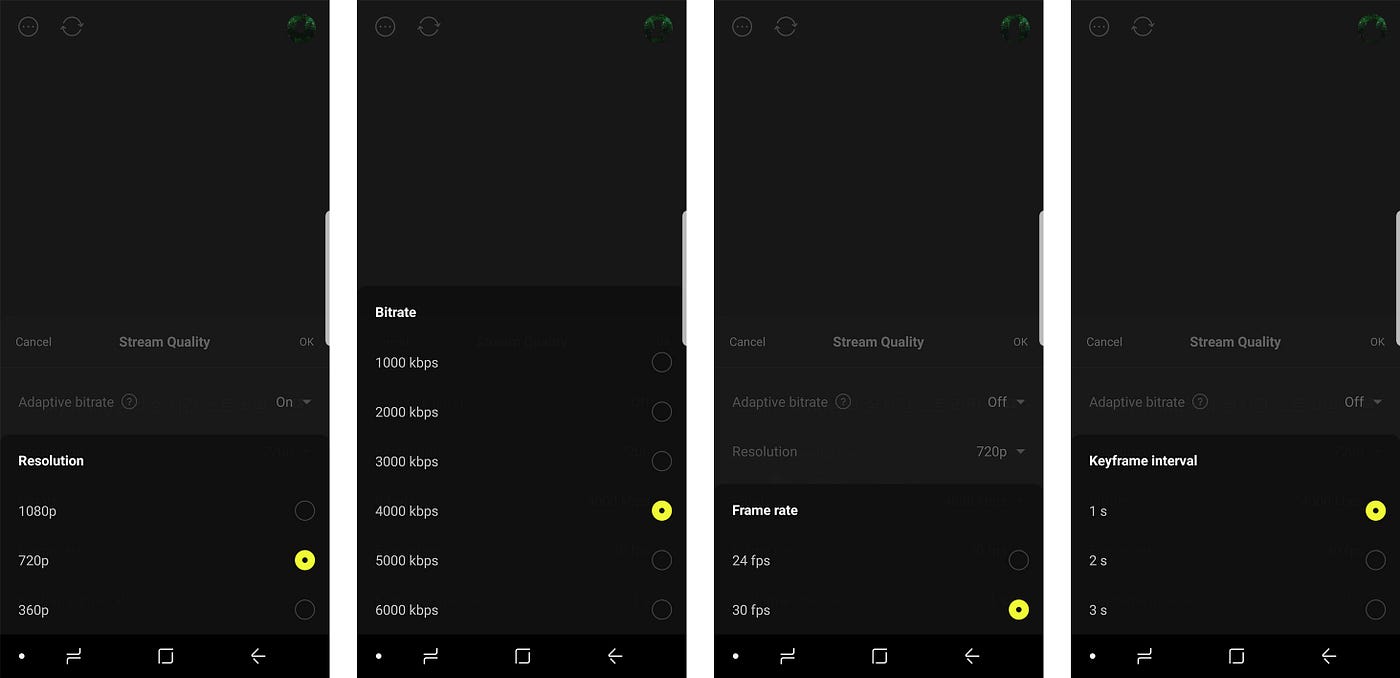
**ABP (Adaptive Bitrate Publish)** is a feature that automatically adjusts video quality based on network conditions. For example, as shown in the image below, the video quality is set to **Adaptive** by default. This ensures that broadcasts are delivered in the most optimal quality according to the current network conditions.

<figure><img src="https://1019928184-files.gitbook.io/~/files/v0/b/gitbook-x-prod.appspot.com/o/spaces%2FlISC5rfB4Hnmbsjf8phq%2Fuploads%2F32SNko407dTAWV7umkI0%2Fadaptive.png?alt=media&amp;token=60220b65-1011-4fbb-b2f9-16038cefc1bb" alt=""><figcaption></figcaption></figure>

There are four factors that determine video quality: resolution, bitrate, frame rate, and keyframe interval. You can adjust the details of these options in the settings.&#x20;

**Resolution** is the dimension of the video in pixels (width × height). As PRISM supports various resolutions such as 360p, 720p, and 1080p, simply select the resolution of your choice.&#x20;

**Bitrate** is a unit that determines how much data should be used per second. Generally, we recommend setting the bitrate to 4000kbps when the resolution is 720p, and 6000kbps when the resolution is 1080p for the highest video streaming quality.&#x20;

**Frame rate** refers to the number of frames displayed per second, typically 30fps or 60fps.&#x20;

**Keyframe interval** defines how frequently keyframes are inserted in the video stream, typically set to every 2 seconds for optimal streaming performance.

But if you are a rookie streamer, we recommend keeping your ABP on.

<figure><img src="https://miro.medium.com/v2/resize:fit:1400/1*GYu5WXZze9QRz9J2IH4e6Q.jpeg" alt=""><figcaption><p>You can adjust the details of these options in the settings.</p></figcaption></figure>

You can also adjust the maximum bitrate when adaptive bitrate is enabled. If the network is stable enough to support the set bitrate, the stream will maintain that quality. However, if the network conditions degrade, the video quality will automatically adjust.

<figure><img src="https://1019928184-files.gitbook.io/~/files/v0/b/gitbook-x-prod.appspot.com/o/spaces%2FlISC5rfB4Hnmbsjf8phq%2Fuploads%2FeGb60bu0WKPfRY4Zab1q%2Fadaptive2.png?alt=media&amp;token=e7712114-f310-41a3-951c-5df7ddb41a32" alt=""><figcaption><p>You can adjust the maximum bitrate when adaptive bitrate is enabled.</p></figcaption></figure>

[Mobile](/mobile/overview), [Guides](/mobile/guides), [Streaming](/mobile/guides/streaming), [Configuration](/mobile/guides/streaming/configuration)


# Setting Non-save Video Option while Streaming

iOS

Due to insufficient storage space, you might want the option to not save videos during live streaming in the PRISM iOS app. And it could also offer performance benefits. Not saving videos during live streaming reduces the strain on device resources that would otherwise be used for video storage, potentially causing device overheating and performance degradation.

You can use the **Temporary storage of live streaming video files** option in the Settings page to stream live video without saving it. If you don’t need to retain the recorded video after the live broadcast, utilize this feature to conduct live streaming in a better device condition.

<figure><img src="https://1019928184-files.gitbook.io/~/files/v0/b/gitbook-x-prod.appspot.com/o/spaces%2FlISC5rfB4Hnmbsjf8phq%2Fuploads%2FfxUtk9ex66c99PkYUyqf%2Fimage6.png?alt=media&amp;token=baa938c4-7165-4a1d-bc50-5187b34a20c7" alt=""><figcaption><p>You can find the option in the Settings page.</p></figcaption></figure>

[Mobile](/mobile/overview), [Guides](/mobile/guides), [Streaming](/mobile/guides/streaming), [Configuration](/mobile/guides/streaming/configuration)


# Sharing


# Sharing Live Stream Links

Android, iOS

You can share the link to your live stream before, during, or after the broadcast.&#x20;

In most cases, the link directs to the channel where you will be streaming. Specifically, for YouTube, you can obtain the dedicated live stream link when you select a scheduled live stream.

The PRISM app allows you to create or edit a schedule for YouTube. For more details, please refer to the page below:

* [Setting Detailed Options for YouTube, Twitch, and Facebook](/mobile/guides/streaming/configuration/setting-detailed-options-for-youtube-twitch-and-facebook)

<figure><img src="https://1019928184-files.gitbook.io/~/files/v0/b/gitbook-x-prod.appspot.com/o/spaces%2FlISC5rfB4Hnmbsjf8phq%2Fuploads%2F7nn1RH8DJkU2qrnjtAj1%2Fshare1.jpg?alt=media&amp;token=71efc6e2-68f2-4732-bd2c-0dd1b874bfe4" alt=""><figcaption><p>Share a link before the live stream.</p></figcaption></figure>

<figure><img src="https://1019928184-files.gitbook.io/~/files/v0/b/gitbook-x-prod.appspot.com/o/spaces%2FlISC5rfB4Hnmbsjf8phq%2Fuploads%2FNQ7bwiYRzDlpjwNcOy3l%2Fshare2.jpg?alt=media&amp;token=c194ce7e-77eb-4595-a82a-19c1863826d5" alt=""><figcaption><p>Share a link during the live stream.</p></figcaption></figure>

<figure><img src="https://1019928184-files.gitbook.io/~/files/v0/b/gitbook-x-prod.appspot.com/o/spaces%2FlISC5rfB4Hnmbsjf8phq%2Fuploads%2FYuPCFjOoW8fiSnm4RoTw%2Fshare3.jpg?alt=media&amp;token=9b61412e-9190-47ad-a2e8-5f18959b13f5" alt=""><figcaption><p>Share a link after the live stream.</p></figcaption></figure>

[Mobile](/mobile/overview), [Guides](/mobile/guides), [Streaming](/mobile/guides/streaming), [Sharing](/mobile/guides/streaming/sharing)


# RTMP


# Using Custom RTMP

Android, iOS

Nowadays a lot of PRISM users are streaming to Kick.com using the Custom RTMP feature.

Unfortunately, we are not yet able to support platform login based integration into Kick.com. For that we need their public API as it is not yet supported.

But we’re working on improving this, so expect good news soon. And we made a guide for you to use Custom RTMP function in PRISM mobile app.

***

## A comprehensive guide on using custom RTMP instead of platform logins <a href="#id-9df2" id="id-9df2"></a>

{% embed url="<https://www.youtube.com/watch?v=eqZkxFox3Co>" %}

[Mobile](/mobile/overview),  [Guides](/mobile/guides),  [Streaming](/mobile/guides/streaming), [RTMP](/mobile/guides/streaming/rtmp)


# Connecting Facebook via RTMP

Android, iOS

**RTMP (Real-Time Messaging Protocol)** is a protocol used to transmit video, audio, and data from the PRISM app to streaming platform servers, requiring both a stream URL and a stream key.

The PRISM app support a login-based method for Facebook. However, You may rarely experience login issues within PRISM app with various reasons. Most login failures are resolved within a few hours, you might want to connect temporary while than.&#x20;

{% hint style="warning" %}
A manual RTMP connection does not support information such as chat and number of viewers on screen.\
Additionally, a PC is required to connect and start live streaming on Facebook via RTMP, as it requires access to the Facebook Live Dashboard.
{% endhint %}

***

To connect Facebook via RTMP, follow the instructions below.

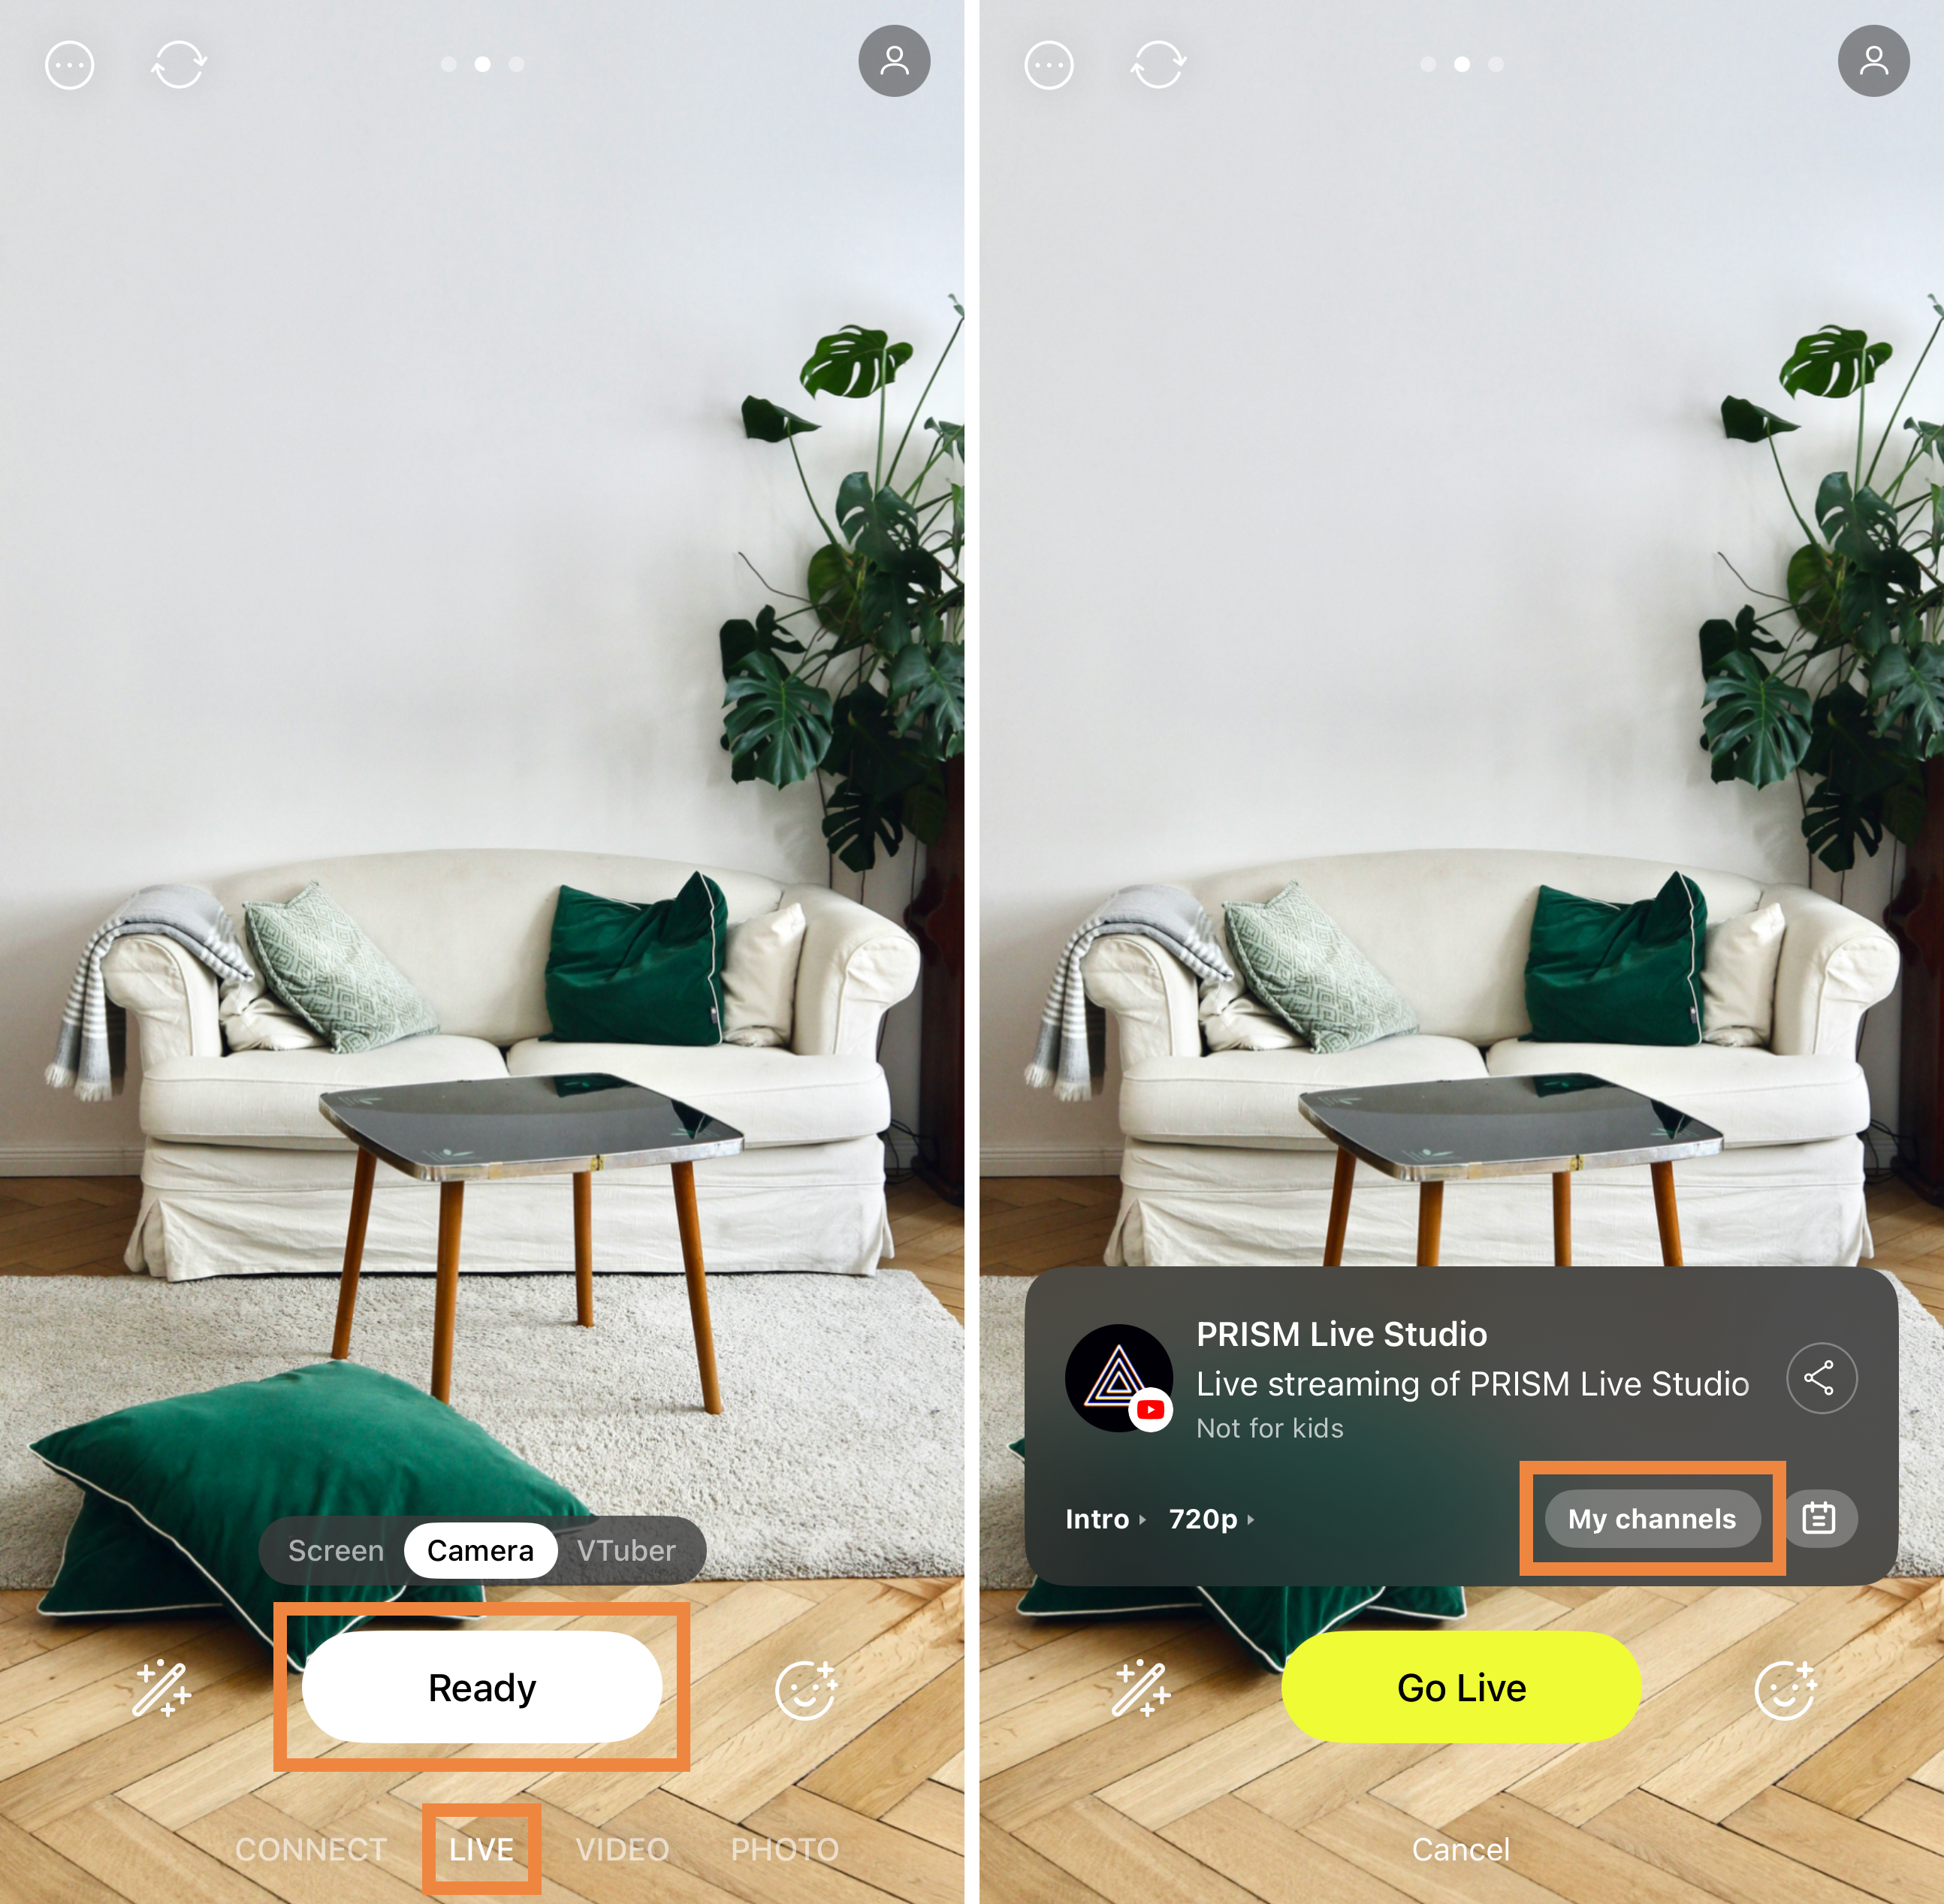
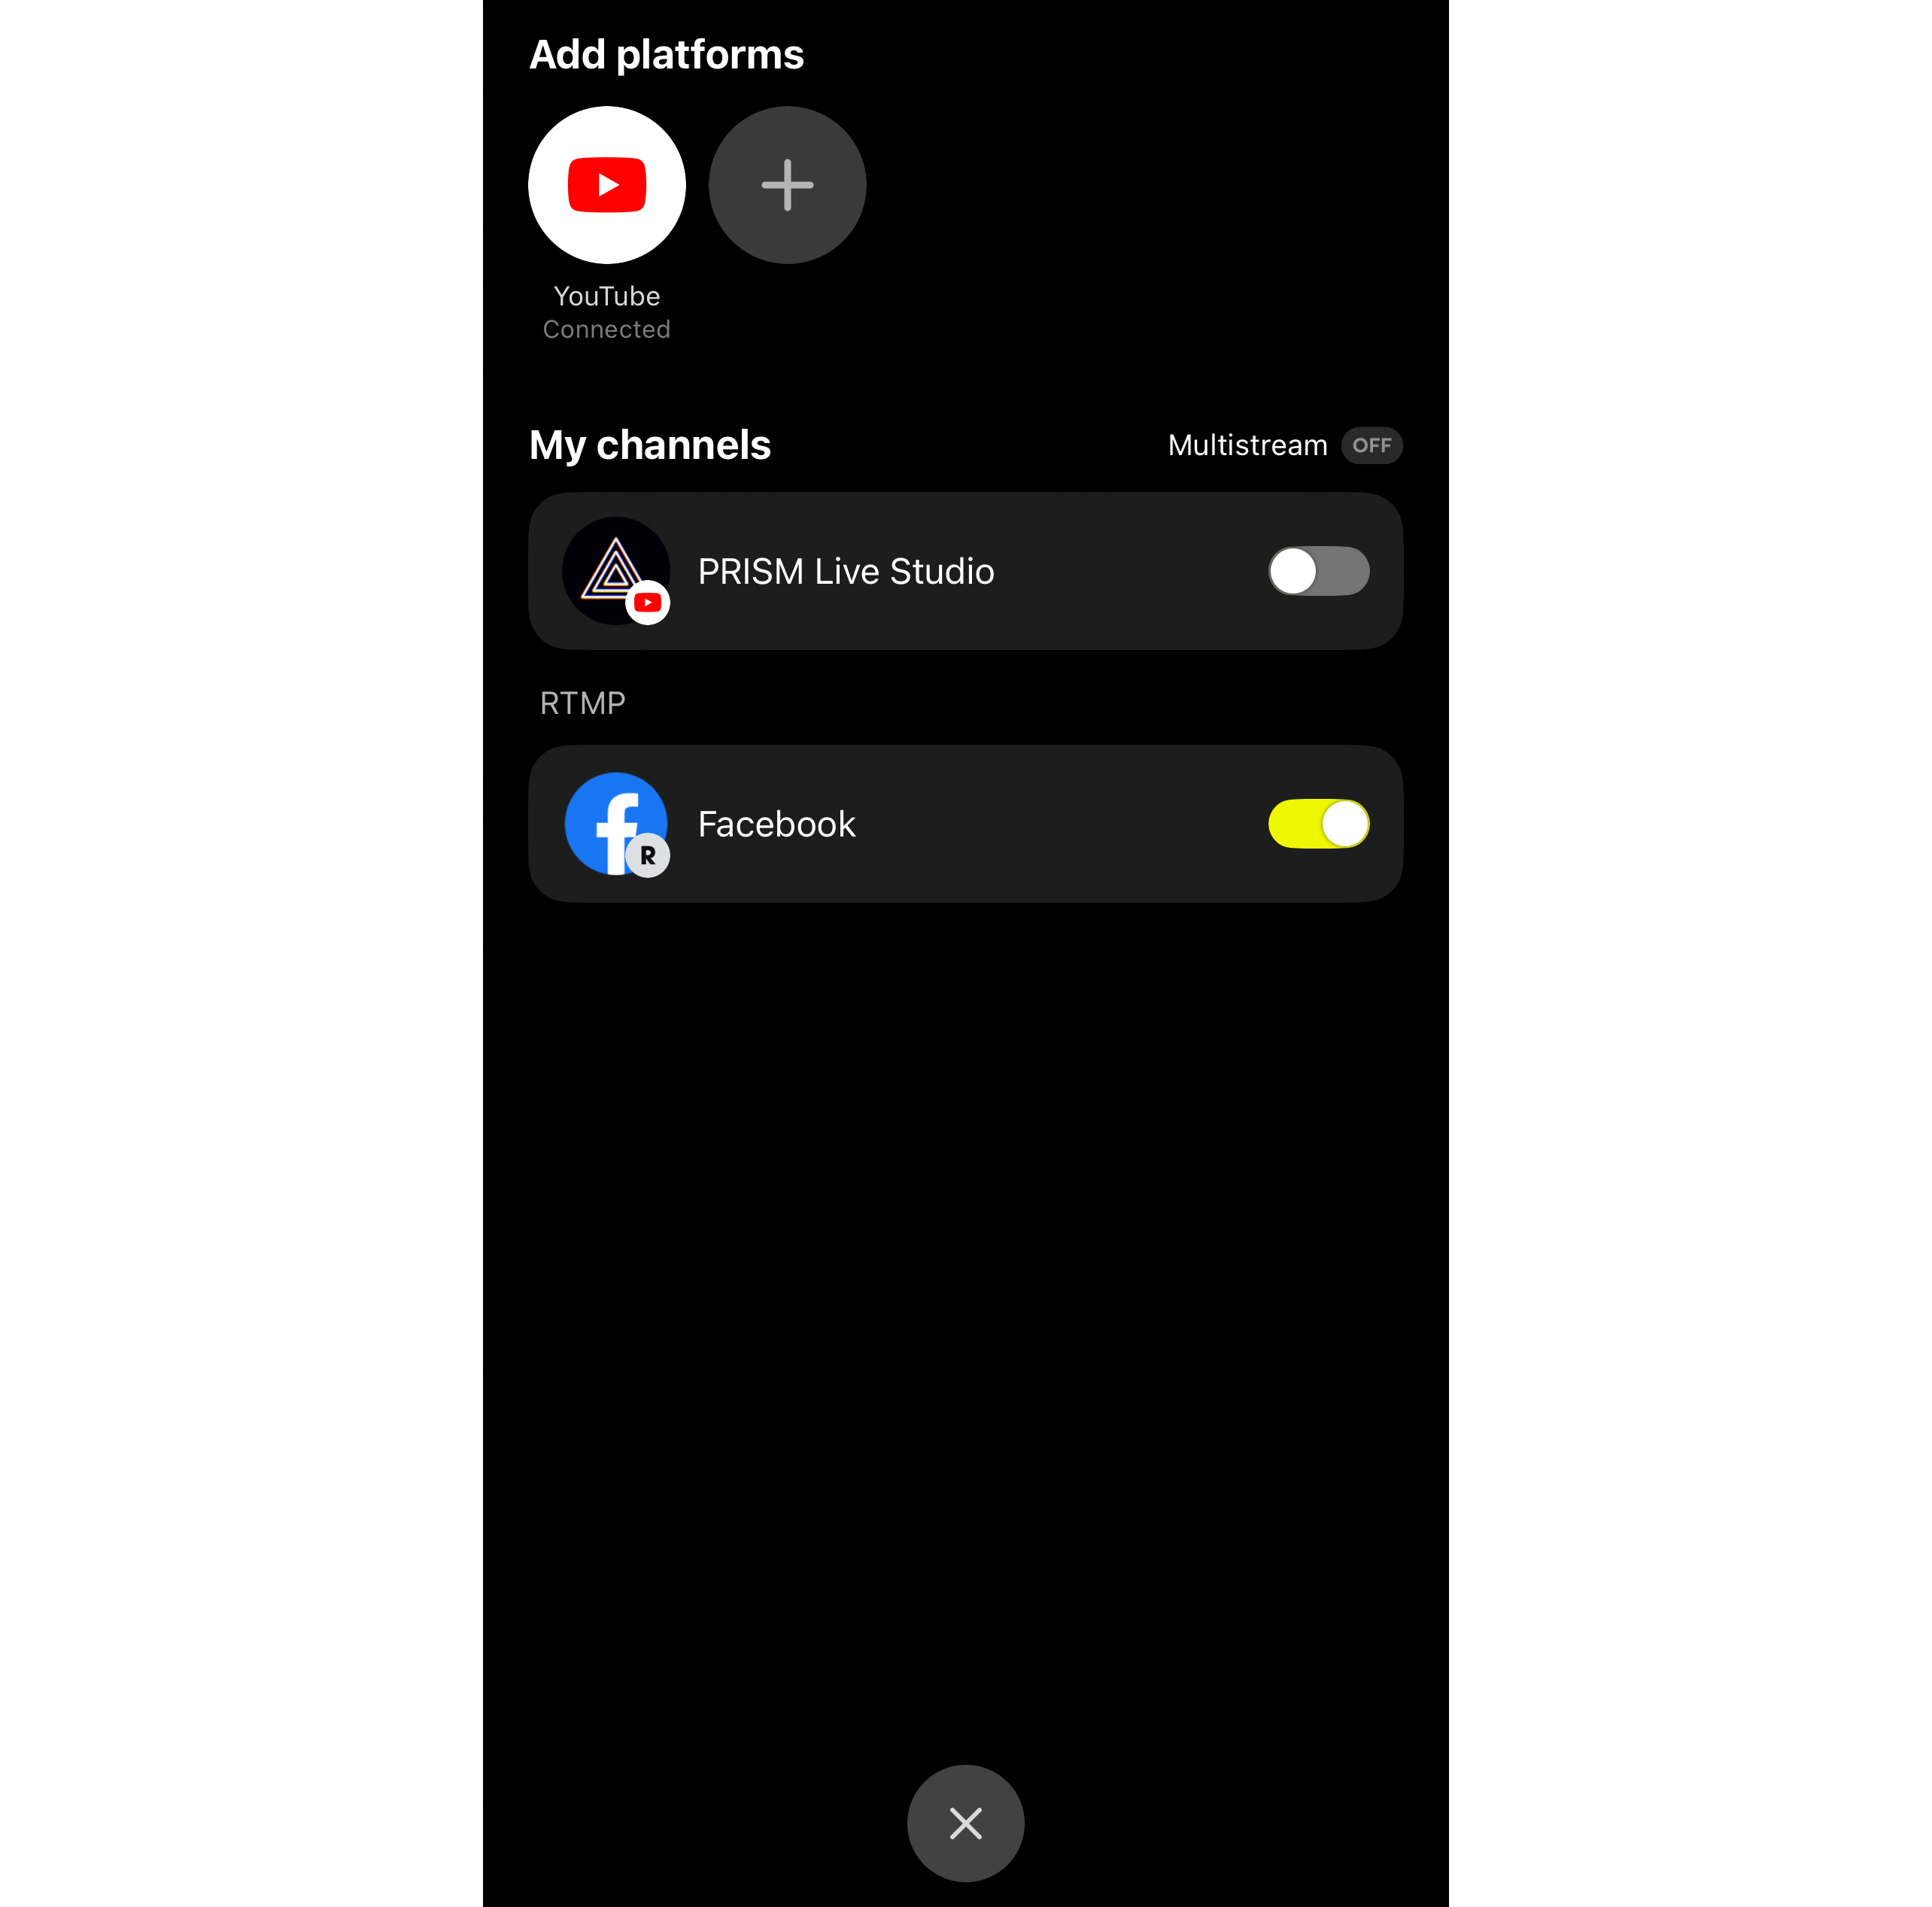
**Step 1: In the LIVE tab, click the Ready button and go to My channels.**

<figure><img src="https://1019928184-files.gitbook.io/~/files/v0/b/gitbook-x-prod.appspot.com/o/spaces%2FlISC5rfB4Hnmbsjf8phq%2Fuploads%2Fjh2y9VJ16qoXP7W45mB1%2Ffacebookrtmp1.png?alt=media&amp;token=0b9a597d-c67b-418d-a5c5-8aa245689713" alt=""><figcaption><p>In the <strong>LIVE</strong> tab, click the <strong>Ready</strong> button and go to <strong>My channels.</strong></p></figcaption></figure>

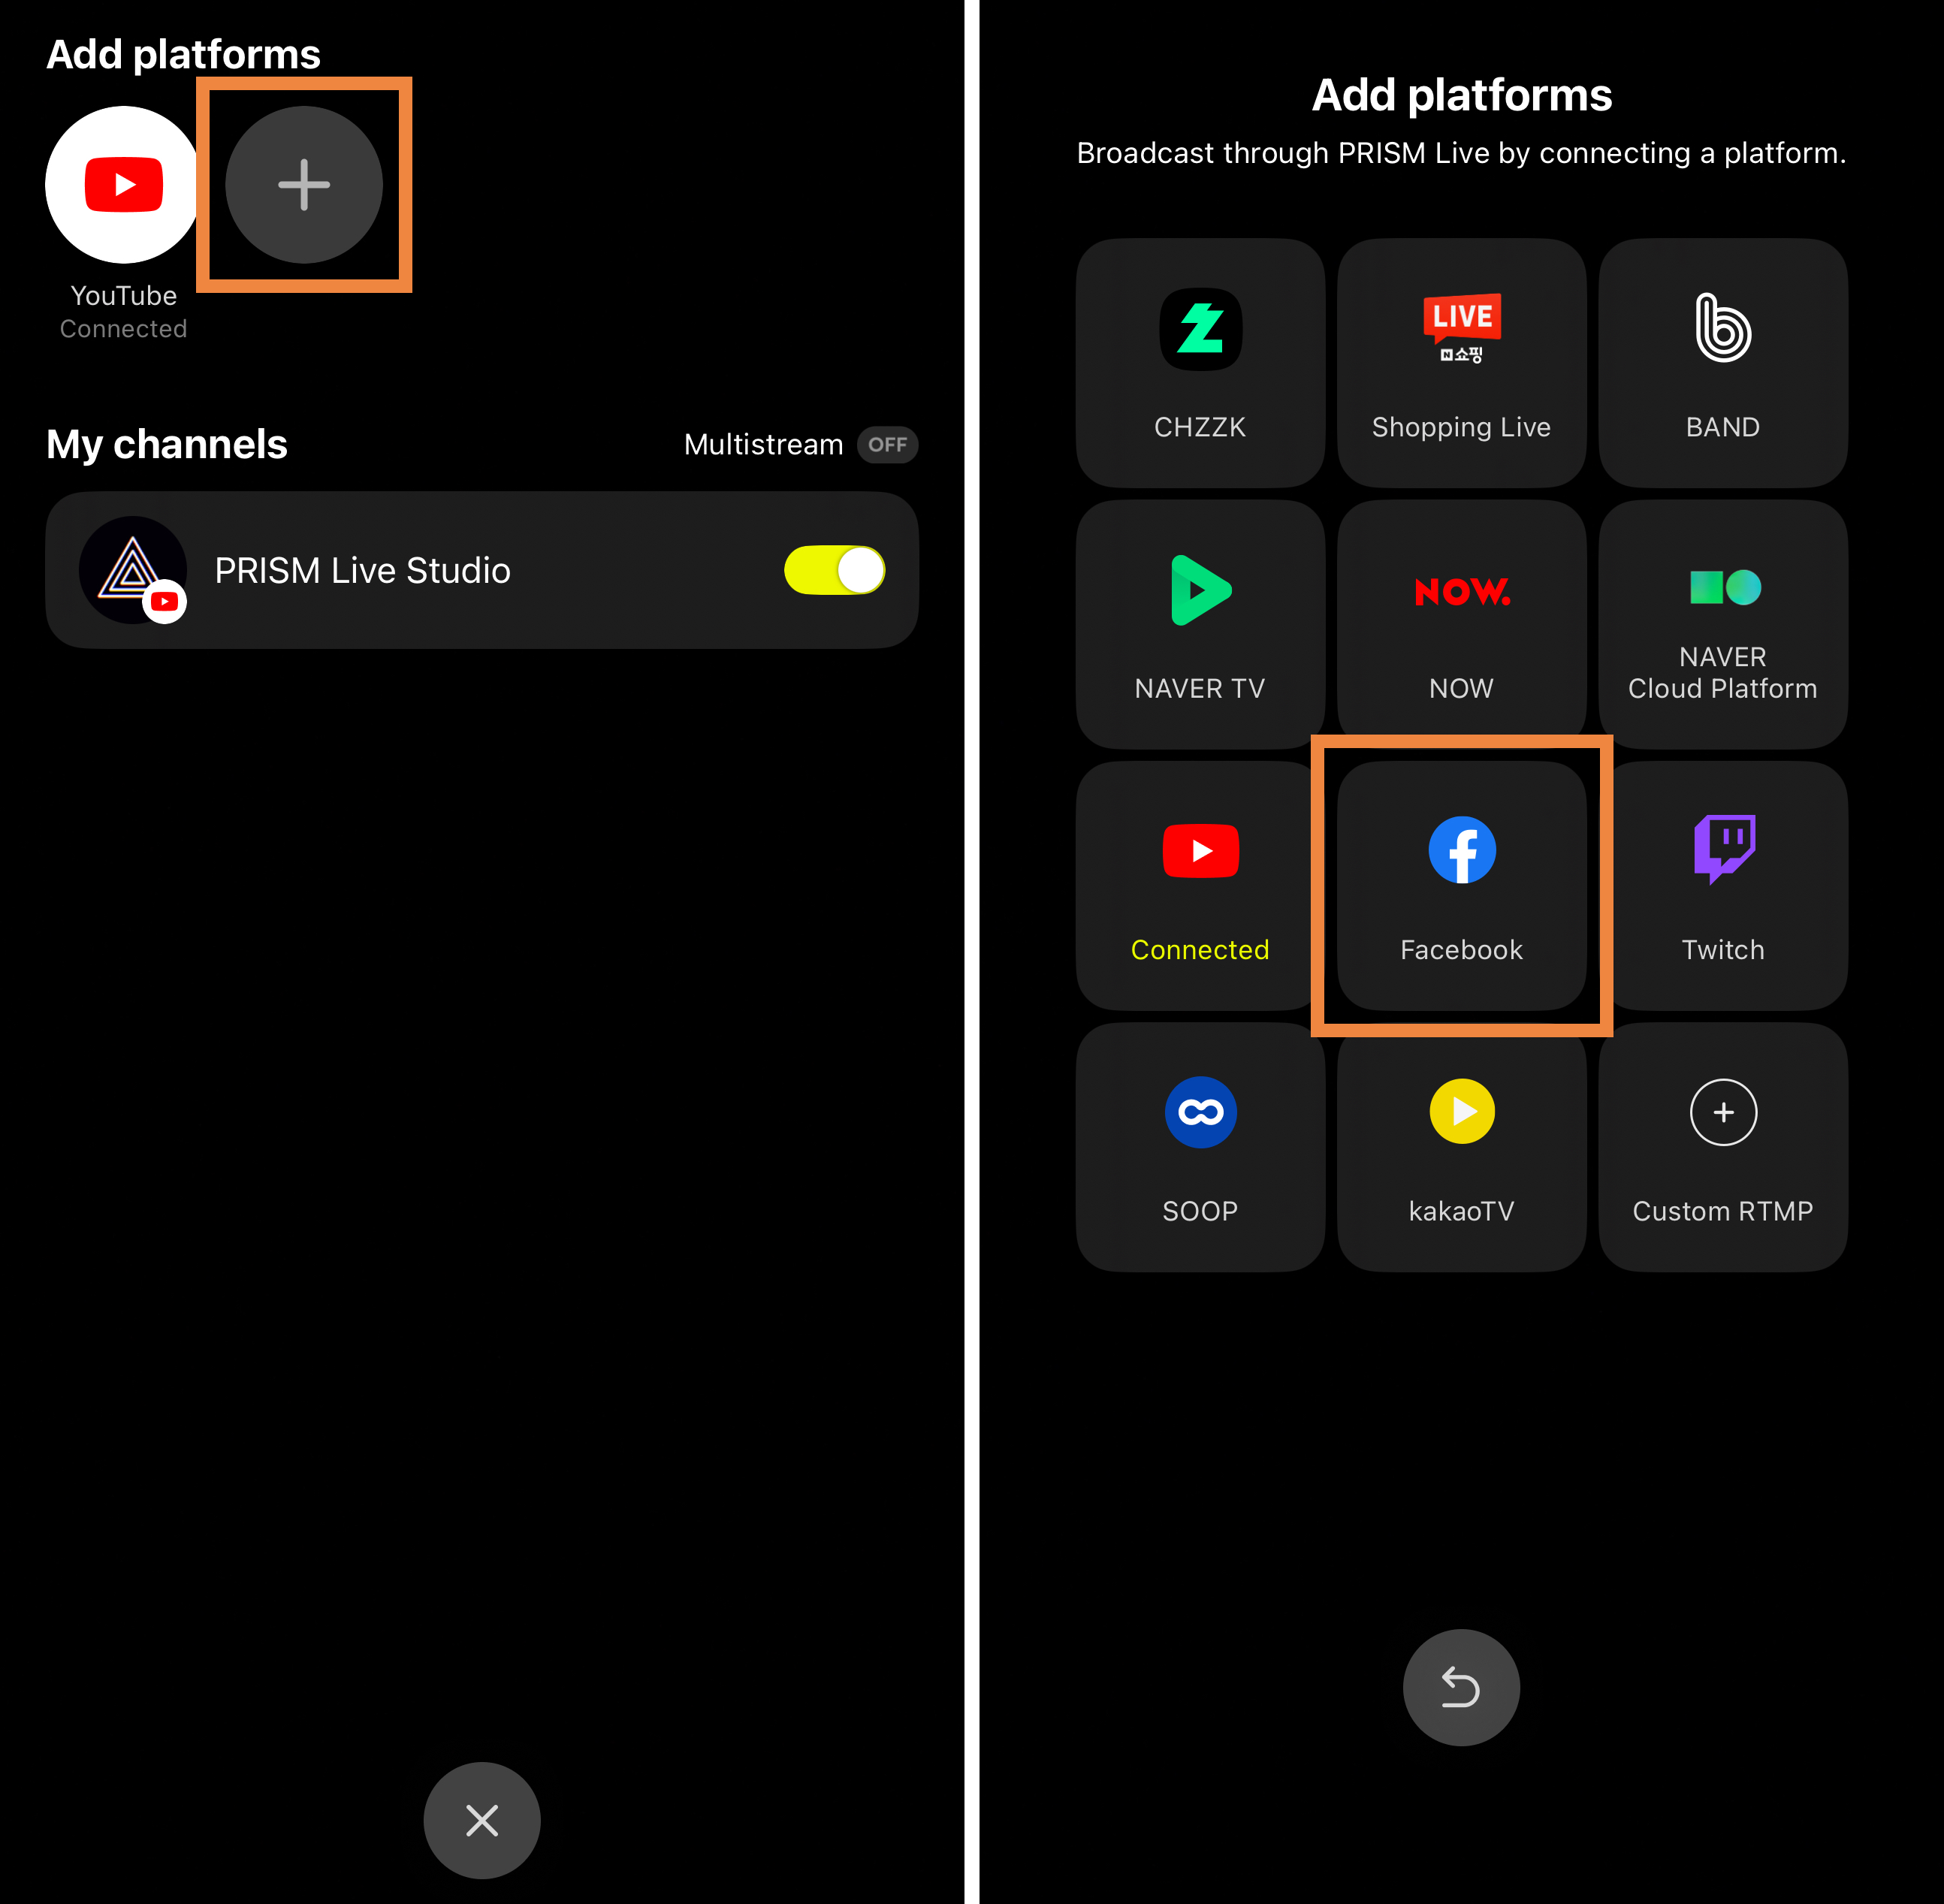
**Step 2: Click the Plus (+) button and select Facebook.**

<figure><img src="https://1019928184-files.gitbook.io/~/files/v0/b/gitbook-x-prod.appspot.com/o/spaces%2FlISC5rfB4Hnmbsjf8phq%2Fuploads%2FPxQRLkYJj85ma0gnmzqw%2Ffacebookrtmp2.png?alt=media&amp;token=978243df-39f3-4f32-a3d9-dcc563b350dd" alt=""><figcaption><p>Click the <strong>Plus (+)</strong> button and select <strong>Facebook.</strong></p></figcaption></figure>

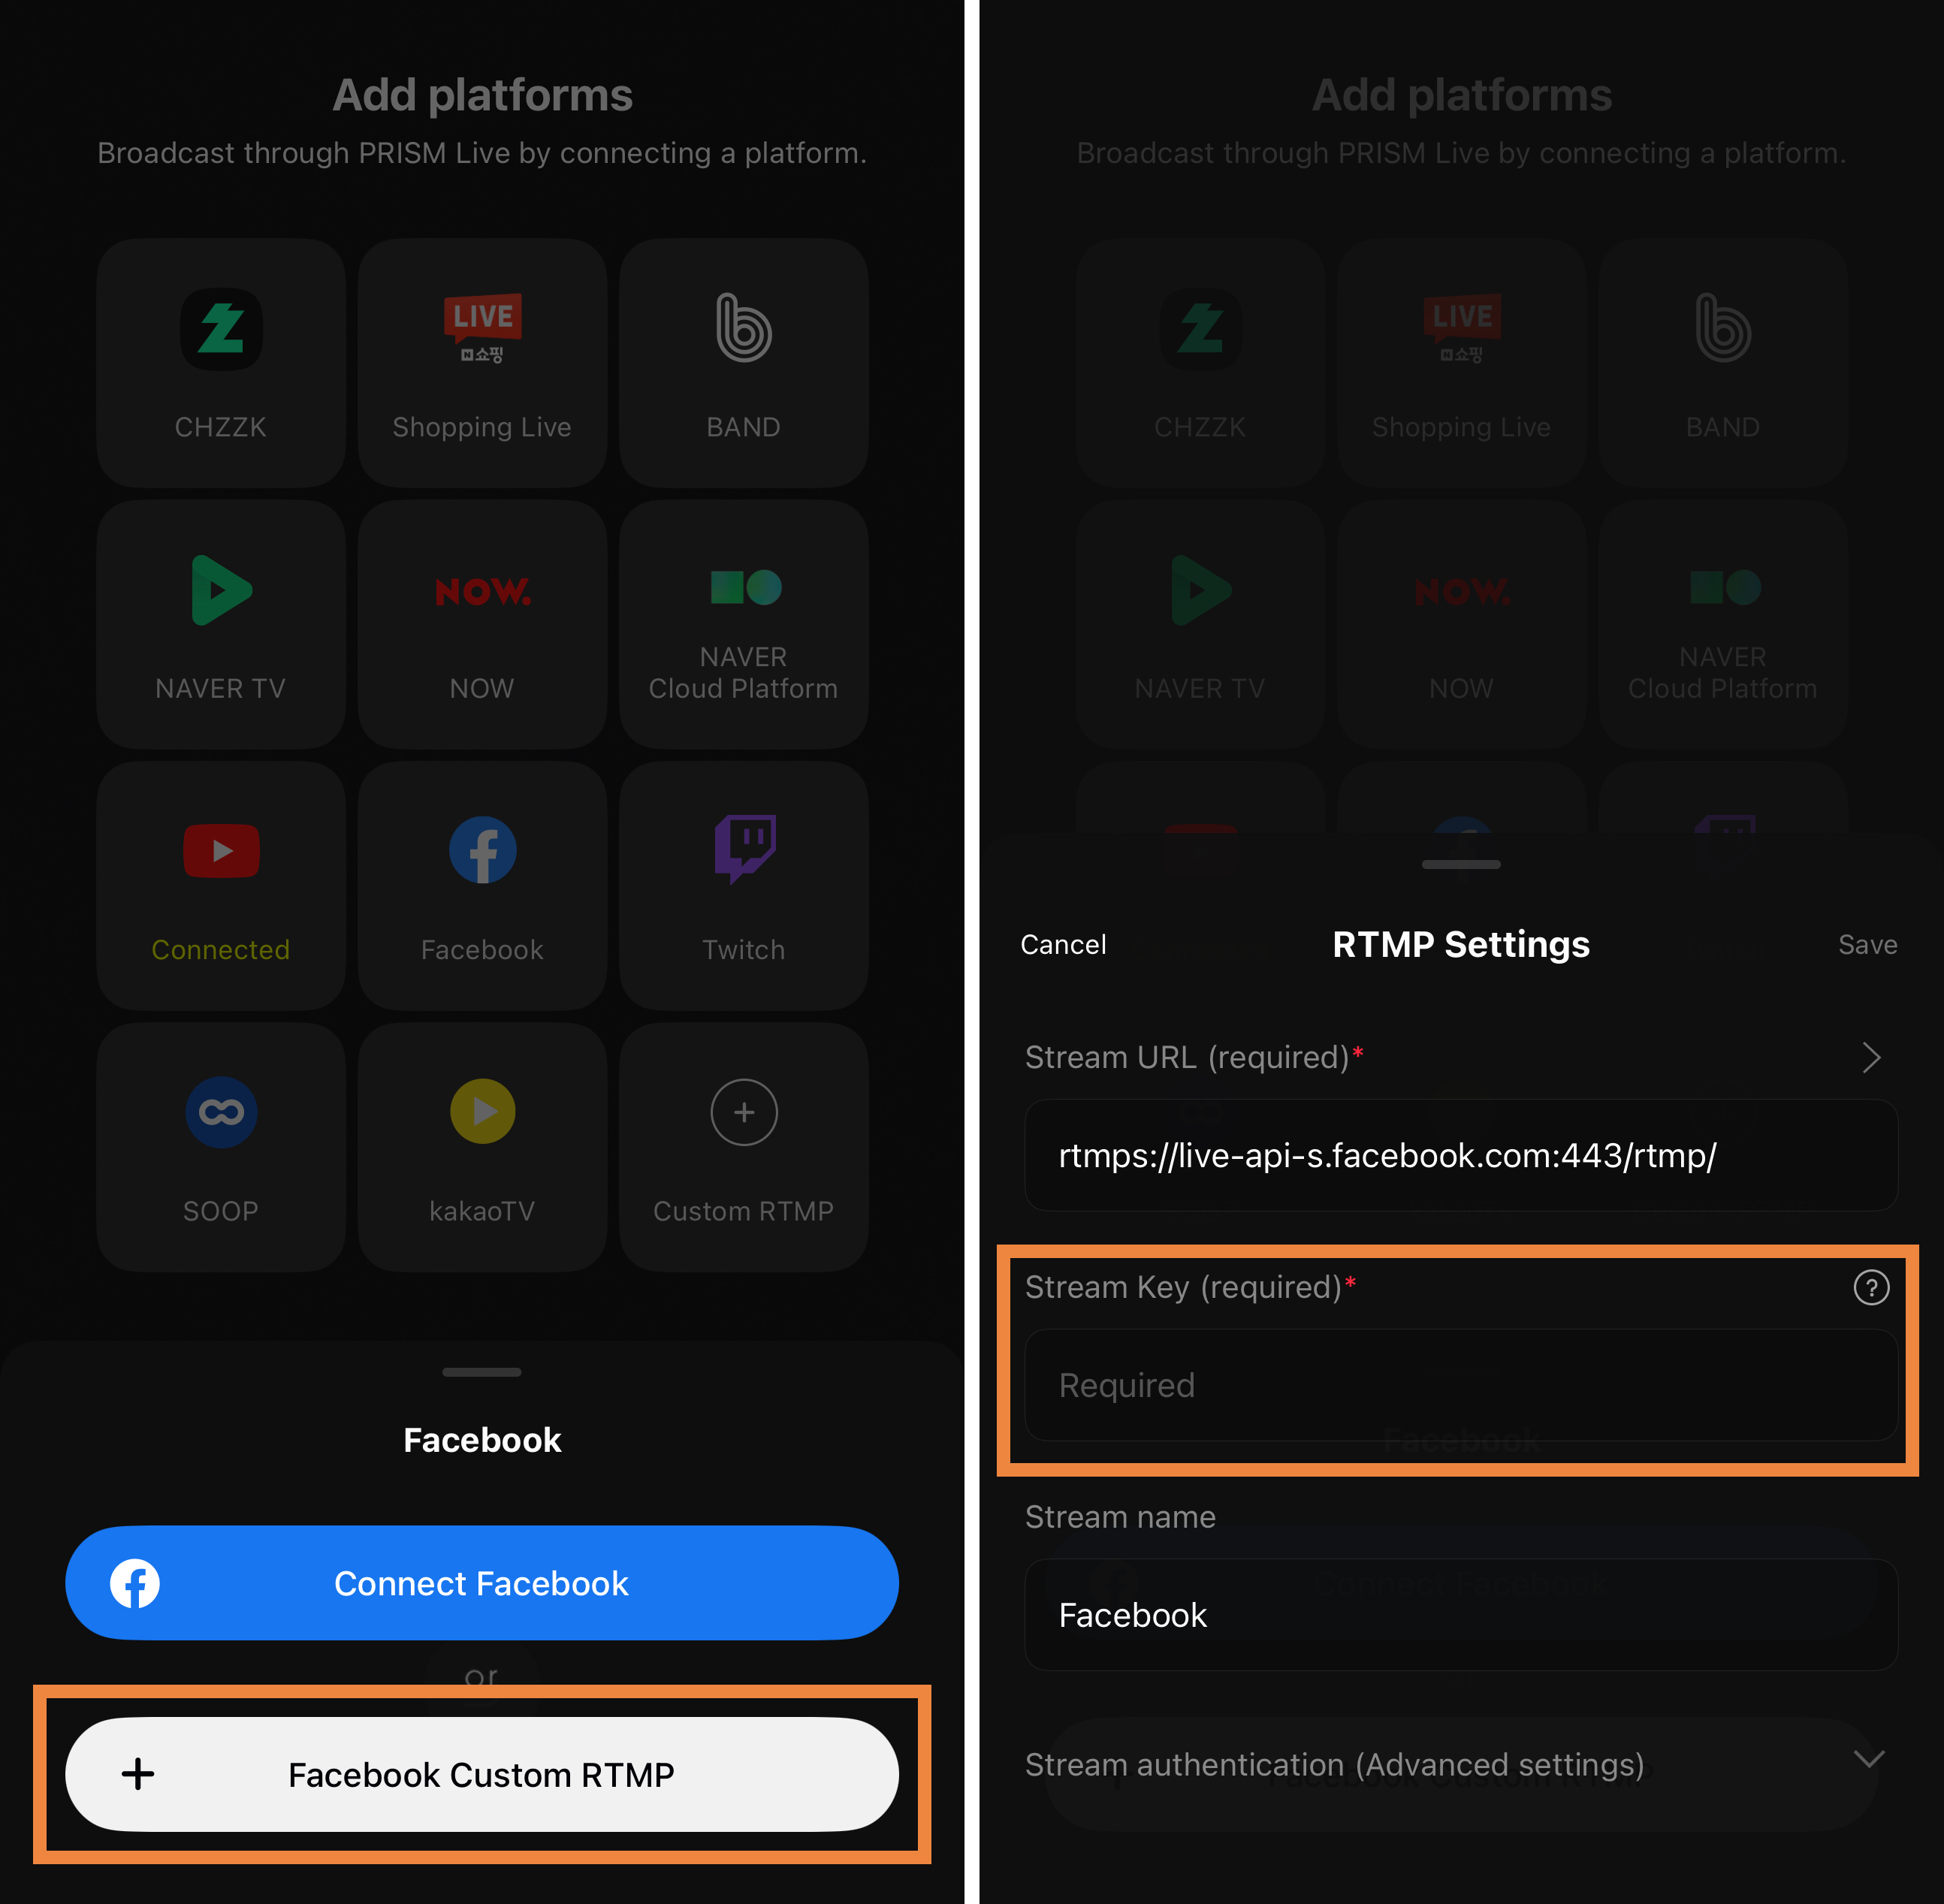
**Step 3: Select Facebook Custom RTMP and enter the Stream Key from Facebook Live Dashboard.**\
The Stream URL will be automatically filled using the RTMP preset, but you must enter your own Stream Key from Facebook. Instructions on how to retrieve the Stream Key are provided below:

* [#getting-stream-key-of-facebook](#getting-stream-key-of-facebook "mention")

Once you’ve entered the Stream Key, click the **Save** button to complete the process.

<figure><img src="https://1019928184-files.gitbook.io/~/files/v0/b/gitbook-x-prod.appspot.com/o/spaces%2FlISC5rfB4Hnmbsjf8phq%2Fuploads%2FgcWx9tBK9hjqopfjPXzC%2Ffacebookrtmp3.png?alt=media&amp;token=7c30b5fa-a16e-4b1d-a253-71b12b0623ea" alt=""><figcaption><p>Select <strong>Facebook Custom RTMP</strong> and enter the <strong>Stream Key.</strong></p></figcaption></figure>

<figure><img src="https://1019928184-files.gitbook.io/~/files/v0/b/gitbook-x-prod.appspot.com/o/spaces%2FlISC5rfB4Hnmbsjf8phq%2Fuploads%2FVVcIjQbBoUOX9w0ap97u%2Ffacebookrtmp5.png?alt=media&amp;token=2e18c63f-2751-4bfc-8743-25c12fab4706" alt=""><figcaption><p>You can now start broadcasting to Facebook.</p></figcaption></figure>

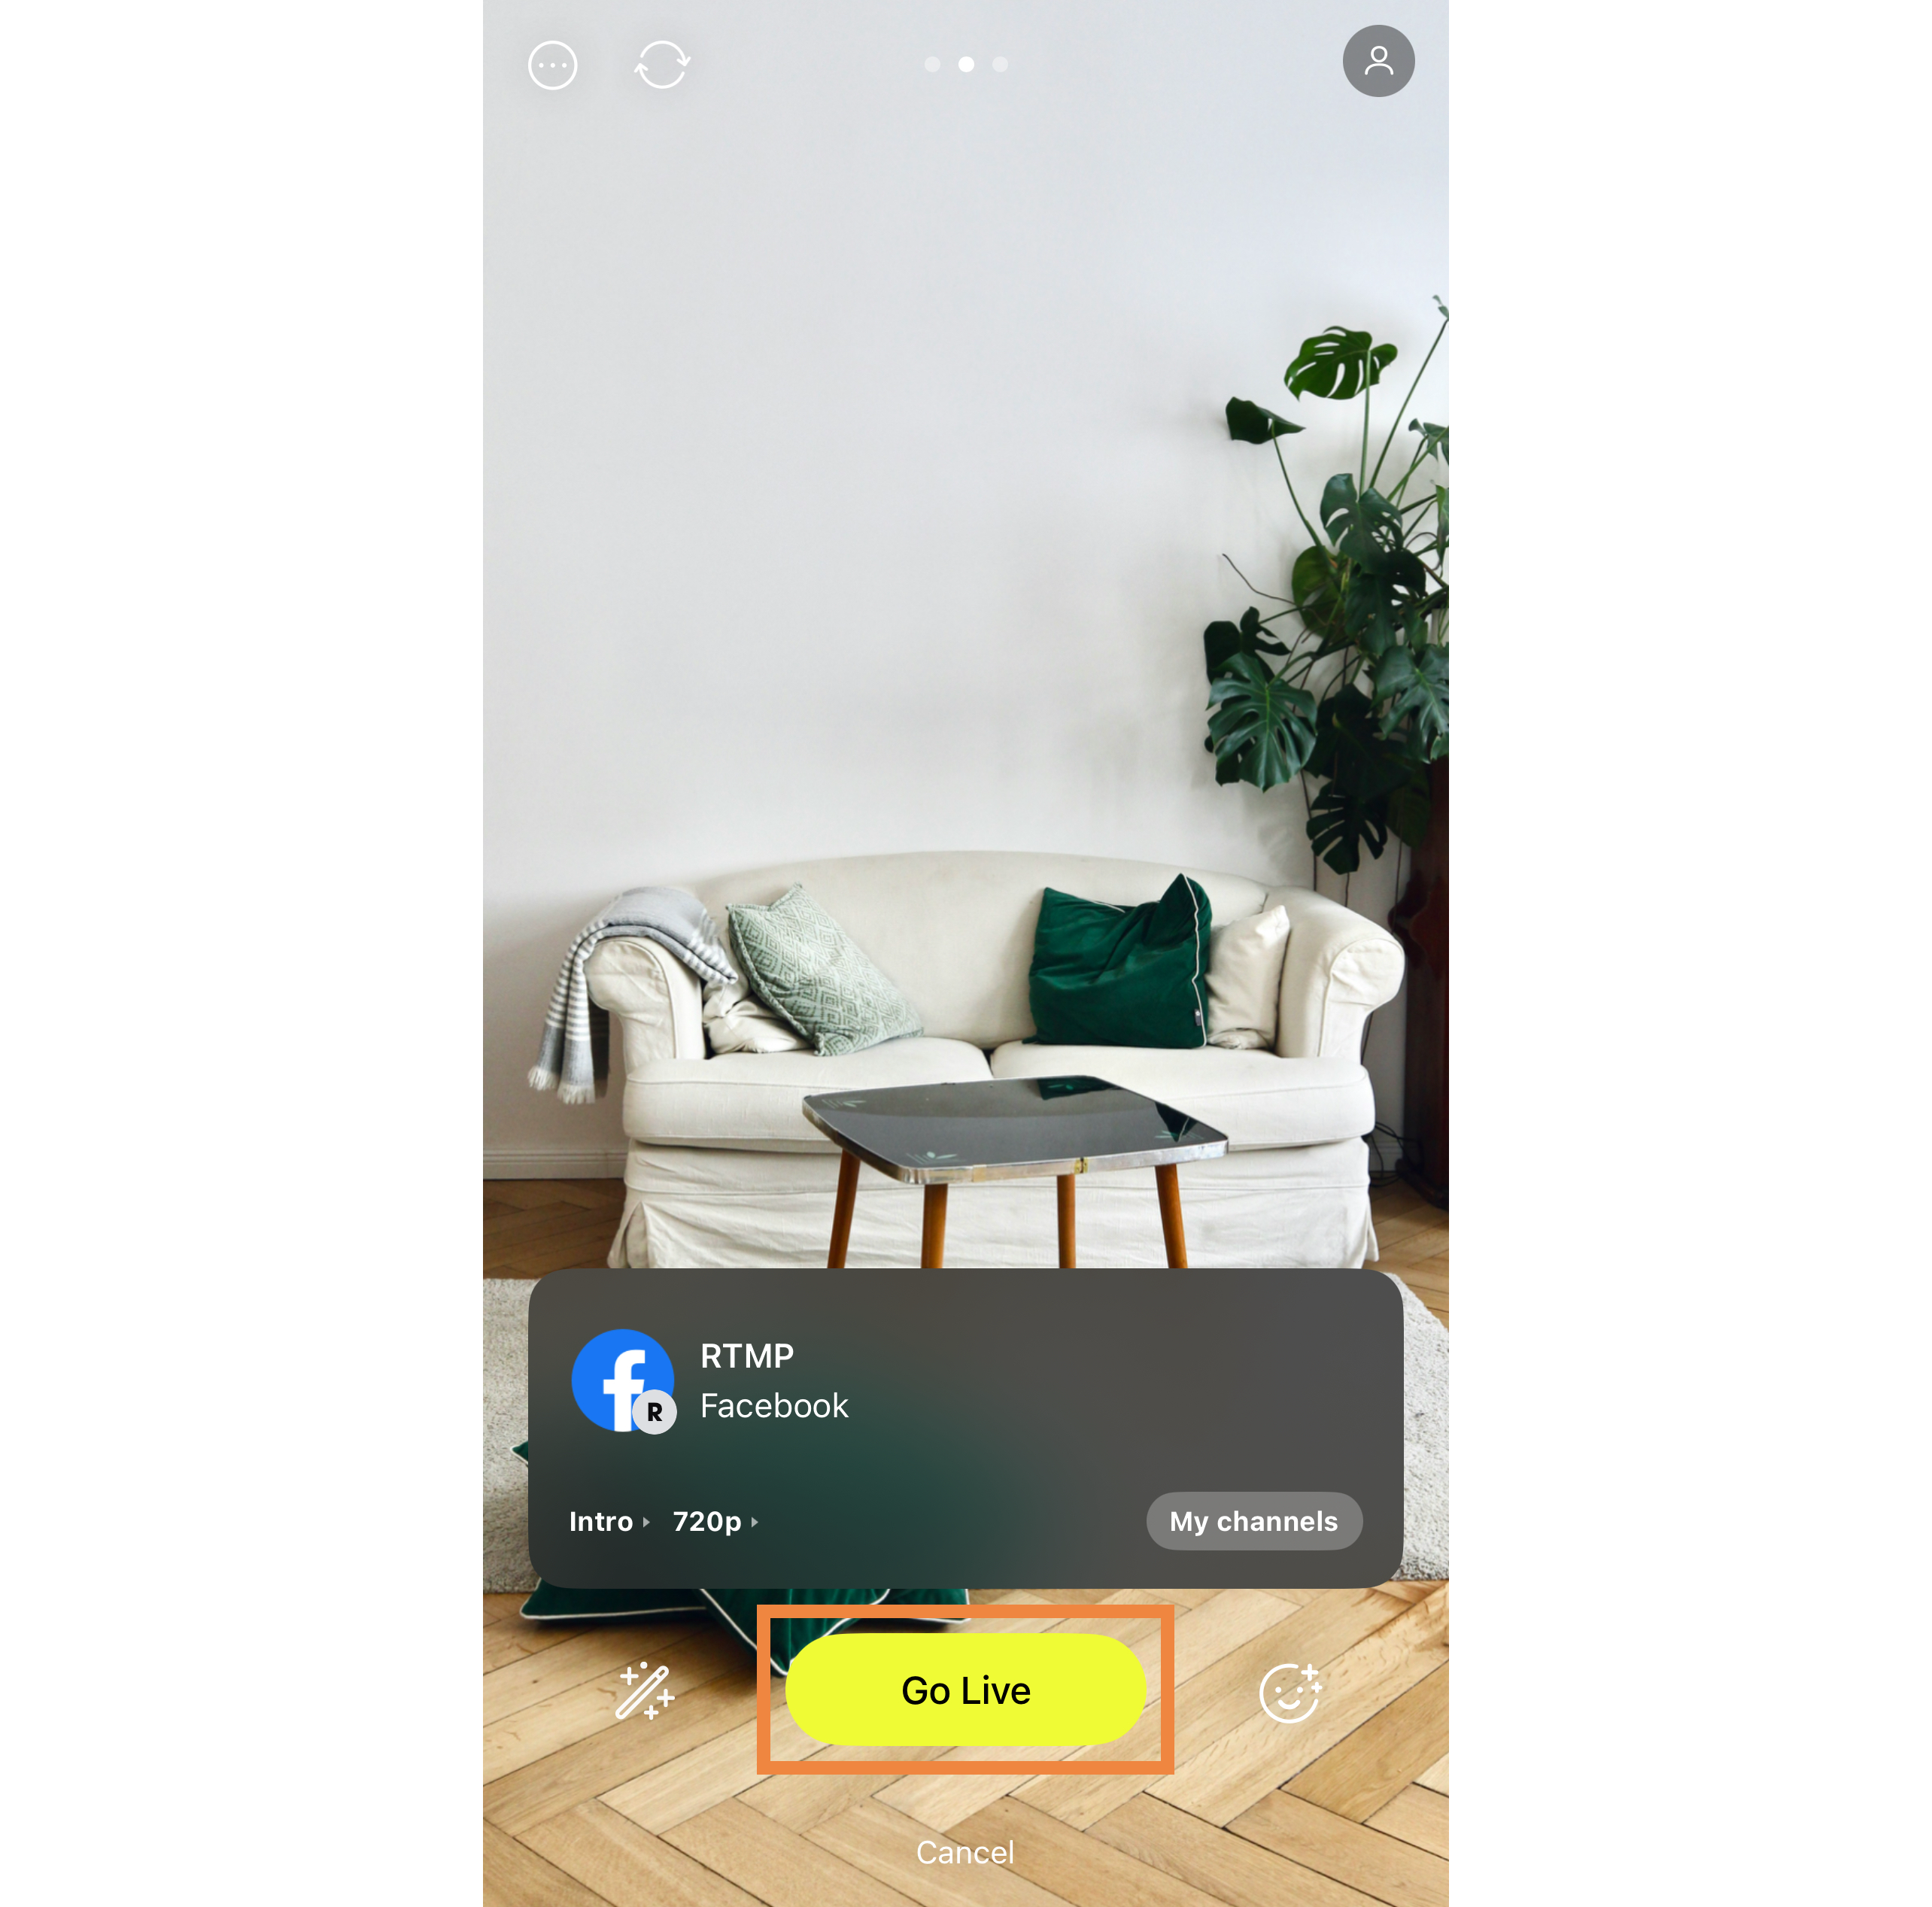
To start live streaming on Facebook with RTMP, first, click **Go Live** in the PRISM app, then go to the Facebook Live Producer website and log in to your account. You can visit the website via the link below on your PC:

* <https://www.facebook.com/live/producer/>

<figure><img src="https://1019928184-files.gitbook.io/~/files/v0/b/gitbook-x-prod.appspot.com/o/spaces%2FlISC5rfB4Hnmbsjf8phq%2Fuploads%2F6AsI9yWADgWgBVML9Nri%2Ffacebookrtmp6.png?alt=media&amp;token=cfbd4fe0-0f4d-4450-9ace-5d1dd419409d" alt=""><figcaption><p>Click <strong>Go Live</strong> in the PRISM app.</p></figcaption></figure>

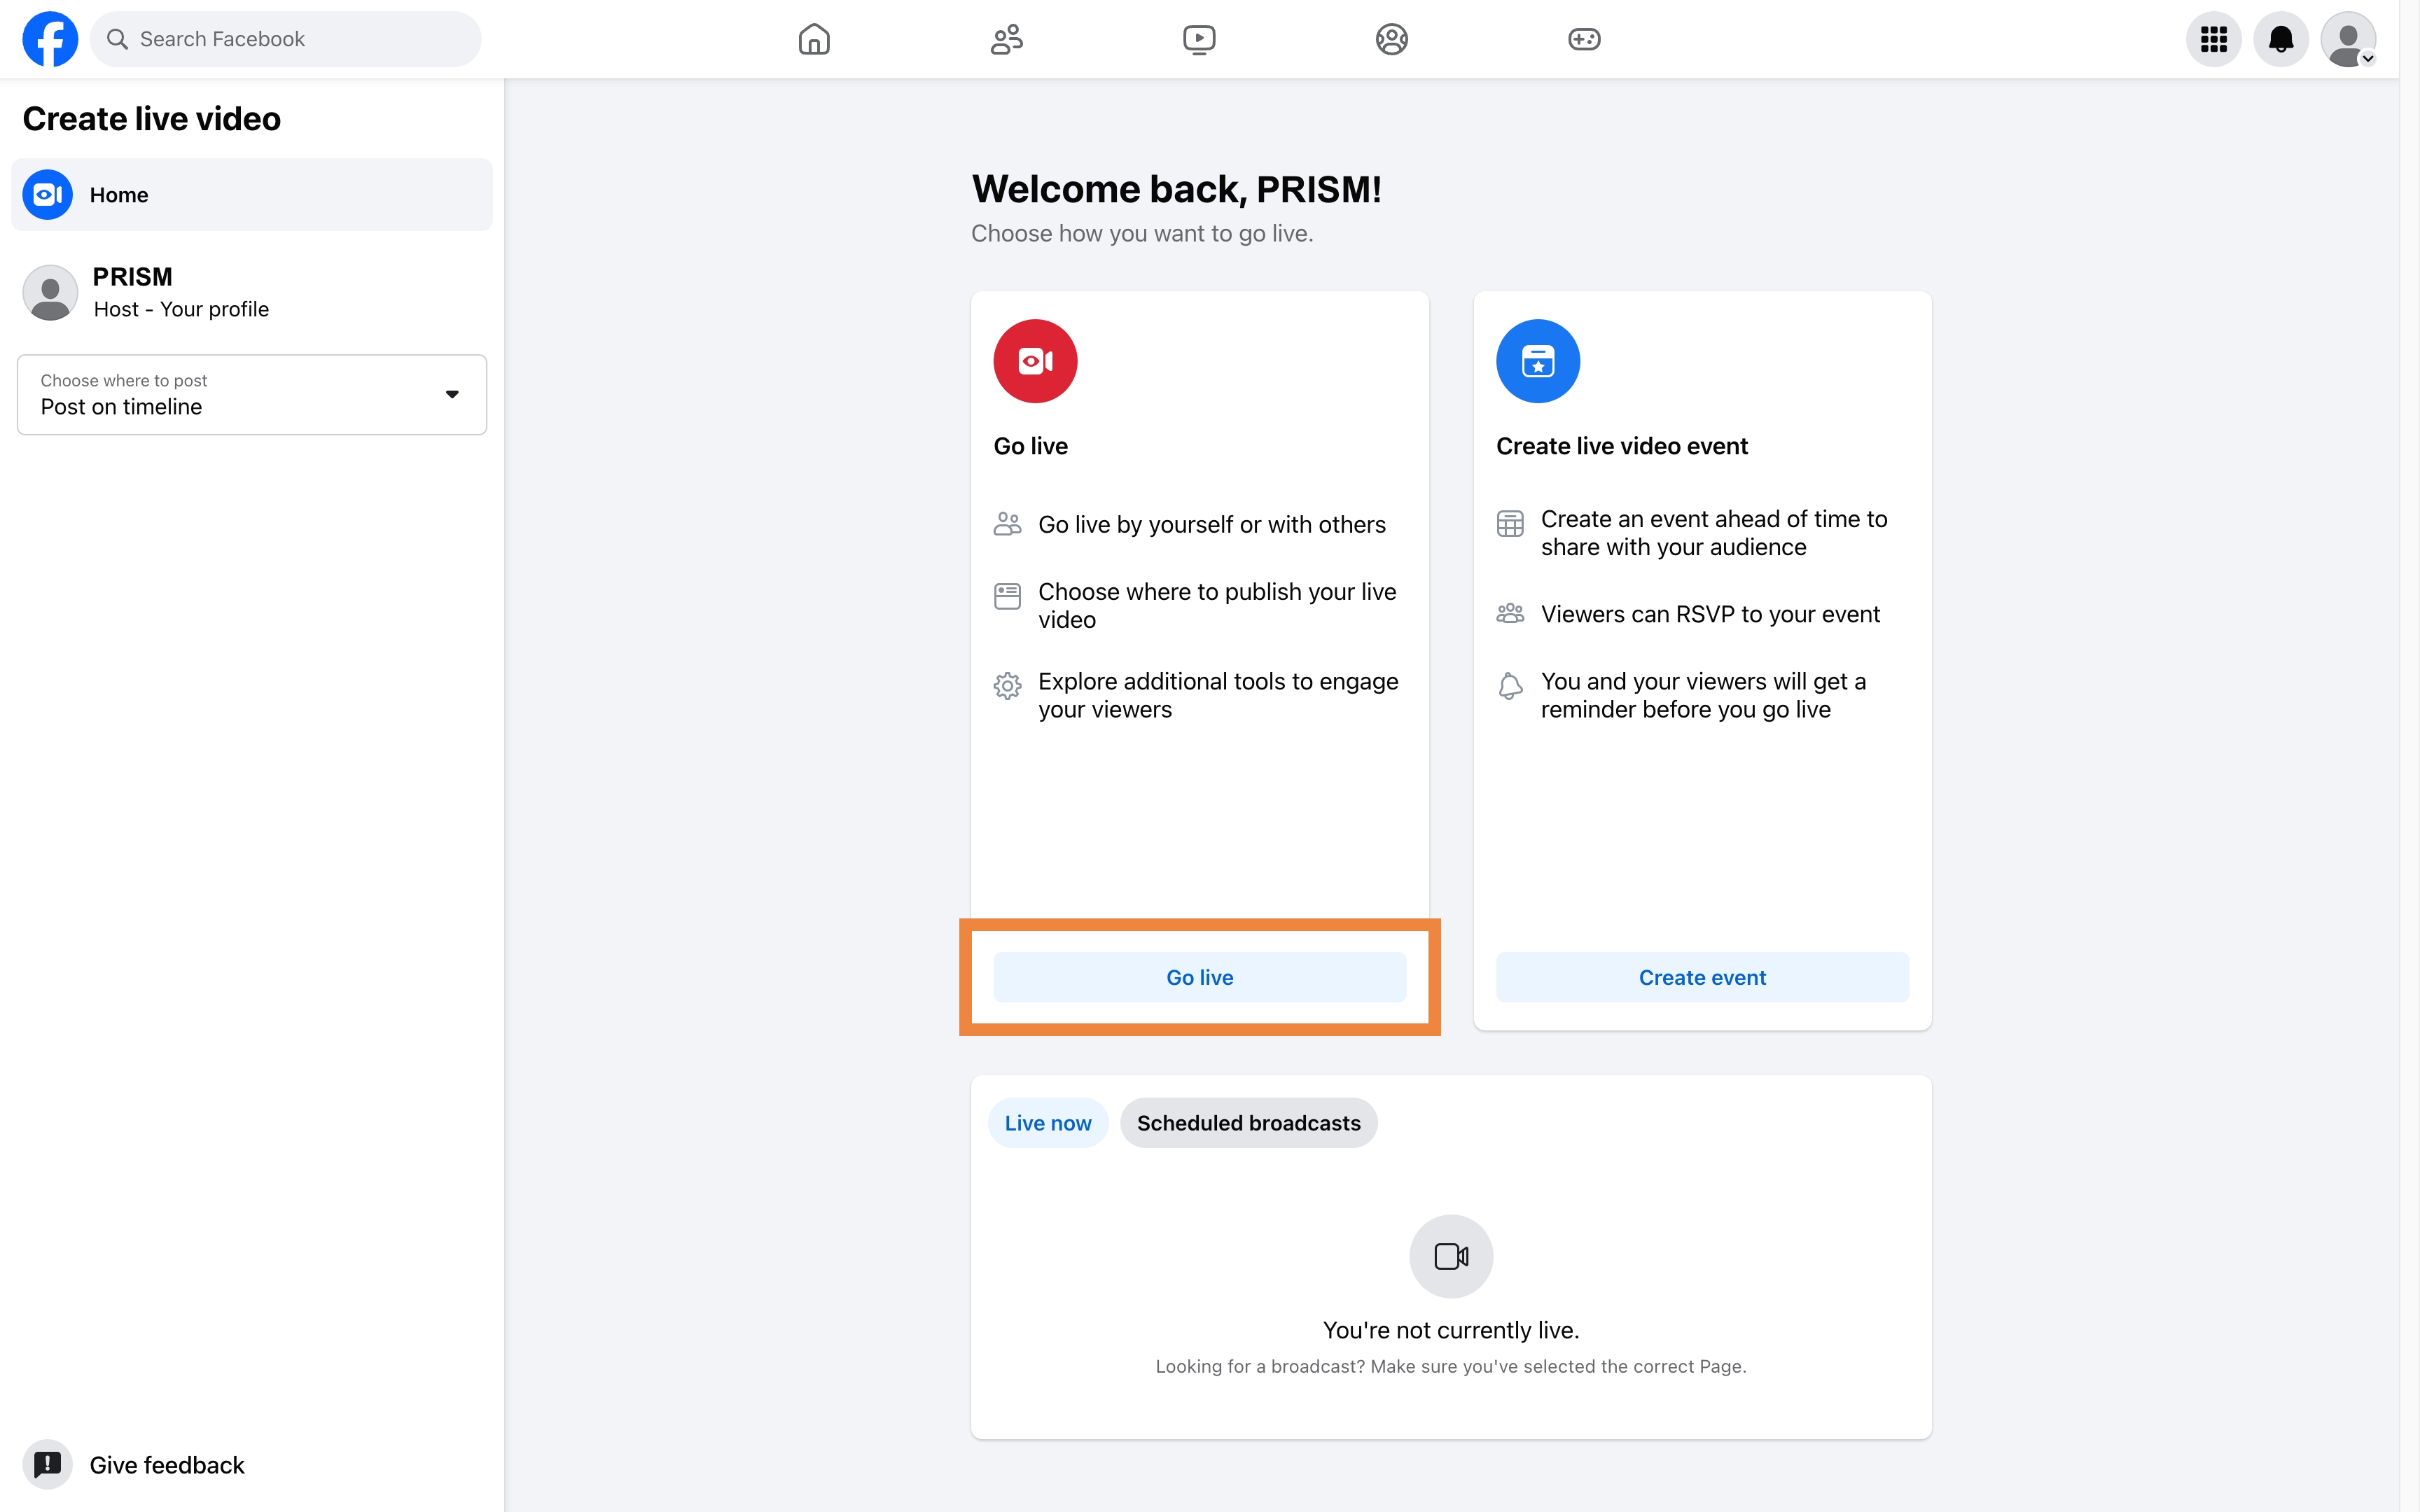
On the Facebook Live Producer page, select **Go Live**.

<figure><img src="https://1019928184-files.gitbook.io/~/files/v0/b/gitbook-x-prod.appspot.com/o/spaces%2FlISC5rfB4Hnmbsjf8phq%2Fuploads%2FjGMrDU2cgFNKSMJjICRM%2Ffacebookrtmp7.jpg?alt=media&amp;token=a1245221-dfb4-4db8-9d6d-90767cf711c9" alt=""><figcaption><p>Select <strong>Go Live</strong>.</p></figcaption></figure>

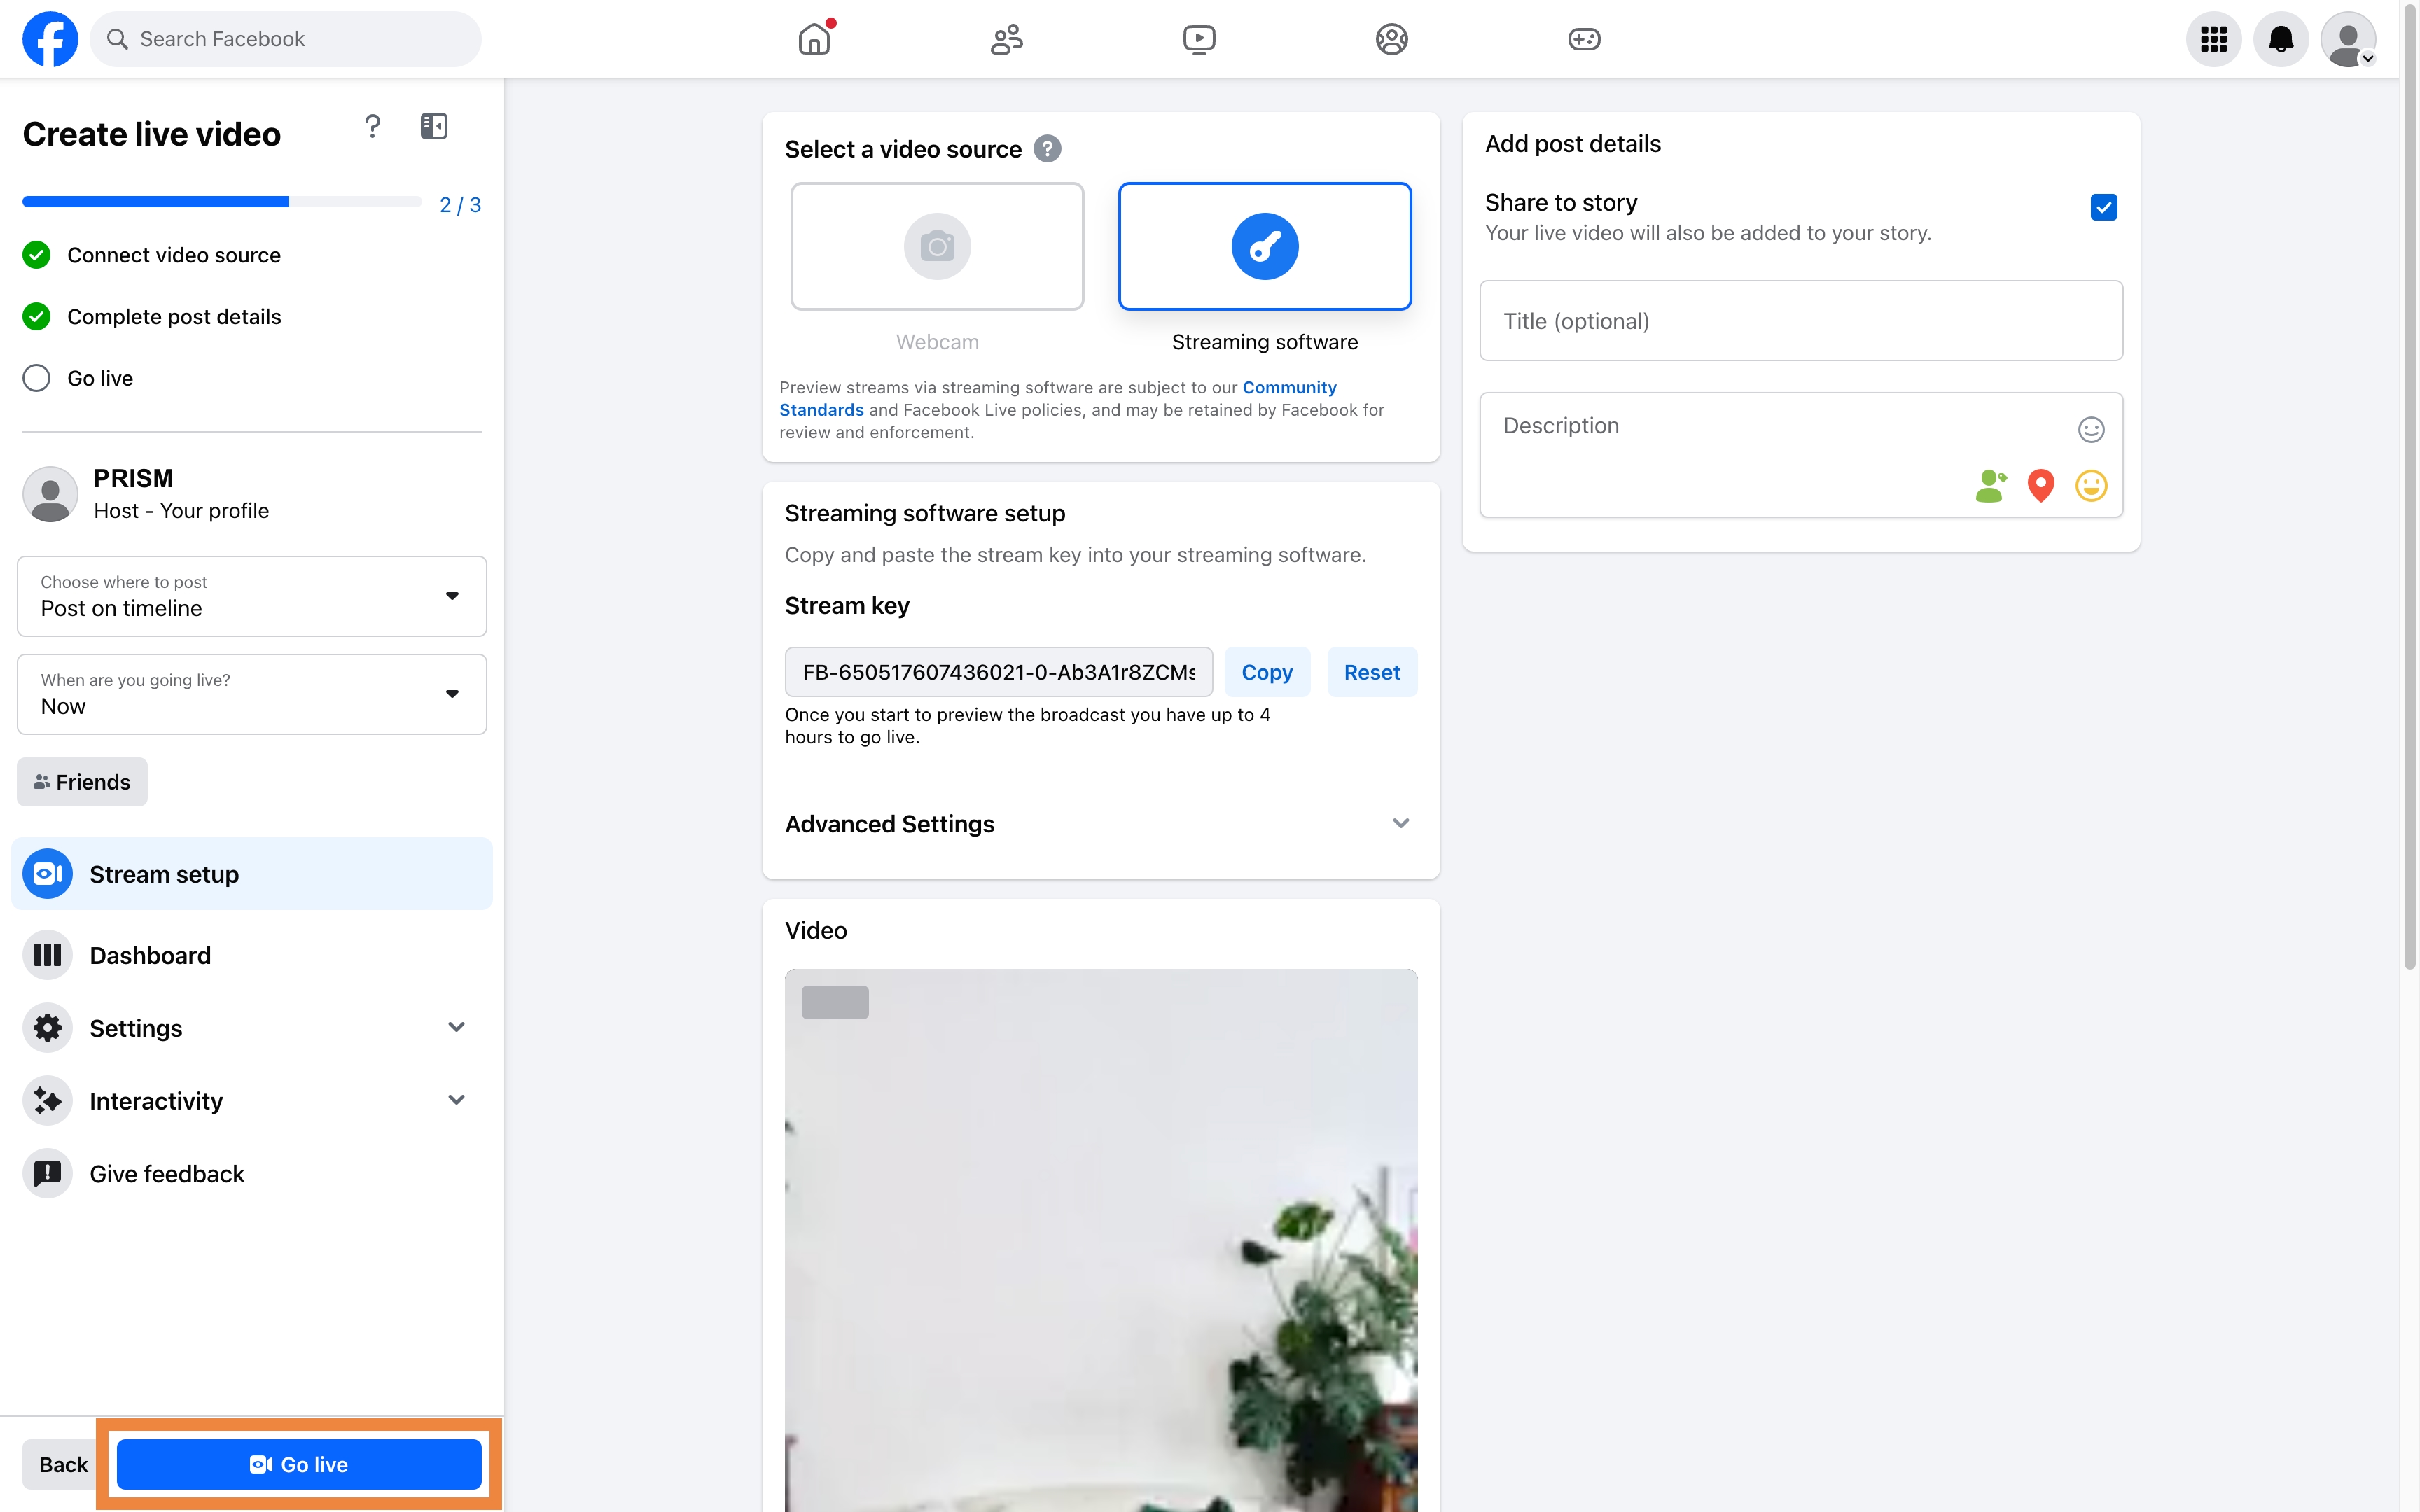
Check if the video feed from PRISM app is displayed correctly. Configure various options provided by Facebook. Once you’re ready, click **Go Live** to start your live broadcast.

<figure><img src="https://1019928184-files.gitbook.io/~/files/v0/b/gitbook-x-prod.appspot.com/o/spaces%2FlISC5rfB4Hnmbsjf8phq%2Fuploads%2FE8Uc4XKrGOsPqGQDk2Qd%2Ffacebookrtmp8.jpg?alt=media&amp;token=f8ce2cb4-19fc-457c-b80f-bf350797e797" alt=""><figcaption><p>Click <strong>Go Live</strong> to start your live broadcast.</p></figcaption></figure>

***

## Getting stream key of Facebook

The Stream Key is a unique code that links the PRISM app to Facebook’s streaming servers, allowing your stream to be transmitted to your page or profile.

To get the stream key for Facebook, follow the instructions below:

**Step 1: Go to the Facebook Live Producer website and log in to your account.**\
You can visit the website via the link below on your PC:

* <https://www.facebook.com/live/producer/>

**Step 2: Select Go Live.**

<figure><img src="https://1019928184-files.gitbook.io/~/files/v0/b/gitbook-x-prod.appspot.com/o/spaces%2FlISC5rfB4Hnmbsjf8phq%2Fuploads%2FjGMrDU2cgFNKSMJjICRM%2Ffacebookrtmp7.jpg?alt=media&amp;token=a1245221-dfb4-4db8-9d6d-90767cf711c9" alt=""><figcaption><p>Select <strong>Go live</strong>.</p></figcaption></figure>

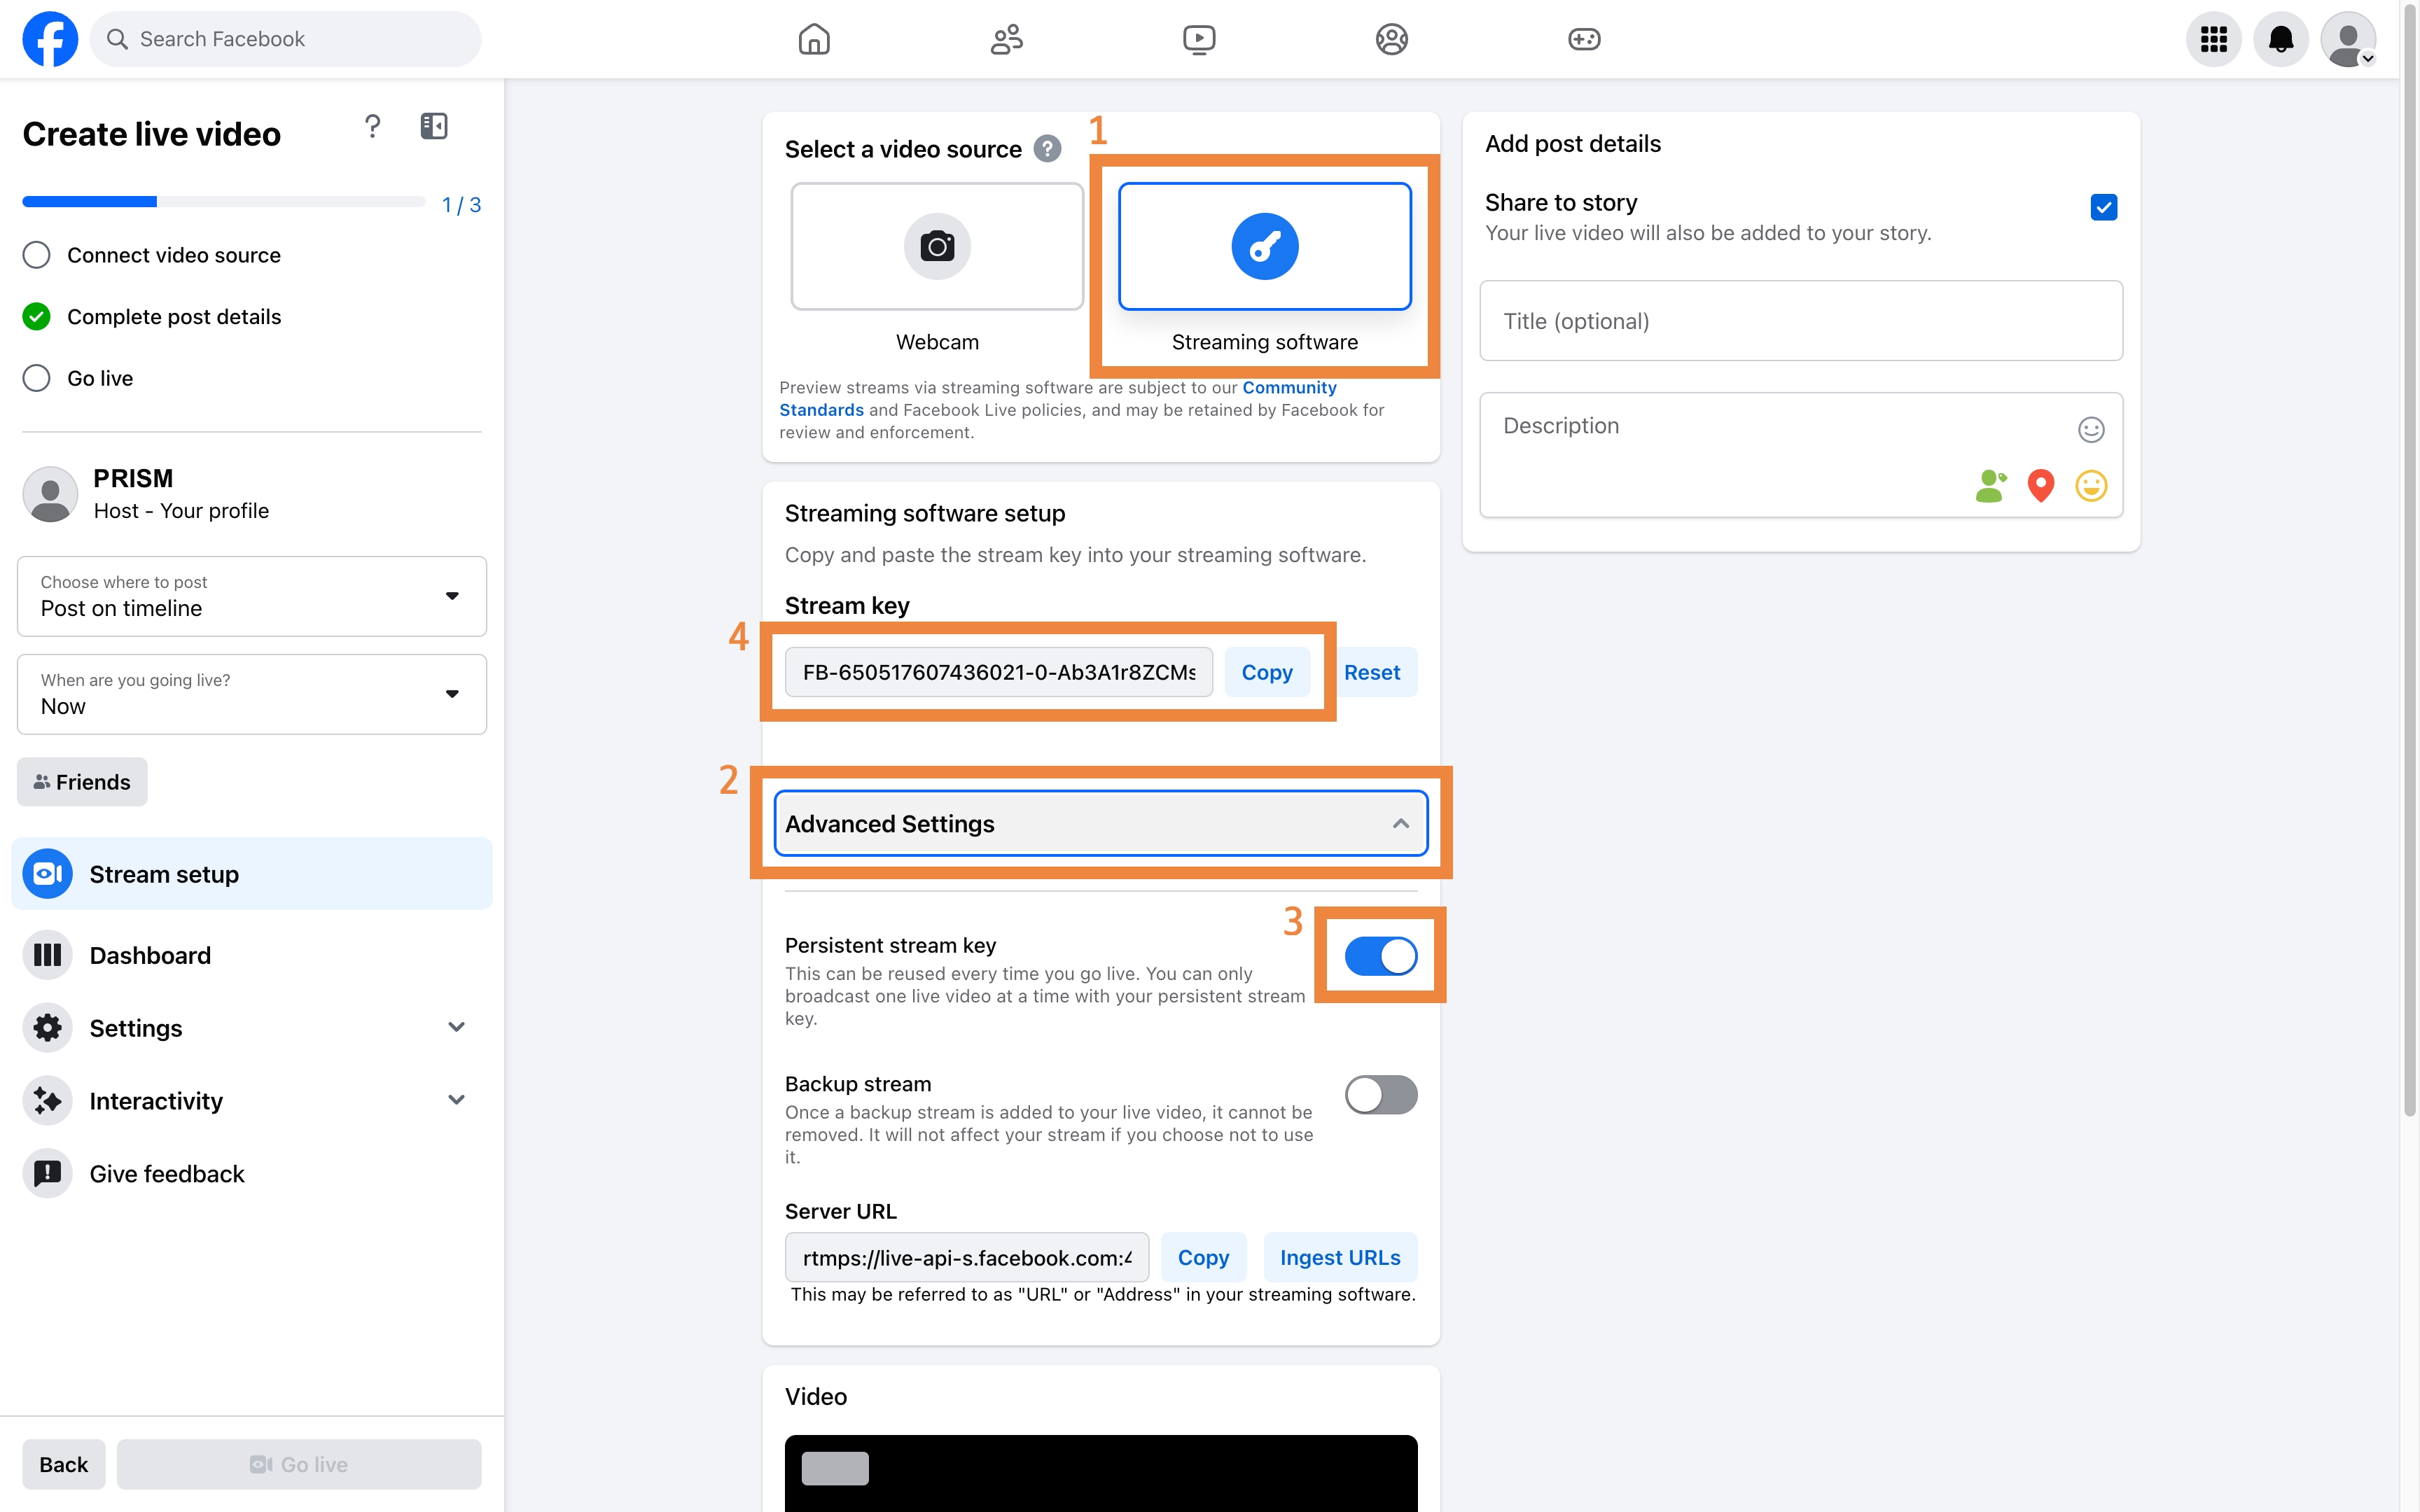
**Step 3: Select Streaming software as the video source and copy the Persistent Stream Key.**\
After selecting **Streaming software** as the video source, scroll down and click **Advanced Settings** to expand the section. Toggle on the **Persistent Stream Key** option if you want to use the same key for future broadcasts, which eliminates the need to copy a new key each time. Then, copy the **Stream Key** displayed on the screen.

{% hint style="danger" %}
Be sure to keep your stream key private. It is a unique code that links your broadcast to your channel, and sharing it could allow others to stream on your channel without permission.
{% endhint %}

<figure><img src="https://1019928184-files.gitbook.io/~/files/v0/b/gitbook-x-prod.appspot.com/o/spaces%2FlISC5rfB4Hnmbsjf8phq%2Fuploads%2FarHbDNHGSDkEFWoVozPg%2Ffacebookrtmp9.jpg?alt=media&amp;token=9d093cb1-fa11-4a2e-9a16-36d1afbe9f04" alt=""><figcaption><p>Follow the order indicated on the image to set and copy the <strong>Persistent stream key</strong>.</p></figcaption></figure>

[Mobile](/mobile/overview), [Guides](/mobile/guides), [Streaming](/mobile/guides/streaming), [RTMP](/mobile/guides/streaming/rtmp)


# How to Check the Stream Key of an RTMP Server

To stream to an RTMP server, copy the stream key from your platform and enter it into PRISM Mobile.

{% hint style="info" %}
We recommend checking the stream key on a desktop.
{% endhint %}

## 1. Checking the Stream Key on YouTube <a href="#id-1.-checking-the-stream-key-on-youtube" id="id-1.-checking-the-stream-key-on-youtube"></a>

1. Go to: [https://www.youtube.com/live\_dashboard](https://www.youtube.com/live_dashboard?utm_source=chatgpt.com)​
2. Log in with the YouTube account you will use for streaming.
3. On the Live Dashboard page, scroll down to **\[Encoder Setup]** and find **\[Stream Name/Key]**.
4. Copy the key and paste it into the **\[Stream Key]** field in the **Custom RTMP** settings of PRISM Mobile, then start streaming.

​

## 2. Checking the Stream Key on Facebook <a href="#id-2.-checking-the-stream-key-on-facebook" id="id-2.-checking-the-stream-key-on-facebook"></a>

1. Go to: [https://www.facebook.com/](https://www.facebook.com/?utm_source=chatgpt.com)​
2. Log in with the Facebook account you will use for streaming.
3. In the posting area, click **\[Live video]**.
4. Select the **\[Go live]** button in the Go live area, and copy the **\[Stream Key]**.
5. Paste it into the **\[Stream Key]** field in PRISM Mobile’s **Custom RTMP** settings and start streaming.

​

## 3. Checking the Stream Key on Twitch <a href="#id-3.-checking-the-stream-key-on-twitch" id="id-3.-checking-the-stream-key-on-twitch"></a>

1. Go to: <https://www.twitch.tv/prismlive/dashboard/settings/stream>
2. Log in with the Twitch account you will use for streaming.
3. From the left menu, select **\[Settings > Stream]**.
4. Under **\[Stream Key]**, click **\[Show Key]** and copy it.
5. Enter it into the **\[Stream Key]** field in PRISM Mobile’s **Custom RTMP** settings and start streaming.

## 4. Checking the Stream Key on BAND <a href="#id-4.-checking-the-stream-key-on-band" id="id-4.-checking-the-stream-key-on-band"></a>

1. Go to: [https://band.us](https://band.us/?utm_source=chatgpt.com)​
2. Log in with your BAND account and select the Band where you want to stream.
3. Click the **\[Live Stream]** menu, then get and copy the stream URL and key.
4. Paste the stream key into the **\[Stream Key]** field in PRISM Mobile’s **Custom RTMP** settings and start streaming.

​

## 5. Checking the Stream Key on NAVER TV <a href="#id-5.-checking-the-stream-key-on-naver-tv" id="id-5.-checking-the-stream-key-on-naver-tv"></a>

1. Go to: [https://studio.tv.naver.com/live](https://studio.tv.naver.com/live?utm_source=chatgpt.com)​
2. Log in with the NAVER account that owns the NAVER TV channel.
3. In **Live List > Start/Edit**, find the **\[Stream Settings]** section on the right to check the key.
4. Enter it into the **\[Stream Key]** field in PRISM Mobile’s **Custom RTMP** settings and start streaming.

​

## 6. Checking the Stream Key on SOOP&#x20;

1. Go to: [https://dashboard.sooplive.co.kr/](https://dashboard.sooplive.co.kr/?utm_source=chatgpt.com)
2. Log in with your SOOP account.
3. Go to the Account Icon>**\[Manage Stream]**, available at the menu of the **\[RTMP]**, and check the **\[Stream Key]**.
4. Copy the key, paste it into the **\[Stream Key]** field in PRISM Mobile’s **Custom RTMP** settings, and start streaming.

## 7. Checking the Stream Key on kakaoTV

1. Go to: [https://tv.kakao.com/studio/live/start](https://tv.kakao.com/studio/live/start?utm_source=chatgpt.com)
2. Log in with the kakaoTV account you will use for streaming.
3. On the right-hand **\[Stream Settings]** panel, click **\[Check Stream Key]**.
4. Copy the key and paste it into the **\[Stream Key]** field in PRISM Mobile’s **Custom RTMP** settings, then start streaming.

<br>


# Widgets & Effects


# Emotion Effect


# Using Emotion Effect

Android, iOS

Emotion effects are motion effects that allow you to express sudden feelings or situations. To access emotion effects in PRISM, tap the effects icon (<img src="https://m.prismlive.com/im/icon_effect_magicwand.png" alt="마술봉" data-size="line">) next to the **Go Live** button, and then select the emotion effects icon (<img src="https://prismlive.com/img/ico-type7_v2.png" alt="랜덤 감정 이펙트" data-size="line">), as shown in the image below.

<figure><img src="https://1019928184-files.gitbook.io/~/files/v0/b/gitbook-x-prod.appspot.com/o/spaces%2FlISC5rfB4Hnmbsjf8phq%2Fuploads%2FujPveba9WZ3VhmErsFC8%2Femotion1.png?alt=media&amp;token=bfdb11a8-bf68-42fa-be5b-e21840eeaede" alt=""><figcaption></figcaption></figure>

You can tap on each effect to apply it. Some effects support face detection, which tracks your face in real time and positions the effect accordingly on the screen. Face-detecting effects are marked with a small face icon (![](https://1019928184-files.gitbook.io/~/files/v0/b/gitbook-x-prod.appspot.com/o/spaces%2FlISC5rfB4Hnmbsjf8phq%2Fuploads%2FJ4rMQsHQ3Mtg7HtvSHxI%2Fmask.png?alt=media\&token=9a07e747-ae39-4f3a-a254-28406c8ee42a)) on their thumbnails for easy identification.

<figure><img src="https://1019928184-files.gitbook.io/~/files/v0/b/gitbook-x-prod.appspot.com/o/spaces%2FlISC5rfB4Hnmbsjf8phq%2Fuploads%2F61SYAzOFVrKkPAqgOXhn%2Femotion2.jpg?alt=media&amp;token=27c74d68-7a94-4c1a-ac51-d1a1fc92f1b5" alt=""><figcaption></figcaption></figure>

To add an effect to your favorites, simply long-press the effect. You can access your favorites by selecting the **Favorites** tab (<img src="https://prismlive.com/img/ico-type13.png" alt="드로잉 이벤트" data-size="line">) located on the left side of the tab bar. In the **Favorites** tab, effects are displayed in order of most recent use, with favorited effects appearing first. To remove a favorited effect, long-press it again.

<figure><img src="https://1019928184-files.gitbook.io/~/files/v0/b/gitbook-x-prod.appspot.com/o/spaces%2FlISC5rfB4Hnmbsjf8phq%2Fuploads%2FZ3MjZW5HRLP8G1qjbjsi%2Femotion4.jpg?alt=media&amp;token=b5ff7c70-ef6e-4a3e-8ec5-5cd917e3e949" alt=""><figcaption></figcaption></figure>

There are eight emotion categories: **Greet**, **Love**, **Congrats**, **Awesome**, **Fun**, **OMG**, **Angry**, and **Sad**. Additionally, there are two special categories: **RandomTouch** and **Shopping**.

**RandomTouch** effects appear in random positions and sizes each time you tap on them, adding a playful and dynamic element to your broadcast.

<figure><img src="https://1019928184-files.gitbook.io/~/files/v0/b/gitbook-x-prod.appspot.com/o/spaces%2FlISC5rfB4Hnmbsjf8phq%2Fuploads%2FUtn4eDWCkuSk09sx9nAB%2Femotion3_1.png?alt=media&amp;token=d01b22bc-b849-4700-a12b-b335029b1608" alt=""><figcaption><p>RandomTouch (left) / Greet (right)</p></figcaption></figure>

<figure><img src="https://1019928184-files.gitbook.io/~/files/v0/b/gitbook-x-prod.appspot.com/o/spaces%2FlISC5rfB4Hnmbsjf8phq%2Fuploads%2FMY7VT8JPbAwVUNQAGOKa%2Femotion3_2.png?alt=media&amp;token=16d54f18-a2f4-4e6c-916f-ef5f3f66a9f6" alt=""><figcaption><p>Love (left) / Congrats (right)</p></figcaption></figure>

<figure><img src="https://1019928184-files.gitbook.io/~/files/v0/b/gitbook-x-prod.appspot.com/o/spaces%2FlISC5rfB4Hnmbsjf8phq%2Fuploads%2FjMdgjZKQOqeerRXDnVxI%2Femotion3_3.png?alt=media&amp;token=2fc49799-98a7-4a1e-9ffb-c4c72df7384e" alt=""><figcaption><p>Awesome (left) / Fun (right)</p></figcaption></figure>

<figure><img src="https://1019928184-files.gitbook.io/~/files/v0/b/gitbook-x-prod.appspot.com/o/spaces%2FlISC5rfB4Hnmbsjf8phq%2Fuploads%2F4T08iXop91scSBatS15z%2Femotion3_4.png?alt=media&amp;token=a5a8f279-7d76-49ff-a77b-df6780d3f99f" alt=""><figcaption><p>Omg (left) / Shopping (right)</p></figcaption></figure>

<figure><img src="https://1019928184-files.gitbook.io/~/files/v0/b/gitbook-x-prod.appspot.com/o/spaces%2FlISC5rfB4Hnmbsjf8phq%2Fuploads%2FmZq66T5Ec9nXXbBsxRZW%2Femotion3_5.png?alt=media&amp;token=f14fba1e-d8c9-4036-820b-c72601c2ce6a" alt=""><figcaption><p>Angry (left) / Sad (right)</p></figcaption></figure>

[Mobile](/mobile/overview), [Guides](/mobile/guides), [Widgets & Effects](/mobile/guides/widgets-and-effects), [Emotion Effect](/mobile/guides/widgets-and-effects/emotion-effect)


# Beauty Effects


# Using Beauty Effects

Android, iOS

You can access the beauty effects feature by clicking the face icon next to the **Ready** button.

In the beauty effects, users can set 5 factors such as Shape (face type), Smooth (skin texture), Eye (makeup), Blush (skin tone), and Lipstick (makeup). And It comes with 7 presets, K-pop, Glam, Soft, Bold, Natural, Cute and Sharp templates that are properly mixed and set up with these 5 elements.

However, the five elements of the templates are individually adjustable, so we recommend finding and using values that suit you best. To access the preset settings, click the preset button that is already selected.

In addition, beauty effects may affect the quality of live broadcasting by using a lot of resources such as the smartphone’s CPU, so we recommend that you use them after testing in advance on your smartphone device and environment.

<figure><img src="https://1019928184-files.gitbook.io/~/files/v0/b/gitbook-x-prod.appspot.com/o/spaces%2FlISC5rfB4Hnmbsjf8phq%2Fuploads%2FwkO4ElB6LjrXY4f2GHmm%2FUsing%20beauty%20effect%201.png?alt=media&amp;token=797539b0-76d3-4389-b604-c7411b572996" alt=""><figcaption></figcaption></figure>

<figure><img src="https://1019928184-files.gitbook.io/~/files/v0/b/gitbook-x-prod.appspot.com/o/spaces%2FlISC5rfB4Hnmbsjf8phq%2Fuploads%2FhMUEh8CWo9U2e4go5rcZ%2FUsing%20beauty%20effect%202.png?alt=media&amp;token=8c7754cf-3094-4989-8059-5c9b59e086fd" alt=""><figcaption></figcaption></figure>

[Mobile](/mobile/overview), [Guides](/mobile/guides), [Widgets & Effects](/mobile/guides/widgets-and-effects), [Beauty Effects](/mobile/guides/widgets-and-effects/beauty-effects)


# GIPHY Effect


# Using GIPHY Effect

Android, iOS

GIPHY offers a vast library of GIFs through its partnership with the PRISM app, making all GIFs on giphy.com available for use. To access GIPHY effects in PRISM, click the effect icon (<img src="https://m.prismlive.com/im/icon_effect_magicwand.png" alt="마술봉" data-size="line">) next to the **Go Live** button, then select the GIPHY effect icon (<img src="https://m.prismlive.com/im/icon_effect_sticker.png" alt="Giphy Stickers" data-size="line">), as shown in the image below.

<figure><img src="https://1019928184-files.gitbook.io/~/files/v0/b/gitbook-x-prod.appspot.com/o/spaces%2FlISC5rfB4Hnmbsjf8phq%2Fuploads%2Fl4yf4RMesACKP0oxJUYO%2FGiphy%20Images%201.png?alt=media&amp;token=2c1ad499-d758-4290-b96a-94c22a1c39b5" alt=""><figcaption></figcaption></figure>

Once you access the menu, you’ll find categories like Trending, Reactions, and Thanks, along with a search function to find specific effects.

<figure><img src="https://1019928184-files.gitbook.io/~/files/v0/b/gitbook-x-prod.appspot.com/o/spaces%2FlISC5rfB4Hnmbsjf8phq%2Fuploads%2FOseQpqFRdfTj3oXZDRRJ%2FGiphy%20Images%202.png?alt=media&amp;token=a4de49ad-546b-4712-a0e1-22ccbfb06d00" alt=""><figcaption></figcaption></figure>

You can apply the selected effects to the screen and adjust their size, position, and rotation using pinch-to-zoom, just like other elements in PRISM.

[Mobile](/mobile/overview), [Guides](/mobile/guides), [Widgets & Effects](/mobile/guides/widgets-and-effects), [GIPHY Effect](/mobile/guides/widgets-and-effects/giphy-effect)


# Media Playlist


# Using Media Playlist

Android, iOS

You can create playlists with videos and music within the PRISM app and use them in live streaming. The playlists you list are saved as one item in My Studio and can be reused at any time.

<figure><img src="https://miro.medium.com/v2/resize:fit:1400/1*7Ev3gcqLgiam4XCObEHcrQ.png" alt=""><figcaption><p>Click the <strong>Playlist</strong> button in My Studio and create a <strong>Video playlist</strong>.</p></figcaption></figure>

<figure><img src="https://miro.medium.com/v2/resize:fit:1400/1*9YnzHohSGQaYxMj62BQg2g.png" alt=""><figcaption><p>Select all the videos to be included in the playlist and create the playlist.</p></figcaption></figure>

<figure><img src="https://miro.medium.com/v2/resize:fit:1400/1*hUerzjO1W4q0N5_pQ-lLdA.png" alt=""><figcaption><p>You can adjust the order of the videos and select specific positions by seeking.</p></figcaption></figure>

<figure><img src="https://miro.medium.com/v2/resize:fit:1400/1*edROBwfd9nc6SETQZPHW4A.png" alt=""><figcaption><p>You can also create Music playlists. You will be taken to the free music menu of the PRISM app.</p></figcaption></figure>

<figure><img src="https://miro.medium.com/v2/resize:fit:1400/1*FVF1bHrbTEQ9eA-9S75Pbg.png" alt=""><figcaption><p>The saved music playlist is saved in My Studio, and the list can be edited.</p></figcaption></figure>

**Tip:** While you are playing videos and music, if you set the microphone option to off with the round more button at the top left of the screen, only the sound of the video and music being played will be mixed and streamed for live streaming.

[Mobile](/mobile/overview)*,* [Guides](/mobile/guides), [Widgets & Effects](/mobile/guides/widgets-and-effects), [Media Playlist](/mobile/guides/widgets-and-effects/media-playlist)


# Chat Widget


# Automatically Disappearing Chat Messages

Android, iOS

The PRISM app provides two chat modes. One is the basic chat area, available by default on the live preview screen, and the other is the PRISM chat widget area, accessible through the widget menu in My Studio.

You can enable the automatic disappearance feature for chat messages in the PRISM chat widget area. To use this function, check the **Disappearing Chat Messages** option. With this feature, older chat messages can automatically disappear.

The disappearance interval offers various options, such as 5 seconds, 15 seconds, 1 minute, or 2 minutes. Feel free to give it a try.

<figure><img src="https://1019928184-files.gitbook.io/~/files/v0/b/gitbook-x-prod.appspot.com/o/spaces%2FlISC5rfB4Hnmbsjf8phq%2Fuploads%2FqvfOj7KUiuWxKlRB8LCM%2FDissapearing%20Message%201.png?alt=media&amp;token=11dc2cbd-9dd0-4275-965c-697734311234" alt=""><figcaption></figcaption></figure>

<figure><img src="https://1019928184-files.gitbook.io/~/files/v0/b/gitbook-x-prod.appspot.com/o/spaces%2FlISC5rfB4Hnmbsjf8phq%2Fuploads%2FucwRw2fAp14R3HtxnZCD%2FDissapearing%20Message%202.png?alt=media&amp;token=703bf8d3-be21-46a4-b304-896fad139ed9" alt=""><figcaption></figcaption></figure>

[Mobile](/mobile/overview), [Guides](/mobile/guides), [Widgets & Effects](/mobile/guides/widgets-and-effects), [Chat Widget](/mobile/guides/widgets-and-effects/chat-widget)


# Displaying Superchat Widget

Android, iOS

**SuperChat** is a paid system that can support streamers during live streaming. If a viewer sends a SuperChat to the streamer, the corresponding SuperChat will be exposed in the chatting area and a separate widget of SuperChat itself will also be available at the top of the chatting area. Depending on the amount you sponsor, the exposure time of the widget may differ. The remaining exposure time is displayed in a gauge format on the widget.

<figure><img src="https://1019928184-files.gitbook.io/~/files/v0/b/gitbook-x-prod.appspot.com/o/spaces%2FlISC5rfB4Hnmbsjf8phq%2Fuploads%2FC3i67oSGiXmTEA2cUsRK%2Fimage.png?alt=media&amp;token=09d559ed-be6a-4fd3-94b7-7bf59bd2787f" alt=""><figcaption><p>The widget's exposure time varies by sponsorship amount.</p></figcaption></figure>

The PRISM Chat Widget also displays superchats in the chat area, but they are not pinned at the top.

<figure><img src="https://1019928184-files.gitbook.io/~/files/v0/b/gitbook-x-prod.appspot.com/o/spaces%2FlISC5rfB4Hnmbsjf8phq%2Fuploads%2F0jhMpZFDQoAA3SK6x06P%2Fsuperchat.jpg?alt=media&amp;token=4a62372c-59de-4b40-9d3e-1a977bfb68cf" alt=""><figcaption></figcaption></figure>

[Mobile](/mobile/overview), [Guides](/mobile/guides), [Widgets & Effects](/mobile/guides/widgets-and-effects), [Chat Widget](/mobile/guides/widgets-and-effects/chat-widget)


# Text Widget


# Using Informational Text Widget

Android, iOS

You can use the informational effect through the **Text** widget in the My Studio menu, which is accessed by swiping left on the main screen.

<figure><img src="https://1019928184-files.gitbook.io/~/files/v0/b/gitbook-x-prod.appspot.com/o/spaces%2FlISC5rfB4Hnmbsjf8phq%2Fuploads%2FX6cab0QIMpSASeO37Cyw%2FText%20Template%201.png?alt=media&amp;token=c4819e69-12a3-47e6-97fa-afd1b9a0d65a" alt=""><figcaption><p>You can access informational effect through the <strong>Text</strong> button in the My Studio menu.</p></figcaption></figure>

A total of 50 effects are provided in 6 categories as follows, which include splendid animation effects and allow users to set their own messages.

* 10 title effect
* 5 screen saver effects
* 5 clock and timer effects (a countdown widget, and a timer widget containing 4 functional effects)
* 19 social effects
* 5 caption effects
* 6 sticker effects

Most of the effects are animated and can be customized using a designated editor to adjust settings such as size, font, text outline, color, and alignment. You can also choose whether the text remains on the screen or disappears after the animation is performed. As you can see, there are multiple language options, including Korean, English, Chinese, and Japanese, available in various fonts.

<figure><img src="https://1019928184-files.gitbook.io/~/files/v0/b/gitbook-x-prod.appspot.com/o/spaces%2FlISC5rfB4Hnmbsjf8phq%2Fuploads%2F3v16bWHhcbVR6wJdlXZq%2Feffect.gif?alt=media&amp;token=2ab5471b-1216-4fd1-b24c-8d28df213860" alt=""><figcaption></figcaption></figure>

***

## Informational effects

In the **TITLE** category, you can use plain text, transitioning text, or marquee banner. The marquee banner's text flows from right to left. And you can place it anywhere you want on the live stream screen.

In the **SCREEN SAVER** category, each effect displays graphics on the screen along with the text you set. They can be used for various purposes throughout your live stream and have dynamic animations that will catch the attention of viewers.

<figure><img src="https://1019928184-files.gitbook.io/~/files/v0/b/gitbook-x-prod.appspot.com/o/spaces%2FlISC5rfB4Hnmbsjf8phq%2Fuploads%2FSNYhMcjQxs6nHazaHNF3%2FText%20Template%202.png?alt=media&amp;token=bf751a3c-722d-4825-b66c-5ad336844ba2" alt=""><figcaption><p><strong>TITLE</strong> and <strong>SCREEN SAVER</strong> category</p></figcaption></figure>

In the **CLOCK & TIMER** category, It consists of a countdown effect that can set the count, and a timer effect that can be set to clock or timer. The clock effect provides more detailed features, which we will explain in detail later in this page.

In the **SOCIAL** category, each effects can effectively display streamer SNS information to viewers.

<figure><img src="https://1019928184-files.gitbook.io/~/files/v0/b/gitbook-x-prod.appspot.com/o/spaces%2FlISC5rfB4Hnmbsjf8phq%2Fuploads%2FFEzGtwiEIfzqij5BJcca%2FText%20Template%203.png?alt=media&amp;token=2da33320-5a0d-44ff-b7d2-9b7cf69d2420" alt=""><figcaption><p><strong>CLOCK/TIMER</strong> and <strong>SOCIAL</strong> category</p></figcaption></figure>

In the **CAPTION** category, there are animation text effects that many streamers have been using.&#x20;

In the **STICKER** category, streamers can edit and overlay the stickers on their live stream to suit their needs.

<figure><img src="https://1019928184-files.gitbook.io/~/files/v0/b/gitbook-x-prod.appspot.com/o/spaces%2FlISC5rfB4Hnmbsjf8phq%2Fuploads%2FhM1gvhwwPzTzejT4K6Bp%2FText%20Template%204.png?alt=media&amp;token=10e3a80f-9791-4d2b-b3fd-4e586eb5f8fc" alt=""><figcaption><p><strong>CAPTION</strong> and <strong>STICKER</strong> category</p></figcaption></figure>

When you finish setting each effect, they are registered in the My Studio menu like normal live sources, so you can use them on the live stream screen whenever you need.

Then, adjust and place the effects in an appropriate position and size on your live stream screen, as shown in the picture on the right below.

<figure><img src="https://1019928184-files.gitbook.io/~/files/v0/b/gitbook-x-prod.appspot.com/o/spaces%2FlISC5rfB4Hnmbsjf8phq%2Fuploads%2FHa6UHnTn2oOJKIWc8hoW%2FText%20Template%205.png?alt=media&amp;token=ab59a9a0-bec4-49a5-b33e-6d3ece3ebb8f" alt=""><figcaption></figcaption></figure>

***

### Marquee effect

We often see streamers displaying a persistent message to their viewers with marquee banners at the top or bottom of their live stream screens.

Usually, this effect is possible by using a third party web overlay, but we added that feature so that users can use the same functionality within the PRISM app without using a third party service.

<figure><img src="https://1019928184-files.gitbook.io/~/files/v0/b/gitbook-x-prod.appspot.com/o/spaces%2FlISC5rfB4Hnmbsjf8phq%2Fuploads%2FmSnMs3NrX21IGxddeXjK%2FText%20Template%206.png?alt=media&amp;token=b53eca8e-4ab7-427f-851d-a90799b227ce" alt=""><figcaption></figcaption></figure>

***

### Screensaver effects

These are screen saver effects that cover the entire screen. All of the effects have very beautiful animations, so we strongly recommend that you try them out in our app.

These screensaver effects can be useful when you leave your seat during a live stream or change the flow of a live stream. Besides, you can edit the text inside the effect as you like.

<figure><img src="https://1019928184-files.gitbook.io/~/files/v0/b/gitbook-x-prod.appspot.com/o/spaces%2FlISC5rfB4Hnmbsjf8phq%2Fuploads%2F5UD9FbLthiEM8DiMBveP%2FText%20Template%207.png?alt=media&amp;token=db20c4d1-d151-4e26-9af0-ef3a3ee394b9" alt=""><figcaption></figcaption></figure>

***

### Timer Effect

The timer effect contains the following 4 functional effects.

* *Timer*
* *Stopwatch*
* *Current time*
* *Elapsed time*

You can set hours, minutes and seconds in the timer effect. And you can display hours, minutes, seconds and optionally even milliseconds on the stopwatch.

<figure><img src="https://1019928184-files.gitbook.io/~/files/v0/b/gitbook-x-prod.appspot.com/o/spaces%2FlISC5rfB4Hnmbsjf8phq%2Fuploads%2FDCyYCNhfApYZRAZ2Viuj%2FText%20Template%208.png?alt=media&amp;token=7ffc6ede-32bc-4384-84e2-f983c1fa7d6b" alt=""><figcaption></figcaption></figure>

We also offer you a Current time effect that displays the current time and a Elapsed time effect that displays airtime.&#x20;

<figure><img src="https://1019928184-files.gitbook.io/~/files/v0/b/gitbook-x-prod.appspot.com/o/spaces%2FlISC5rfB4Hnmbsjf8phq%2Fuploads%2FzxFCeGJ4fHMgz9MCKSIC%2FText%20Template%209.png?alt=media&amp;token=cc761603-e8ef-4055-b1b8-dbf068c3cb32" alt=""><figcaption></figcaption></figure>

[Mobile](/mobile/overview), [Guides](/mobile/guides), [Widgets & Effects](/mobile/guides/widgets-and-effects), [Text Widget](/mobile/guides/widgets-and-effects/text-widget)


# Web Widget


# Using Web Browser Widget

Android, iOS

The web browser widget allows you to load a website as a source to your broadcast screen. This means you can now display not only the webpage itself, but also sponsored contents and chat windows to your broadcast.

<figure><img src="https://1019928184-files.gitbook.io/~/files/v0/b/gitbook-x-prod.appspot.com/o/spaces%2FlISC5rfB4Hnmbsjf8phq%2Fuploads%2F51pSCm4uCnxX4hnAb2wF%2Fwebwidget.png?alt=media&amp;token=f521388c-43be-4b1b-8ec7-e991b19e53b2" alt=""><figcaption><p>Click the <strong>Widget</strong> button in My Studio and create a <strong>Web</strong> source.</p></figcaption></figure>

Please do understand that as there are numerous devices and OS versions available on the market, which means that the maximum number of web sources has been limited to **4 items**, in order to ensure that apps can run and broadcast reliably on as many devices as possible.

In the future, as network conditions improve and devices evolve, we will work on improving the availability of even more web sources.

<figure><img src="https://1019928184-files.gitbook.io/~/files/v0/b/gitbook-x-prod.appspot.com/o/spaces%2FlISC5rfB4Hnmbsjf8phq%2Fuploads%2FgmXTyul0kb7KsQw5iwls%2Fgitbook_image_widget%201.png?alt=media&amp;token=226fef04-93c1-4a50-ba35-d56672e2d1cc" alt="" width="317"><figcaption></figcaption></figure>

[Mobile](/mobile/overview), [Guides](/mobile/guides), [Widgets & Effects](/mobile/guides/widgets-and-effects), [Web Widget](/mobile/guides/widgets-and-effects/web-widget)


# RTMP Overlay Widget


# Using RTMP Overlay

Android, iOS

The RTMP Overlay feature allows receiving video from devices capable of RTMP streaming and integrating it as a single source for live streaming in the PRISM app.

You can use the RTMP Overlay function in the Widget menu of My Studio that appears when you swipe left on the Live Ready screen. Select ‘RTMP Video Source’ from the function list of the Widget menu, it will be added to the My Studio source list. And when you click on the RTMP Overlay source in the source list, it will be placed on the live streaming screen.

<figure><img src="https://1019928184-files.gitbook.io/~/files/v0/b/gitbook-x-prod.appspot.com/o/spaces%2FlISC5rfB4Hnmbsjf8phq%2Fuploads%2FImtzzEiAxXYjmgl9KQMa%2FRTMP%20Overlay%201.png?alt=media&amp;token=71fe79f8-d2b7-4f78-a324-19c3fc753f20" alt=""><figcaption></figcaption></figure>

Once it is placed, it can be resized, repositioned and rotated just like an image overlay. And as soon as that source is placed, the RTMP information that can be streamed to the RTMP Overlay is displayed.

The RTMP information is generated by the combination of the RTMP Stream URL and RTMP Stream Key. Please note that excessively minimizing the RTMP Overlay area may hide the RTMP information.

<figure><img src="https://1019928184-files.gitbook.io/~/files/v0/b/gitbook-x-prod.appspot.com/o/spaces%2FlISC5rfB4Hnmbsjf8phq%2Fuploads%2FVcHHlANhg5eZAuxy00Nl%2FRTMP%20Overlay%202.png?alt=media&amp;token=03278e06-b543-4225-868d-73a11c65d548" alt=""><figcaption><p>You can check the RTMP Stream URL and RTMP Stream Key in the widget.</p></figcaption></figure>

Clicking the **Edit** button at the bottom of the RTMP Overlay or the **More** button on the source item in My Studio, takes you to the detailed screen for the RTMP video source.&#x20;

The displayed RTMP information can be shared externally through the \[Share] button, allowing you to configure external RTMP streaming devices with the shared information and utilize the RTMP Overlay feature.

<figure><img src="https://1019928184-files.gitbook.io/~/files/v0/b/gitbook-x-prod.appspot.com/o/spaces%2FlISC5rfB4Hnmbsjf8phq%2Fuploads%2FwinJtrs3lUiDcogcdnr7%2FRTMP%20Overlay%203.png?alt=media&amp;token=f6accc68-1647-4702-ba20-26651f66c53a" alt=""><figcaption><p>Here you can check and share the RTMP information.</p></figcaption></figure>

The RTMP video source details screen provides the following usage guide, so please refer to it.

* *Connect to the same WiFi network > Enter the RTMP URL from an external camera > Stream the video > Display the recived video on the overlay (excluding audio)*

In addition, if the video being streamed exceeds 1080p / 60fps, reception of it may be unstable or the device may lose its RTMP connection in rare cases.

When the video starts streaming from the external device, the ‘Receiving RTMP video...’ comment will be displayed in the widget for a while as shown below. ​And then, when the RTMP video starts to be processed normally, it is displayed on the live streaming screen and is shown to viewers at the same time.

<figure><img src="https://1019928184-files.gitbook.io/~/files/v0/b/gitbook-x-prod.appspot.com/o/spaces%2FlISC5rfB4Hnmbsjf8phq%2Fuploads%2FNYuQlepWpAJh6Q3ijr3h%2FRTMP%20Overlay%204.png?alt=media&amp;token=cc791b6d-ab96-407d-9949-dca54ea31751" alt=""><figcaption><p>The RTMP video may take a while to display.</p></figcaption></figure>

<figure><img src="https://1019928184-files.gitbook.io/~/files/v0/b/gitbook-x-prod.appspot.com/o/spaces%2FlISC5rfB4Hnmbsjf8phq%2Fuploads%2FslA2G42ieFTxzk38xuU9%2FRTMP%20Overlay%205.png?alt=media&amp;token=920f2f01-d704-440f-bb6c-07734406767f" alt=""><figcaption><p>You can resize and position the area of the RTMP Overlay.</p></figcaption></figure>

If the reception of RTMP video is not normal, the app exposes the progress UI or displays the status of disconnected network. In this situation, please use the function again after checking the network environment and device status.

<figure><img src="https://1019928184-files.gitbook.io/~/files/v0/b/gitbook-x-prod.appspot.com/o/spaces%2FlISC5rfB4Hnmbsjf8phq%2Fuploads%2FZJElsbOsa9F0raGY1Cf6%2FRTMP%20Overlay%206.png?alt=media&amp;token=e59fad6a-ac3b-4543-83ac-7dc9c0937dd6" alt=""><figcaption></figcaption></figure>

[Mobile](/mobile/overview), [Guides](/mobile/guides), [Widgets & Effects](/mobile/guides/widgets-and-effects), [RTMP Overlay Widget](/mobile/guides/widgets-and-effects/rtmp-overlay-widget)


# Others


# Source Usage Limit Guide

Android, iOS

When you create a live stream in PRISM Live Studio, you can add different types of sources such as images, text, music, or chat windows. To keep your live stable and smooth, there are limits on how many sources you can use at the same time. This guide explains the maximum number of each source type and how you can combine them.

\*We are reviewing options to increase this limit to allow the use of more overlays in the future.

## Android - My Studio Sources (Camera, VTuber mode)

<table><thead><tr><th width="513.90234375">Sources</th><th>Limit</th></tr></thead><tbody><tr><td>Chat</td><td>1</td></tr><tr><td>Image</td><td>5</td></tr><tr><td>Text</td><td>3</td></tr><tr><td>Web</td><td>4</td></tr><tr><td>QR Code</td><td>1</td></tr><tr><td>RTMP Video</td><td>1</td></tr><tr><td>Play Features<br>- Music, Video, Music Playlist, Video Playlist, Image Playlist<br>- The above source cannot be used together.</td><td>1</td></tr></tbody></table>

{% hint style="info" %}
The Basic version allows you to display up to two overlays on the screen. To display more than two overlays, please subscribe to the Plus version.
{% endhint %}

## Android - Screencast Sources (Screen mode)

<table><thead><tr><th width="513.90234375">Sources</th><th>Limit</th></tr></thead><tbody><tr><td>Chat</td><td>1</td></tr><tr><td>Image</td><td>3</td></tr><tr><td>Text</td><td>3</td></tr><tr><td>Web</td><td>3</td></tr><tr><td>2D Avatar</td><td>1</td></tr><tr><td>3D Avatar</td><td>1</td></tr><tr><td>QR Code</td><td>1</td></tr></tbody></table>

## iOS - My Studio Sources (Camera, VTuber mode)

<table><thead><tr><th width="513.90234375">Sources</th><th>Limit</th></tr></thead><tbody><tr><td>Chat, Web<br>- Only one chat is allowed.</td><td>4</td></tr><tr><td>Image</td><td>5</td></tr><tr><td>Text</td><td>3</td></tr><tr><td>QR Code</td><td>1</td></tr><tr><td>RTMP Video</td><td>1</td></tr><tr><td>Play Features<br>- Music, Video, Music Playlist, Video Playlist, Image Playlist<br>- The above source cannot be used together.</td><td>1</td></tr></tbody></table>

{% hint style="info" %}
The Basic version allows you to display up to two overlays on the screen. To display more than two overlays, please subscribe to the Plus version.
{% endhint %}

## iOS - Screencast Sources (Screen mode)

<table><thead><tr><th width="513.90234375">Sources</th><th>Limit</th></tr></thead><tbody><tr><td>Chat</td><td>1</td></tr><tr><td>Image</td><td>2</td></tr><tr><td>Text</td><td>3</td></tr><tr><td>Web</td><td>2</td></tr><tr><td>2D Avatar</td><td>1</td></tr><tr><td>3D Avatar</td><td>1</td></tr><tr><td>QR Code</td><td>1</td></tr></tbody></table>

### Usage Examples

#### IRL Streaming

* Camera feed + 1 chat + 2 images (channel logo, banner)

#### Game Streaming

* Screen capture + 1 chat + 2 images (channel logo, banner) + 1 text (notice)

#### VTuber Streaming

* 1 3D avatar + 1 chat + 2 text items (stream title, support info) + 1 QR code (support link)

### Tips

* **Minimize the Number of Sources**\
  Adding too many sources can overload the stream. Place only the essentials for a more stable broadcast.
* **Playback Sources Are Not Compatible Simultaneously**\
  Music, video, and image playlists cannot be played together. Choose only one type depending on your stream’s purpose.
* **Check OS Limitations**\
  The maximum number of supported sources may differ between Android and iOS. Verify in advance and design your layout accordingly.

[Mobile](/mobile/overview)*,* [Guides](/mobile/guides), [Widgets & Effects](/mobile/guides/widgets-and-effects)


# Features


# ScreenCast


# Using Screencast

Android, iOS

PRISM app supports Camera-Live using the device’s camera, Screen-Live for sharing your device’s screen, and VTubing-Live with your own character avatar. Among them, the **ScreenCast** feature is primarily utilized for game streaming, enabling live streaming directly from smartphones by broadcasting the device’s screen.

Furthermore, the ScreenCast feature in the PRISM app allows users to overlay various sources onto the broadcast screen by **Scene editing**, adjust the device and microphone volume separately, and enable a screensaver to protect private information during live streams.

{% tabs %}
{% tab title="EN" %}
{% hint style="info" %}
**Supported iOS devices for 1080p ScreenCast**

Using **1080p** resolution in ScreenCast mode requires high processing power, which may impact streaming performance on certain iOS devices. To ensure smooth streaming, only the following devices support 1080p ScreenCast (as of 25-07-07) :

* **iPhone:** iPhone 12 or later
* **iPad:** 10th generation or later
* **iPad Pro (11-inch):** 3rd generation or later
* **iPad Pro(12.9-inch):** 5th generation or later&#x20;
* **iPad Air:** 4th generation or later
* **Mini:** 6th generation or later

For devices not included in this list, ScreenCast resolution will be limited to **720p** to maintain stable performance.
{% endhint %}
{% endtab %}

{% tab title="한국어" %}
{% hint style="info" %}
**1080p 스크린캐스트 지원 iOS 기기 안내**

스크린캐스트 모드에서 1080p 해상도를 사용하려면 높은 처리 성능이 필요하여, 일부 iOS 기기에서는 스트리밍 성능에 영향을 줄 수 있습니다. 원활한 스트리밍을 위해 1080p 스크린캐스트는 다음 기기에서만 지원됩니다. (25년 7월 7일 기준)

* **iPhone**: iPhone 12 이상
* **iPad**: 10세대 이상
* **iPad Pro(11인치)**: 3세대 이상
* **iPad Pro(12.9인치)**: 5세대 이상
* **iPad Air**: 4세대 이상
* **iPad mini**: 6세대 이상

위 기기 목록에 포함되지 않은 경우, 안정적인 성능 유지를 위해 스크린캐스트 해상도는 720p로 제한됩니다.
{% endhint %}
{% endtab %}
{% endtabs %}

***

To enter ScreenCast mode, click on the **LIVE** tab in the bottom menu, then select **Screen** mode from the available options **(Screen, Camera, VTuber)**.

On the App Store, there are various portrait and landscape games. The PRISM app allows users to capture the screen in both **portrait** and **landscape** modes. Additionally, regardless of the screen orientation, it supports both **16:9** and **9:16** aspect ratios for streaming videos.

Once you have configured your broadcast settings, click **Go Live**.

<figure><img src="https://1019928184-files.gitbook.io/~/files/v0/b/gitbook-x-prod.appspot.com/o/spaces%2FlISC5rfB4Hnmbsjf8phq%2Fuploads%2F6sDPAlUAOgdyTpamwRib%2Fsc_01.png?alt=media&amp;token=34cea84b-8272-49a4-8322-c92e188bf404" alt=""><figcaption><p>Click on the <strong>LIVE</strong> tab in the bottom menu, then select the <strong>Screen</strong> mode.</p></figcaption></figure>

<figure><img src="https://1019928184-files.gitbook.io/~/files/v0/b/gitbook-x-prod.appspot.com/o/spaces%2FlISC5rfB4Hnmbsjf8phq%2Fuploads%2FJEsox6S8NugguJienoUG%2Fsc_02.png?alt=media&amp;token=7c78af97-5278-45c6-9e54-97e56e4fe447" alt=""><figcaption><p>You can use Portrait screen capture for both 16:9 and 9:16 aspect ratio streaming.</p></figcaption></figure>

<figure><img src="https://1019928184-files.gitbook.io/~/files/v0/b/gitbook-x-prod.appspot.com/o/spaces%2FlISC5rfB4Hnmbsjf8phq%2Fuploads%2FAjKjy2r5tnV4AttZBoDl%2Fsc_03.png?alt=media&amp;token=36471232-dfca-484e-861e-1f1924d811df" alt=""><figcaption><p>And you can also use Landscape screen capture for both 16:9 and 9:16 aspect ratio streaming.</p></figcaption></figure>

On iOS, the ScreenCast feature operates through iOS ReplayKit, so a system popup will appear before streaming begins.

Make sure to turn on the **Microphone** at the bottom, as it cannot be activated within the PRISM app if the microphone toggle is set to off. However, you can still enable it after starting the broadcast by accessing the device **Control Center** and clicking the recording widget.

When you’re ready, click **Start Broadcast** to begin streaming live.

<figure><img src="https://1019928184-files.gitbook.io/~/files/v0/b/gitbook-x-prod.appspot.com/o/spaces%2FlISC5rfB4Hnmbsjf8phq%2Fuploads%2FXHUmCflAdgq4lqsaSb0G%2Fscreencast3.png?alt=media&amp;token=2dc7f5ed-14b6-4d42-863d-664c01eac6a1" alt=""><figcaption><p>Turn on the <strong>Microphone</strong> and click <strong>Start Broadcast</strong> to begin streaming live.</p></figcaption></figure>

***

## Viewers chat

When you start live streaming in ScreenCast mode, the PRISM app interface changes as shown in the image above. At this point, you can switch the PRISM app to the background and launch another app or game to fully utilize the ScreenCast feature.

You can see that the chat button and information edit button are located in the bottom right corner of the screen. Clicking the chat button will open the chat view, allowing you to interact with viewers in real time.

<figure><img src="https://1019928184-files.gitbook.io/~/files/v0/b/gitbook-x-prod.appspot.com/o/spaces%2FlISC5rfB4Hnmbsjf8phq%2Fuploads%2FlqvFpN5gezfUkYQSy0T1%2Fsc_04.png?alt=media&amp;token=e6e0f8b8-fb45-45fe-84ec-9fbcbedd70da" alt=""><figcaption><p>Click the chat button to open the chat view.</p></figcaption></figure>

<figure><img src="https://miro.medium.com/v2/resize:fit:1400/1*ImsYDOvnfBKRkA_Fh2Ncjw.png" alt=""><figcaption><p>Interact with viewers in real time using the chat view.</p></figcaption></figure>

***

## Audio settings <a href="#id-3feb" id="id-3feb"></a>

You can adjust both the device’s internal sound and microphone volume to balance audio levels for your stream. The microphone volume can be monitored in real-time using the level meter, helping you ensure clear and appropriate audio levels during your broadcast.

<figure><img src="https://1019928184-files.gitbook.io/~/files/v0/b/gitbook-x-prod.appspot.com/o/spaces%2FlISC5rfB4Hnmbsjf8phq%2Fuploads%2FobwIa9jAnhg7VXvrK4m3%2FScreenshot_20250314_203742_PRISM%20Live.jpg?alt=media&amp;token=45549f35-c8b0-4dbe-9495-29ff5cadd153" alt=""><figcaption><p>Adjust the device’s internal sound and microphone volume to balance audio levels for your stream.</p></figcaption></figure>

***

## Screen saver settings <a href="#id-3bf0" id="id-3bf0"></a>

When using ScreenCast, there is a possibility of personal information being exposed, such as account login screens. To prevent this, the **Screensaver** feature provides screen protection presets and various customization options.

Additionally, the **Screensaver auto off timer** allows you to automatically turn off the screensaver after a set period once your game has started. You can choose from preset options ranging from 5 seconds to 10 minutes, depending on your preference.

<figure><img src="https://1019928184-files.gitbook.io/~/files/v0/b/gitbook-x-prod.appspot.com/o/spaces%2FlISC5rfB4Hnmbsjf8phq%2Fuploads%2FEYXetgeoVchibGod2Xz7%2FScreenshot_20250314_203825_PRISM%20Live.jpg?alt=media&amp;token=f326146b-4dde-4001-b01e-503462d63c7c" alt=""><figcaption><p>Use the <strong>Screensaver</strong> feature to protect your personal information from being exposed.</p></figcaption></figure>

<figure><img src="https://1019928184-files.gitbook.io/~/files/v0/b/gitbook-x-prod.appspot.com/o/spaces%2FlISC5rfB4Hnmbsjf8phq%2Fuploads%2FHMrfrIbwiMav9cdxpTmh%2Fsc_13.png?alt=media&amp;token=e3b84023-2f1b-463a-b969-4dd14edcf39e" alt=""><figcaption><p>And you can easily enable the <strong>Screensaver</strong> on the live preparation screen using the toggle button.</p></figcaption></figure>

<figure><img src="https://1019928184-files.gitbook.io/~/files/v0/b/gitbook-x-prod.appspot.com/o/spaces%2FlISC5rfB4Hnmbsjf8phq%2Fuploads%2Fln54Qbo3Qor1b0UYG5PK%2Fsc_14.png?alt=media&amp;token=cfda774b-67ab-4919-b810-005bf5c60780" alt=""><figcaption><p>You can apply more detailed options through the <strong>Screensaver settings</strong> section in the <strong>Screen settings</strong> menu.</p></figcaption></figure>

***

## ScreenCast Scene editing <a href="#id-1757" id="id-1757"></a>

You can set a layout of the screencast to overlay various sources, including images, webpages, and VTube avatars, onto your device’s screen. Additionally, you can adjust the size and position of your device’s screen as if it were just another type of source.

{% hint style="info" %}
**Supported iOS devices for ScreenCast Scene editing**

Using the Scene editing function on iOS devices may result in decreased live streaming quality, as it requires additional processing power. To ensure optimal performance, this feature is only available on devices that can fully support it. The list of compatible devices is as follows:

* **iPhone:** iPhone 12 or later
* **iPad:** 10th generation or later
* i**Pad Pro (11-inch):** 3rd generation or later
* **iPad Pro (12.9-inch):** 5th generation or later
* i**Pad Air:** 4th generation or later
* **iPad mini:** 6th generation or later
  {% endhint %}

To access the ScreenCast layout, click the Screen settings button.

<figure><img src="https://1019928184-files.gitbook.io/~/files/v0/b/gitbook-x-prod.appspot.com/o/spaces%2FlISC5rfB4Hnmbsjf8phq%2Fuploads%2FwRDNxZaBDpXbFDV1XxLa%2Fsc_05.png?alt=media&amp;token=2b99b500-7d0b-43f2-80fb-3fa3f75c6813" alt=""><figcaption><p>You can configure a scene by clicking the <strong>Scene editing</strong> option in the <strong>Screen settings</strong> bottom sheet.</p></figcaption></figure>

The navy-colored box represents the area where your device’s screen is captured. The screen capture area varies depending on the Landscape or Portrait layout.

There are four buttons located in the upper right corner of the scene editing screen:

• Add sources

• Manage layers of the sources

• Change layout sets

• Switch screen orientation

Click the screen rotating button to switch between Landscape and Portrait screen capture.

<figure><img src="https://1019928184-files.gitbook.io/~/files/v0/b/gitbook-x-prod.appspot.com/o/spaces%2FlISC5rfB4Hnmbsjf8phq%2Fuploads%2FQKEBO4eqNDTmwHrrMAAi%2Fsc_06.png?alt=media&amp;token=ae97fdd4-c945-4903-8bac-86415279cab2" alt=""><figcaption><p>Click the screen rotating button to switch between <strong>Landscape</strong> and <strong>Portrait</strong> screen capture in 16:9 video aspect ratio.</p></figcaption></figure>

<figure><img src="https://1019928184-files.gitbook.io/~/files/v0/b/gitbook-x-prod.appspot.com/o/spaces%2FlISC5rfB4Hnmbsjf8phq%2Fuploads%2FXBmqZsvVgAOTqk7UuOKI%2Fsc_07.png?alt=media&amp;token=9da004a2-6940-437c-969a-8f2558d36745" alt=""><figcaption><p>Click the screen rotating button to switch between <strong>Landscape</strong> and <strong>Portrait</strong> screen capture in 9:16 video aspect ratio.</p></figcaption></figure>

When you click the Plus (**+**) button, a menu for adding sources appears from the right side of the screen. As seen below, you can add:&#x20;

* Chat
* Web(Webpage)
* Image
* 2D Avatar
* 3D Avatar
* QR Code

However, Chat, Web, 2D Avatar, 3D Avatar, and QR Code sources can only be added once per layout. If these sources are already placed on the screen, their add button will be displayed in gray.

When you click the Plus (**+**) button, a menu for adding sources appears from the right side of the screen. As you can see below, you can add chat, web, image, 2D Avatar, 3D avatar, and QR code source in the menu. Chat, VTuber, and QR code source are can be only added as single source, the add button of already added source disabled.&#x20;

Once a source is added, you can position, resize, and configure various properties of it.

<figure><img src="https://1019928184-files.gitbook.io/~/files/v0/b/gitbook-x-prod.appspot.com/o/spaces%2FlISC5rfB4Hnmbsjf8phq%2Fuploads%2FOdHGgEbW6n75OJ5wVEPe%2Fsc_08.png?alt=media&amp;token=80af85bb-b52b-4a45-b6cd-1de4c2fa632a" alt=""><figcaption><p>Add sources and adjust their position, size, and settings as needed.</p></figcaption></figure>

<figure><img src="https://1019928184-files.gitbook.io/~/files/v0/b/gitbook-x-prod.appspot.com/o/spaces%2FlISC5rfB4Hnmbsjf8phq%2Fuploads%2FYZbOOgqppHttPmgleeew%2Fsc_15.png?alt=media&amp;token=39882f54-1179-4ba2-ba3e-8f4870a38593" alt=""><figcaption><p>The menu layout for the <strong>9:16 video aspect ratio</strong> for the vertical live streaming looks like this.</p></figcaption></figure>

<figure><img src="https://1019928184-files.gitbook.io/~/files/v0/b/gitbook-x-prod.appspot.com/o/spaces%2FlISC5rfB4Hnmbsjf8phq%2Fuploads%2Fp56ClDileyns8ip0IF2k%2Fsc_16.png?alt=media&amp;token=6b10b9ce-9276-4808-9498-894344c155d2" alt=""><figcaption><p>This is a setting for vertical live streaming, but landscape screen capture is also possible.</p></figcaption></figure>

In this case, the shape of the video streamed through PRISM app’s ScreenCast feature is in a 16:9 video aspect ratio. And if you exceed the safe streaming area, the source will be cropped. This is indicated by the orange-colored box in the image below.

<figure><img src="https://1019928184-files.gitbook.io/~/files/v0/b/gitbook-x-prod.appspot.com/o/spaces%2FlISC5rfB4Hnmbsjf8phq%2Fuploads%2FIKUgJz81dOs496FyAf7D%2Fscreencast7.png?alt=media&amp;token=e49bfd8a-304b-4820-8c99-c04785f4be88" alt=""><figcaption><p>Make sure not to exceed the safe streaming area to avoid cropping.</p></figcaption></figure>

You can use the Layers menu by clicking the Layers button. This feature allows you to lock or unlock layers, ensuring that certain elements remain fixed in place while adjusting others. Additionally, you can change the z-order of sources to determine which elements appear in front or behind others.

<figure><img src="https://1019928184-files.gitbook.io/~/files/v0/b/gitbook-x-prod.appspot.com/o/spaces%2FlISC5rfB4Hnmbsjf8phq%2Fuploads%2FJkqOeVyiSsdV8kUrIFHN%2Fscreencast8.png?alt=media&amp;token=c28077dc-e97d-4bab-b32e-de6f172a7a32" alt=""><figcaption><p>The Layers menu lets you lock or unlock layers and adjust the z-order of sources.</p></figcaption></figure>

The PRISM app allows you to create and save multiple scene editing to suit different streaming needs. To manage your scenes, click the Scene button, where available scenes will be displayed in a list. Click the Plus (**+**) button to add a new scene.

{% hint style="info" %}
The scene lists are generated and managed according to the broadcast aspect ratios of 16:9 and 9:16, so please keep that in mind.
{% endhint %}

<figure><img src="https://1019928184-files.gitbook.io/~/files/v0/b/gitbook-x-prod.appspot.com/o/spaces%2FlISC5rfB4Hnmbsjf8phq%2Fuploads%2FyJONhI2auQQx8OirN87A%2Fsc_09.png?alt=media&amp;token=d3f3b637-be2c-4e30-8c68-841d31cfdd8a" alt=""><figcaption><p>Click the Scene button, then click the Plus (+) button.</p></figcaption></figure>

You can choose from preset options to add a scene, which will then be added to your list of saved scenes. After selecting a scene, you can fine-tune the position of elements to best fit your stream’s aesthetics.

<figure><img src="https://1019928184-files.gitbook.io/~/files/v0/b/gitbook-x-prod.appspot.com/o/spaces%2FlISC5rfB4Hnmbsjf8phq%2Fuploads%2F4pu9uIgr7985QxbH0PEi%2Fsc_10.png?alt=media&amp;token=228a7c7e-9738-42a3-9c1c-3e3b61d72c9d" alt=""><figcaption><p>You can select and use preset scenes.</p></figcaption></figure>

Once you have saved multiple scenes, you can easily switch between them based on your current stream setup. To further manage your saved scenes, click the three-dot menu (**⋮**) next to a scene, where you will find options to rename, copy, or delete it.

### Chat source <a href="#id-3390" id="id-3390"></a>

You can place a chat widget on your streaming screen to display real-time viewer interactions. The chat widget offers various customization options through the settings menu, allowing you to adjust its appearance and behavior to match your stream’s style.

You can set chat messages to automatically disappear after a certain amount of time, ensuring a clean and dynamic display. Additionally, you can customize text opacity, chat color, and font styles to enhance readability. The widget also provides multiple design templates, allowing you to choose the one that best fits your stream’s aesthetics.

<figure><img src="https://1019928184-files.gitbook.io/~/files/v0/b/gitbook-x-prod.appspot.com/o/spaces%2FlISC5rfB4Hnmbsjf8phq%2Fuploads%2FhASlkBef8jaAt8WTL0ln%2Fsc_11.png?alt=media&amp;token=cfb74a95-c338-463f-a24a-3e2f4aaa2c49" alt=""><figcaption><p>The <strong>Chat</strong> feature provides various options to configure different chat widgets.</p></figcaption></figure>

### Web source <a href="#id-378e" id="id-378e"></a>

Web source overlays in live streams are primarily used for displaying donation alerts or other web-based elements. However, due to limitations of the iOS operating system, these overlays are only visible to viewers and will not be displayed on the broadcaster’s screen.

<figure><img src="https://miro.medium.com/v2/resize:fit:1400/1*vnoADU58CN0itwzZfUlqvg.png" alt=""><figcaption></figcaption></figure>

### Image source <a href="#fa3b" id="fa3b"></a>

Just like in regular camera live streams, you can overlay images onto ScreenCast streams. You can select images from your device’s gallery.

<figure><img src="https://miro.medium.com/v2/resize:fit:1400/1*kSC00ud2S4L8G9kZbLYdcA.png" alt=""><figcaption></figcaption></figure>

### 2D / 3D Avatar source <a href="#id-10db" id="id-10db"></a>

You can use PNG Tuber characters provided by the PRISM app with the Screencast feature, allowing you to display an avatar that reacts to your voice during game streaming. The character’s mouth movements sync with your voice, creating a more interactive and engaging experience for viewers. For more details about PNG Tuber, refer to the following page:

* [Adopting PNG Tuber](/mobile/guides/vtuber/adopting-png-tuber)

However, changing the PNG Tuber’s emotions in real time is not supported during game streaming. Instead, you can set a default emotion in the avatar settings menu beforehand. Once configured, your chosen emotion will be applied when using the PNG Tuber in the Screencast feature.&#x20;

<figure><img src="https://miro.medium.com/v2/resize:fit:1400/1*jV3AaAG_e5MYFMdpETBjhQ.png" alt=""><figcaption><p>The <strong>Screencast</strong> feature in the PRISM app supports PNG Tubers using images.</p></figcaption></figure>

<figure><img src="https://1019928184-files.gitbook.io/~/files/v0/b/gitbook-x-prod.appspot.com/o/spaces%2FlISC5rfB4Hnmbsjf8phq%2Fuploads%2F2bbnC5uJkNP0lL68uqqo%2Fsc_12.png?alt=media&amp;token=1db77ebc-f9fc-42d4-a124-865f87804aa4" alt=""><figcaption><p>And it also supports 3D VTuber functionality using VRM models.</p></figcaption></figure>

### Screen source <a href="#id-6e30" id="id-6e30"></a>

You can use your device’s captured screen as an overlay on your live stream. The captured screen can be placed anywhere in the layout and resized as needed, allowing you to position the screen or game area in the most suitable way for your viewers.

Since the screen source size is typically large, it may be helpful to lock the source in the layer menu after resizing and positioning it. This prevents accidental adjustments and ensures a stable streaming layout.

<figure><img src="https://1019928184-files.gitbook.io/~/files/v0/b/gitbook-x-prod.appspot.com/o/spaces%2FlISC5rfB4Hnmbsjf8phq%2Fuploads%2FXfqmM4O19DraNd8Gzyz9%2Fscreencast16.jpg?alt=media&amp;token=397e2e25-812e-4b25-9380-97ad5ed92167" alt=""><figcaption></figcaption></figure>

***

## Floating widget (Android only)

In the ScreenCast mode of the PRISM Android app, a **Floating widget** provides easy access to key streaming functions. Using the **Chat** tab, you can view viewer chats and donations directly on your game screen. The **Thumbnail** tab allows you to preview how your current layout appears to viewers, ensuring your stream looks exactly as intended. Additionally, you can control audio settings and activate the screen saver from the widget.

{% hint style="warning" %}
Floating widgets are not available on iOS due to OS limitations.
{% endhint %}

<figure><img src="https://miro.medium.com/v2/resize:fit:1400/1*1RYBplGwGkYP57HKuk1gBw.jpeg" alt=""><figcaption><p>A <strong>Floating widget</strong> provides easy access to key streaming functions.</p></figcaption></figure>

***

## Front camera overlay (Android only) <a href="#id-2ef9" id="id-2ef9"></a>

The Floating widget in the PRISM Android app also supports a **Front camera overlay**, allowing streamers to include their facecam in the broadcast as Picture-in-Picture (PiP). This feature enhances viewer engagement by displaying the streamer’s face alongside the gameplay.

The PiP window is fully adjustable—you can pinch to zoom for resizing and drag to reposition the camera overlay anywhere on the screen for optimal placement.

<figure><img src="https://miro.medium.com/v2/resize:fit:1400/1*C193PjjfSPv4f02B9MimwQ.jpeg" alt=""><figcaption><p>The <strong>Front camera overlay</strong> displays the facecam in the broadcast as PiP.</p></figcaption></figure>

***

## ScreenCast notification (iOS only)

Unlike the PRISM Android app, which provides real-time information through a Floating widget, the PRISM iOS app does not support this feature due to iOS system limitations.

As an alternative, the iOS app provides real-time notifications for key events such as viewer chats, subscriptions, and Super Chat messages during game streaming. You can customize notification settings in the app’s Settings menu, allowing you to stay informed and interact with your viewers more effectively.

<figure><img src="https://miro.medium.com/v2/resize:fit:1400/1*h0oT99ijmxD_wlDoo3ktQA.png" alt=""><figcaption><p>Through the app’s settings menu, users can configure various notifications for the ScreenCast feature.</p></figcaption></figure>

<figure><img src="https://miro.medium.com/v2/resize:fit:1400/1*6CaSYrxMaexWlcWNU_5fqw.png" alt=""><figcaption><p>Detailed settings are supported, along with Text-to-Speech (TTS) functionality.</p></figcaption></figure>

[Mobile](/mobile/overview), [Guides](/mobile/guides), [Features](/mobile/guides/features), [ScreenCast](/mobile/guides/features/screencast)


# Choosing How to Share Your Screen

## Choosing How to Share Your Screen

{% tabs %}
{% tab title="English" %}

### Pick the right way to share your screen

When you start a screencast on Android, PRISM now shows a short guide that helps you choose how to share your screen — so your viewers see exactly what you want them to see, and nothing you don't.

> **Available on**: Android 5.3.0 or later (screencast)

### When you'll see it

Right after you start a screencast and choose to save the live video, a small sheet titled **"How to share your screen"** appears — just before Android's own screen-sharing pop-up. Read the two options, then tap **Next**.

### The two ways to share

**Share one app** Only the screen of the single app you pick is broadcast, so everything else on your phone stays private. Keep in mind that a few apps block screen or sound sharing — with those, the screen may look black or the app's sound may not come through.

**Share entire screen** Your whole device screen is broadcast, exactly as you see it. Choose this if the screen turns black or if PRISM closes during your broadcast.

### The buttons

* **Next** — continue to Android's screen-sharing pop-up, where you make your final choice.
* **Cancel** — close the guide without continuing.
* **Don't show again** — check this if you'd rather skip the guide next time.
  {% endtab %}

{% tab title="Korean" %}

### 화면을 알맞게 공유하는 방법을 골라요

안드로이드에서 스크린캐스트를 시작하면, 화면을 어떻게 공유할지 쉽게 고를 수 있도록 PRISM이 짧은 안내를 보여줍니다. 시청자에게 보여주고 싶은 화면만 잘 나가도록 도와드려요.

> **지원 기기**: Android 5.3.0 이상 (스크린캐스트)

### 언제 나타나나요

스크린캐스트를 시작하고 라이브 영상을 저장하기로 선택한 직후, 안드로이드의 화면 공유 창이 뜨기 바로 전에 **"화면 공유 방식 안내"** 시트가 잠깐 표시됩니다. 두 가지 방식을 읽어 보고 **다음으로**를 누르면 됩니다.

### 두 가지 공유 방식

**앱 하나 공유** 고른 앱 하나의 화면만 송출합니다. 그래서 나머지 화면은 시청자에게 보이지 않아요. 다만 일부 앱은 화면이나 소리 공유를 막아 두어서, 화면이 까맣게 보이거나 앱 소리가 나가지 않을 수 있습니다.

**전체 화면 공유** 기기 화면 전체를 보이는 그대로 송출합니다. 화면이 까맣게 나오거나 방송 도중 PRISM이 꺼진다면 이 방식을 선택하세요.

### 버튼 안내

* **다음으로** — 안드로이드 화면 공유 창으로 넘어가 방식을 최종 선택합니다.
* **취소** — 안내를 닫고 멈춥니다.
* **그만보기** — 다음부터 이 안내를 건너뛰고 싶다면 체크하세요.
  {% endtab %}
  {% endtabs %}


# Remote Control


# Using Remote Control for Another PRISM App

Android, iOS

Most of the live streaming these days takes place in a situation where the streaming device is mounted some distance away in front of the streamer. As a result, streamers have had some difficulty accessing or controlling the device’s features during live streaming.

PRISM app supports remote control function that can remotely control the other PRISM app. And this feature can be used in various combinations, such as:

**• Streaming with PRISM mobile + remote control with PRISM mobile**\
**• Streaming with PRISM Windows + remote control with PRISM mobile**\
**• Streaming with PRISM mobile + remote control with PRISM Windows** (to be supported in the future)

***

## Connecting remote control

You need at least two devices to use the remote control function. One is a device that actually performs live streaming, and the other is a device that remotely controls a device that is performing live streaming.

### Settings in the PRISM app for live streaming <a href="#id-9aab" id="id-9aab"></a>

Once you click the round More button at the top left of the app, a menu where you can use various functions is provided. Click the **Remote control connection** button from the bottom of that menu to open the QR code sheet.

<figure><img src="https://1019928184-files.gitbook.io/~/files/v0/b/gitbook-x-prod.appspot.com/o/spaces%2FlISC5rfB4Hnmbsjf8phq%2Fuploads%2FKIi0wt6pI98ZSmcYXclh%2Fremote1.png?alt=media&amp;token=033948ee-2ae0-477c-bb73-53b0d66788e8" alt=""><figcaption></figcaption></figure>

There is a QR code for the remote control app to connect to the PRISM app for live streaming. After the remote control app is connected, the screen will display the connection information as shown in the right image.

<figure><img src="https://miro.medium.com/v2/resize:fit:1400/1*uscs_5PpX3b0jUoNYv9Msw.jpeg" alt=""><figcaption></figcaption></figure>

The same QR code connection screen is provided in the PRISM Windows app, and the remote control connection menu button for that screen can be seen on the right side of the app screen.

<figure><img src="https://miro.medium.com/v2/resize:fit:1400/1*OcWV6EdUiCyk-YsqM_WQTQ.jpeg" alt=""><figcaption></figcaption></figure>

The remote control connection screen in the mobile app and Windows app supports not only connection through QR code scan but also automatic connection function.

The PRISM app checks the list of PRISM devices connected to the same WiFi. And when an immediate connection is possible, it connects automatically without going through the process of scanning the QR code.

However, if user confirmation is required for device selection, it provides a connection device selection screen for that. We will look at this again later in this page.

### Settings in the PRISM mobile app for remote control <a href="#b9d6" id="b9d6"></a>

Select the CONNECT tab from the list of tabs at the bottom of the screen to use as a remote control. The CONNECT tab was used to connect the camera or screen of the PRISM mobile app to the PRISM Windows app, but it can also be used for remote control connection.

Scan the QR code of the streaming device with the QR code scan screen of the CONNECT menu to complete the remote control connection.

<figure><img src="https://miro.medium.com/v2/resize:fit:1400/1*Aay3DgUTVesJI4EJbQOqjw.jpeg" alt=""><figcaption><p>Both devices should be connected to the same WiFi.</p></figcaption></figure>

However, as mentioned earlier, since the automatic connection function was embedded to the CONNECT tab, the connection may be processed automatically even before scanning the QR code.

If only one device to connect is specified, the PRISM app will try to connect automatically, but if multiple connectable devices are found, the PRISM app may not be able to connect automatically.

So, in this case, the message **Connectable device** is displayed at the top of the screen, and when you click on it, the PRISM app displays a list of connectable devices so that you can select the intended connection.

<figure><img src="https://miro.medium.com/v2/resize:fit:1400/1*yHKHl9kZjZtlx1F7kGp4Ig.jpeg" alt=""><figcaption><p>Devices may auto-connected, or the sheet asking what device to connect can be displayed.</p></figcaption></figure>

***

## Setting remote control deck

The remote control screen consists of shortcut keys for various functions that can control live streaming. And this configuration can be easily adjusted to suit your convenience. Currently, we provide shortcut keys for a total of 17 functions, but we plan to add shortcut keys for more functions in the future.

When the remote control connection is completed for the first time, the minimum shortcut keys are set as shown in the image above. If you click the boxed plus (**+**) button, you can check the list of shortcut keys that can be used by adding to the remote control.

<figure><img src="https://miro.medium.com/v2/resize:fit:1400/1*doeI35qk7FYn0hA2ejUlDA.jpeg" alt=""><figcaption><p>If you're first using of remote control, minimum shortcut keys are set.</p></figcaption></figure>

After selecting the shortcut keys for the functions you want to use, click the **Add** button to add them to the remote’s deck.

​The deck is a panel where the shortcut keys are placed. You can add as many decks as you want to the PRISM remote control, so you can arrange shortcuts for each deck and use them by purpose.
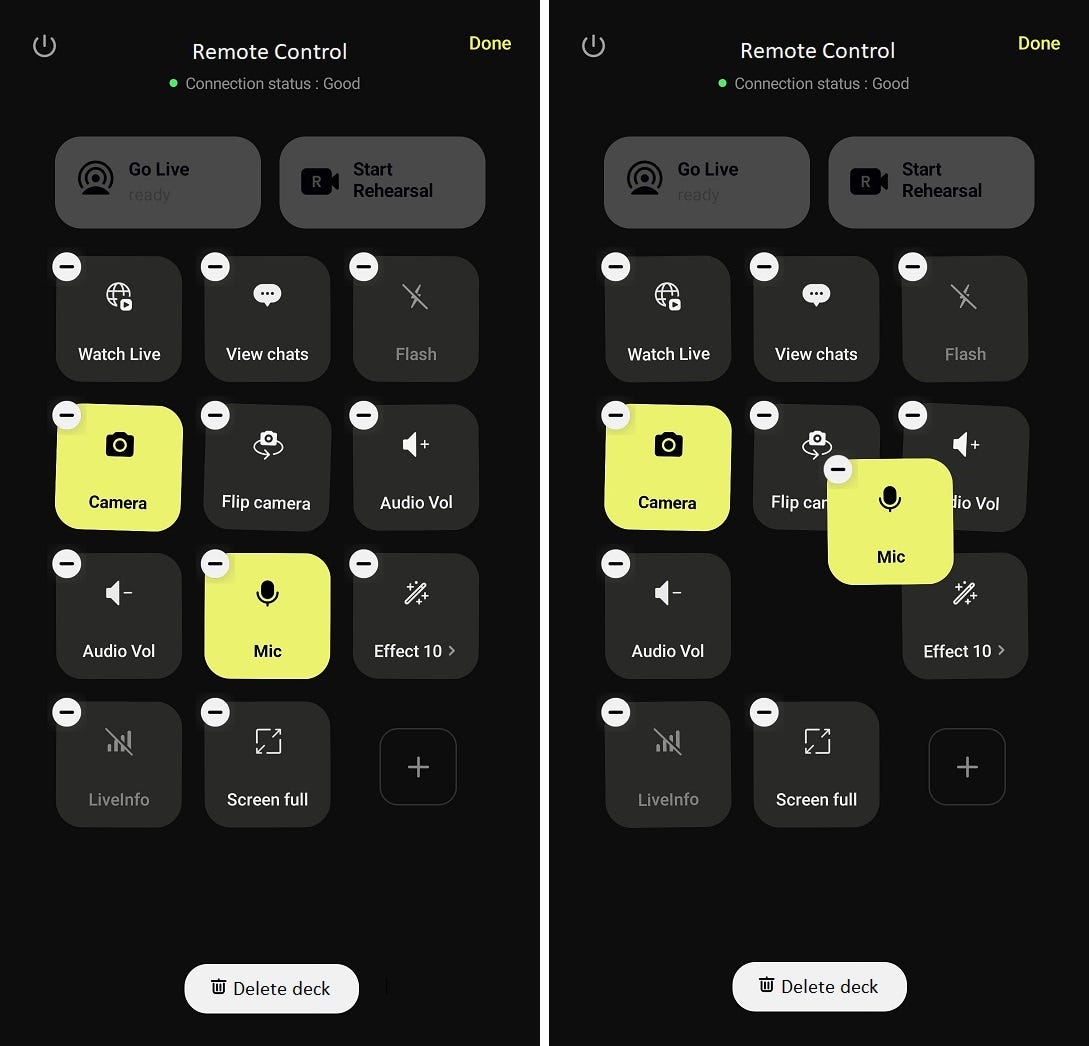
<figure><img src="https://miro.medium.com/v2/resize:fit:1400/1*aEV72u3uFrOEBiwFodG2pA.jpeg" alt=""><figcaption><p>​The deck is a panel where the shortcut keys are placed.</p></figcaption></figure>

Press and hold any shortcut key to enter shortcut editing mode. You can delete a shortcut through the delete button at the top left of the shortcut icon, or you can change the location by grabbing and dragging the shortcut. When editing the shortcut is completed, click the Done button at the top right to save it.
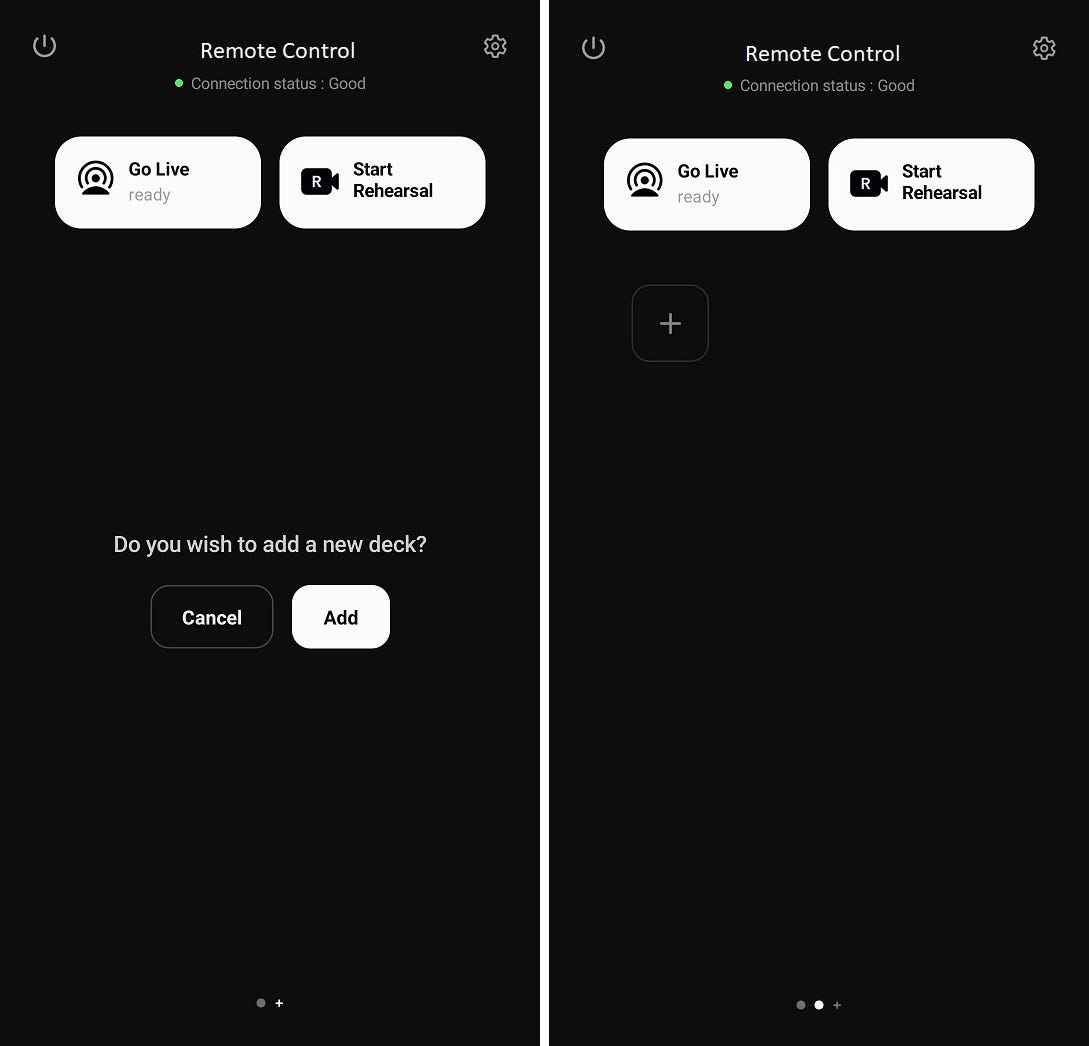
<figure><img src="https://miro.medium.com/v2/resize:fit:1400/1*dXMDBF9TdakRbsMIvpeVaQ.jpeg" alt=""><figcaption><p>Press and hold shortcut key to enter shortcut editing mode.</p></figcaption></figure>

As mentioned earlier, you can add as many decks as you like. To add a deck, swipe the screen from right to left to go to the last deck, where you will see an Add button to add a new deck.

When a new deck is added, it is added as an empty deck with no shortcut keys, but shortcuts can be added to the new deck through the Add Shortcut button.

<figure><img src="https://miro.medium.com/v2/resize:fit:1400/1*JSe17plKzMImqZj_I48fMQ.jpeg" alt=""><figcaption><p>You can add many decks as you like.</p></figcaption></figure>

If multiple decks have been added, you can select a deck by swiping the screen as shown in the image below.

And there will be situations where it is necessary to delete the deck. Press and hold any shortcut icon on the deck to enter shortcut editing mode, and you will see the Delete Deck button at the bottom of the screen.

<figure><img src="https://miro.medium.com/v2/resize:fit:1400/1*ZEv_jZazaobib08EvvTwqA.jpeg" alt=""><figcaption><p>Deleting deck can be accessed by entering editing mode.</p></figcaption></figure>

A shortcut in remote control allows you to remotely apply effects to the screen of a live streaming app. And the effects in the Favorites tab in the effects menu of the streaming app can only be displayed on the remote control screen. Please note that the Favorites tab in the Effects menu is indicated by a star icon.

So when you want to use effects remotely using the remote control, use them beforehand in the streaming app to add them to your favorites list. These effects will be automatically added to the effect shortcut in the remote control app. Check out the effect shortcut to check a list of effects available on the remote control.

<figure><img src="https://miro.medium.com/v2/resize:fit:1400/1*zJUQBQsznRO9BX8nDchFLw.jpeg" alt=""><figcaption></figcaption></figure>

<figure><img src="https://miro.medium.com/v2/resize:fit:1400/1*qLFb8EeqUNLgWLgwwazqvA.jpeg" alt=""><figcaption><p>If you click the appropriate effect icon at remote control app, the effect is applied immediately to live streaming app.</p></figcaption></figure>

As mentioned earlier, you can remotely control streaming from the Windows app through the remote control function of the mobile app. What’s more, you can switch between each scene set in the Windows app in real time from the mobile app, and even control the exposure of individual sources within each scene.

The image below shows 3 scenes set up in the PRISM Windows app: Scene 1, Scene 2, and Scene 3. And you can add those scenes as shortcuts to the remote control app.

<figure><img src="https://miro.medium.com/v2/resize:fit:1400/1*zYGz3DJq9NHhE0rV3iU9QQ.png" alt=""><figcaption></figcaption></figure>

When a specific scene button is clicked, that button turns yellow and the scene is also selected in the Windows app. And when the yellow scene button is clicked once more, the number of sources that the button’s scene contains is displayed.

And in that state, when the scene button is clicked once more, the source list that the scene contains is displayed on a separate layer as shown in the image on the right. Also, note that when each source button is clicked here, you can control the exposure state of each source in the scene.

<figure><img src="https://miro.medium.com/v2/resize:fit:1400/1*CiDdeo9nJebSeK3FzeWrZQ.jpeg" alt=""><figcaption></figcaption></figure>

The PRISM remote control function fully supports landscape mode as well.

Usually the device for live streaming will be placed in front of the streamer and the remote will be placed on a table close to hand for easy operation. In this case, it would be good to check if it is more comfortable to use the remote control in landscape mode.

<figure><img src="https://miro.medium.com/v2/resize:fit:1400/1*LB4BCtnk4IcKjJ_41RhOag.jpeg" alt=""><figcaption><p>PRISM remote control function supports landscape mode.</p></figcaption></figure>

[Mobile](/mobile/overview), [Guides](/mobile/guides), [Features](/mobile/guides/features), [Remote Control](/mobile/guides/features/remote-control)


# Camera


# Setting Camera Focus

Android, iOS

The PRISM mobile app provide the ability to set the focus manually or automatically through the Camera Pro menu, which can be accessed by clicking the round More button in the upper left corner of the app screen.

But you can easily switch between Auto Focus and Manual Focus without entering the Camera Pro menu, by **Focus Mode** setting function in the More menu list.

<figure><img src="https://1019928184-files.gitbook.io/~/files/v0/b/gitbook-x-prod.appspot.com/o/spaces%2FlISC5rfB4Hnmbsjf8phq%2Fuploads%2FAPq1MKWuxOpVKre2fP4k%2FFocus%20mode%201.png?alt=media&amp;token=4bd9c786-4ed6-4d95-b9e8-6918df5cae67" alt=""><figcaption><p><strong>Focus Mode</strong> setting function in the More menu list</p></figcaption></figure>

The page below provides a simpler way to change focus without accessing the More menu.

***

## Default focus mode <a href="#b294" id="b294"></a>

If you do not touch the screen after launching the PRISM mobile app, the PRISM app is in Auto Focus mode. The camera automatically focuses on the preview image provided through the lens.

***

## Focus changes when screen tap <a href="#id-9ac7" id="id-9ac7"></a>

The way focus changes when you tap the screen depends on the current focus mode.

**case 1: Screen tap in Auto Focus mode**\
If you tap the app screen in Auto Focus mode, the app automatically focuses once and stays in Auto Focus mode. At this point, a white focus indicator with a picture of an open lock (meaning Auto Focus mode) is shown where you have touched it.

​

**case 2: Screen tap in Manual Focus mode**\
If you tap the app screen in Manual Focus mode, the app focuses once around the touched location and stays in Manual Focus mode. At this point, a yellow focus indicator with a picture of an closed lock (meaning Manual Focus mode) is shown you have touched it.

<figure><img src="https://1019928184-files.gitbook.io/~/files/v0/b/gitbook-x-prod.appspot.com/o/spaces%2FlISC5rfB4Hnmbsjf8phq%2Fuploads%2FwpkplvxvzlytpMzQvBPk%2FFocus%20mode%202.png?alt=media&amp;token=e56b0a16-76fe-4816-92b0-d6c37b92c24c" alt=""><figcaption><p>Auto focus mode (left) / Manual focus mode (right)</p></figcaption></figure>

***

## Focus changes when long press

The way focus changes when you long press the screen also depends on the current focus mode.

**case 1: Long press in Auto Focus mode**\
If you long press the screen while in Auto Focus mode, the focus indicator turns white with an animation of the lock closing, and it switches to Manual Focus mode.

**case 2: Long press in Manual Focus mode**\
And if you long press the screen while in Manual Focus mode, the focus indicator turns yellow with an animation of the lock opening, and it switches to Auto Focus mode.

[Mobile](/mobile/overview), [Guides](/mobile/guides), [Features](/mobile/guides/features), [Camera](/mobile/guides/features/camera)


# Using Chroma-key Background

Android, iOS

The chroma-key is one of the video synthesis technology, which uses the difference in color tone to include a specific image or video in the background. And it’s commonly used in many film shoots.

***

You can find the **Camera Chroma-Key** function by clicking the More-button located at the top left.

<figure><img src="https://1019928184-files.gitbook.io/~/files/v0/b/gitbook-x-prod.appspot.com/o/spaces%2FlISC5rfB4Hnmbsjf8phq%2Fuploads%2Fx975dHe3plpRckeQQd2F%2FChroma%20key%201.png?alt=media&amp;token=0ee3d127-854f-4d1a-8446-5c233821e30d" alt="" width="375"><figcaption></figcaption></figure>

The chroma-key function can be activated or deactivated through the function’s **ON** / **OFF** button.

<figure><img src="https://1019928184-files.gitbook.io/~/files/v0/b/gitbook-x-prod.appspot.com/o/spaces%2FlISC5rfB4Hnmbsjf8phq%2Fuploads%2FWKJ0xAGdMBw9zrJap9ky%2FChroma%20key%202.png?alt=media&amp;token=f1a43c01-faed-4b5f-93cb-f82f7a4244fd" alt=""><figcaption></figcaption></figure>

Select the target color with the **Color** button and adjust the range of colors with the **Similarity** button.

<figure><img src="https://1019928184-files.gitbook.io/~/files/v0/b/gitbook-x-prod.appspot.com/o/spaces%2FlISC5rfB4Hnmbsjf8phq%2Fuploads%2Fqf2ql9LTm9R7ZYsnHXX5%2FChroma%20key%203.png?alt=media&amp;token=cdafc69a-4b99-4ca8-9ae2-d405e9932dce" alt=""><figcaption></figcaption></figure>

The **Sensitivity** button allows you to adjust the naturalness between the background and the object. Also, you can customize background with **BG** button. You can use images and videos from your device or select from a variety of images and videos provided by the PRISM app as the chroma-key background.

<figure><img src="https://1019928184-files.gitbook.io/~/files/v0/b/gitbook-x-prod.appspot.com/o/spaces%2FlISC5rfB4Hnmbsjf8phq%2Fuploads%2FrlMo0Pw2taPkAQlJfzWG%2FChroma%20key%204.png?alt=media&amp;token=c7284b5a-a6c0-4283-8e18-7693ec4e4fb2" alt=""><figcaption></figcaption></figure>

<figure><img src="https://1019928184-files.gitbook.io/~/files/v0/b/gitbook-x-prod.appspot.com/o/spaces%2FlISC5rfB4Hnmbsjf8phq%2Fuploads%2FyGPZK3301av3as5GZ7kc%2FChroma%20key%205.png?alt=media&amp;token=39106970-6880-46a5-a819-15086bcaf236" alt=""><figcaption><p>You can use images and videos from your device as a chroma-key background.</p></figcaption></figure>

<figure><img src="https://1019928184-files.gitbook.io/~/files/v0/b/gitbook-x-prod.appspot.com/o/spaces%2FlISC5rfB4Hnmbsjf8phq%2Fuploads%2F7Ay4qNN4nuoOl9bPWWHg%2FChroma%20key%206.png?alt=media&amp;token=3656ec7e-ce9e-4b8d-b58f-3b9f84a24307" alt=""><figcaption><p>PRISM app provides a variety of images and videos that can be used as a chroma-key background.</p></figcaption></figure>

[Mobile](/mobile/overview), [Guides](/mobile/guides), [Features](/mobile/guides/features), [Camera](/mobile/guides/features/camera)


# Matching Your Stream Screen to Viewers’ Screens

Android, iOS

The screen ratios of mobile phones vary, which can cause mismatches between the streamer’s view and what viewers see on their devices. For example, areas visible to the streamer may not appear on a viewer’s screen, and vice versa.

To address this, PRISM offers a Screen Full/Fit option to adjust the display area.

Tap the **More** button in the upper-left corner of the screen. The default **View Screen Full** setting displays the broadcast in full screen. If your phone’s screen ratio is slimmer than 16:9 in landscape mode, viewers may see parts of the screen that are hidden from the streamer.

<figure><img src="https://1019928184-files.gitbook.io/~/files/v0/b/gitbook-x-prod.appspot.com/o/spaces%2FlISC5rfB4Hnmbsjf8phq%2Fuploads%2FFS3OFHSUoEaNdrVNkK6J%2FMatching%20screen%201.png?alt=media&amp;token=beb8d80e-bcff-461d-9fcb-84efb63fd6ae" alt=""><figcaption><p>iPhone 16 Pro in Full Screen View</p></figcaption></figure>

Switch to **View Screen Fit** to adapt the broadcast to a 16:9 ratio, ensuring it fits entirely within the viewer’s screen. In this mode, black bars (LetterBox) may appear on the sides if the screen ratio is slimmer than 16:9. This allows the streamer to see all areas visible to viewers.

<figure><img src="https://1019928184-files.gitbook.io/~/files/v0/b/gitbook-x-prod.appspot.com/o/spaces%2FlISC5rfB4Hnmbsjf8phq%2Fuploads%2FKpgCXZKLmC3QWLv8Dorv%2FMatching%20screen%202.png?alt=media&amp;token=8554e916-1f27-4fe2-a567-156838a5efb3" alt=""><figcaption><p>iPhone 16 Pro in Fit Screen Mode (16:9)</p></figcaption></figure>

The same principles apply for portrait mode. Toggle between modes as needed to provide the best viewing experience.

[Mobile](/mobile/overview), [Guides](/mobile/guides), [Features](/mobile/guides/features), [Camera](/mobile/guides/features/camera)


# Rotating Landscape and Portrait Screen

Android, iOS

Both landscape and portrait screen orientations are supported on the PRISM mobile app. However, we have received several inquiries, such as: “Why is the broadcast locked in portrait mode even though I began streaming with my phone in landscape?” or “Why am I unable to rotate the screen orientation during a broadcast?”

<figure><img src="https://1019928184-files.gitbook.io/~/files/v0/b/gitbook-x-prod.appspot.com/o/spaces%2FlISC5rfB4Hnmbsjf8phq%2Fuploads%2Fd8J0tDi7AS67r4l2itpJ%2FRoatating%20screen%201.png?alt=media&amp;token=f506964a-79af-4bf9-9c66-256e559a2bd6" alt=""><figcaption><p>Mobile Screen, Live on PRISM(Top) / Actual Broadcasting Screen Displayed to Viewers(Bottom)</p></figcaption></figure>

If your phone is positioned horizontally but the broadcast still displays in portrait mode, this issue is likely due to the screen orientation being **locked** in your phone settings. Many users often have their phone's screen orientation locked in portrait mode. As a result, even when holding the phone horizontally, the locked orientation prevents the screen from adjusting correctly.

Additionally, if you rotate your phone in the opposite direction from the selected orientation after starting a broadcast, a notification will appear on the screen. This notification indicates that the screen orientation has changed from the preset configuration. Please note that the screen orientation cannot be adjusted once a broadcast has started.

<figure><img src="https://1019928184-files.gitbook.io/~/files/v0/b/gitbook-x-prod.appspot.com/o/spaces%2FlISC5rfB4Hnmbsjf8phq%2Fuploads%2FDUqYyWcaIQvHNWfhkjAO%2FRoatating%20screen%202.png?alt=media&amp;token=11f9f0c1-edac-4ca9-b51d-fe4133ebb342" alt=""><figcaption><p>Notification When the Screen Orientation is Shifted</p></figcaption></figure>

To ensure a seamless streaming experience, make sure your phone's screen orientation is unlocked and set to the desired mode (landscape or portrait) before starting a broadcast. For further clarity, refer to the example images below, which illustrate the screen layouts for both landscape and portrait modes.

By unlocking your phone’s screen orientation, the menus will adapt to the phone’s position, allowing you to select between landscape and portrait modes before going live. Once the broadcast begins, this setting cannot be changed, so please confirm your preferred orientation beforehand.

<figure><img src="https://1019928184-files.gitbook.io/~/files/v0/b/gitbook-x-prod.appspot.com/o/spaces%2FlISC5rfB4Hnmbsjf8phq%2Fuploads%2Fyo6Rgiod1iyNq95SZmgk%2FRoatating%20screen%203.png?alt=media&amp;token=9fa59c29-8645-4893-83a1-b512d4703ca5" alt=""><figcaption><p>Portrait/Landscape Ready Screen Structure</p></figcaption></figure>

<figure><img src="https://1019928184-files.gitbook.io/~/files/v0/b/gitbook-x-prod.appspot.com/o/spaces%2FlISC5rfB4Hnmbsjf8phq%2Fuploads%2Fcz6q9lCMEvocZKZctuDj%2FRoatating%20screen%204.png?alt=media&amp;token=6cd05e42-a79f-44a1-a7bd-c8d96d2d501e" alt=""><figcaption><p>Portrait/Landscape Live Screen Structure</p></figcaption></figure>

However, in screencast mode, the screen orientation can be adjusted even after a broadcast has started. The screen will automatically rotate when you rotate your device, and viewers will see the change. Please note that the screen orientation lock on your device will still apply.

[Mobile](/mobile/overview), [Guides](/mobile/guides), [Features](/mobile/guides/features), [Camera](/mobile/guides/features/camera)


# Flipping Front-facing Camera

Android, iOS

The camera invert feature allows you to flip the front-facing camera horizontally during a live broadcast. This feature mirrors the image, so inverted text appears correctly to viewers, just like in a mirror.

<figure><img src="https://miro.medium.com/v2/resize:fit:1400/1*fheVlHp7slqD8mfAhsz_0A.jpeg" alt=""><figcaption><p>You can put letters in the background going live on PRISM</p></figcaption></figure>

To use this feature, tap the “More” button in the upper-left corner and select **Flip front-facing camera**. By default, the left and right sides are already mirrored. If you want to change this, toggle the button to flip the screen.

<figure><img src="https://1019928184-files.gitbook.io/~/files/v0/b/gitbook-x-prod.appspot.com/o/spaces%2FlISC5rfB4Hnmbsjf8phq%2Fuploads%2FqObTclxcQ70XojHANaVq%2FFront%20Camera%20Flipping%201.png?alt=media&amp;token=70a6433b-cb6d-4136-b98b-e7ae713a1621" alt=""><figcaption></figcaption></figure>

[Mobile](/mobile/overview), [Guides](/mobile/guides), [Features](/mobile/guides/features), [Camera](/mobile/guides/features/camera)


# Using Camera Pro Mode

Android, iOS

The PRISM app offers Camera Pro mode for users who want advanced control over their camera settings, enabling them to adjust professional features for a more customized live streaming experience. Camera Pro mode supports five features:

* Exposure
* Manual focus
* ISO
* White balance
* Shutter speed

You can find the **Camera Pro** function by clicking the More-button located at the top left.

<figure><img src="https://1019928184-files.gitbook.io/~/files/v0/b/gitbook-x-prod.appspot.com/o/spaces%2FlISC5rfB4Hnmbsjf8phq%2Fuploads%2F2rzkFNRFgEouC4u5Fu2g%2FCamera%20Pro%20mode%201.png?alt=media&amp;token=477dd43a-4fcf-44ea-a453-61d45364c98d" alt=""><figcaption></figcaption></figure>

***

## Exposure

The Exposure feature lets you control the brightness of your video with precision. By adjusting the exposure slider, you can brighten or darken your shots to suit different lighting conditions.&#x20;

<figure><img src="https://1019928184-files.gitbook.io/~/files/v0/b/gitbook-x-prod.appspot.com/o/spaces%2FlISC5rfB4Hnmbsjf8phq%2Fuploads%2FEs2tKYsyPIY3JZNT6tx5%2Fcamerapro1.jpg?alt=media&amp;token=fa489e25-6e91-4774-8ee5-a558ef94017c" alt=""><figcaption></figcaption></figure>

***

## Manual focus

The Manual Focus feature allows users to have precise control over the camera's focus point. By simply sliding the focus adjustment bar, you can fine-tune the focus to highlight your subject exactly as desired.

<figure><img src="https://1019928184-files.gitbook.io/~/files/v0/b/gitbook-x-prod.appspot.com/o/spaces%2FlISC5rfB4Hnmbsjf8phq%2Fuploads%2FoL5sUqM7VgC9ycnlG4e5%2Fcamerapro2.jpg?alt=media&amp;token=378a5102-972c-41f2-a18f-151ba574343f" alt=""><figcaption></figcaption></figure>

You can toggle the **Auto** / **Manual** button on the right side to switch between Auto Focus and Manual Focus modes. However, this can also be done conveniently without accessing Camera Pro mode. For more details, please refer to the page below:

* [Setting Camera Focus](/mobile/guides/features/camera/setting-camera-focus)

***

## ISO

The ISO feature allows you to adjust the camera's sensitivity to light, giving you greater control over brightness and noise levels in your video. By increasing the ISO, you can capture clear footage in low-light conditions, while lowering it helps maintain image quality in bright environments.

<figure><img src="https://miro.medium.com/v2/resize:fit:1400/1*T94XXmaD9oxlSjN25d9kkg.png" alt=""><figcaption><p>ISO setting options</p></figcaption></figure>

You can toggle the **Auto** / **Manual** button on the right side to switch between automatic and manual ISO modes. In Auto ISO mode, the ISO value is prefixed with an 'A' (e.g., A3264), while in Manual ISO mode, it appears as a numeric value (e.g., 3264). The Auto/Manual setting for ISO is shared with the Shutter Speed, ensuring seamless control over exposure.

***

## White Balance

The White Balance feature lets you adjust the color temperature of your video to match different lighting conditions. You can manually set the white balance for warmer or cooler tones, or use Auto White Balance mode to let the app automatically optimize the colors. This feature helps ensure natural and accurate color representation during live streaming or recording.

You can toggle the **Auto** / **Manual** button on the right side to switch between automatic and manual White Balance modes.

<figure><img src="https://miro.medium.com/v2/resize:fit:1400/1*fX1h3uewgFAJgVeuWvew9A.png" alt=""><figcaption><p>White-balace setting options</p></figcaption></figure>

***

## Shutter speed

The Shutter Speed feature allows you to control how long the camera's sensor is exposed to light. A faster shutter speed reduces motion blur, ideal for capturing fast-moving subjects, while a slower shutter speed lets in more light, perfect for low-light conditions.&#x20;

<figure><img src="https://1019928184-files.gitbook.io/~/files/v0/b/gitbook-x-prod.appspot.com/o/spaces%2FlISC5rfB4Hnmbsjf8phq%2Fuploads%2FydZycJZ3oLXObhNv6WhG%2Fcamerapro5.png?alt=media&amp;token=a8df42e3-1856-4638-89af-1a58310cce22" alt=""><figcaption></figcaption></figure>

You can toggle the **Auto** / **Manual** button on the right side to switch between automatic and manual shutter speed modes. In auto shutter speed mode, the shutter speed value is prefixed with an 'A' (e.g., A1/45), while in Manual shutter speed mode, it appears as a numeric fraction (e.g., 1/45). The Auto/Manual setting for shutter speed is shared with the ISO, ensuring seamless control over exposure.

[Mobile](/mobile/overview), [Guides](/mobile/guides), [Features](/mobile/guides/features), [Camera](/mobile/guides/features/camera)


# AI


# PRISM AI Assistant

Android, iOS

The PRISM AI Assistant is a built-in chat-based support feature in the PRISM mobile app. It helps you quickly find answers about app features, streaming setup, and troubleshooting — all without leaving the app.

The assistant responds based on the official PRISM documentation, so you can get accurate, reliable guidance in your device's language.

> PRISM AI Assistant is available both before and during a live broadcast. Responses are generated by AI and may occasionally contain inaccuracies.

***

### Accessing the AI Assistant

1. Tap the **More** menu on the main screen.
2. Tap the **AI Assistant** button displayed below the icon buttons.
3. The chat window will appear as a bottom sheet.

<figure><img src="https://1019928184-files.gitbook.io/~/files/v0/b/gitbook-x-prod.appspot.com/o/spaces%2FlISC5rfB4Hnmbsjf8phq%2Fuploads%2FuysAt5L7z3zuLvqGrLAE%2F%E1%84%83%E1%85%A5%E1%84%87%E1%85%A9%E1%84%80%E1%85%B5%E1%84%85%E1%85%A6%E1%84%8B%E1%85%B5%E1%84%8B%E1%85%A5.png?alt=media&amp;token=5173cbed-8d66-45aa-8ffb-e2383b65823a" alt="" width="188"><figcaption></figcaption></figure>

🖼️ More 메뉴에서 AI Assistant CTA 버튼이 보이는 화면 (세로/가로 각 1장)

> The AI Assistant button shows a friendly message like "How can I help you?" to guide you in.

***

### Using the Chat Interface

#### Asking a Question

1. Tap the text input field at the bottom of the chat window.
2. Type your question and tap the **Send** button.
3. The assistant will display a "Thinking..." indicator while preparing the response.
4. The answer will appear with a typing animation effect.

🖼️ 대화창 전체 화면 — 머릿글, 질문/응답, 입력창이 모두 보이는 상태

* You can type up to **512 characters** per question.
* The input field expands as you type, up to a maximum of 3 lines.
* To stop a response while it is being generated, tap the **Stop** button in the input field.

#### Preset Questions

When you first open the AI Assistant, you'll see a set of suggested questions tailored to your current mode. These help you get started quickly without needing to type.

🖼️ 모드별 고정 질문 화면 3장 (카메라 / 스크린 / 버튜버 모드) 나란히 배치

**Camera Mode**

* YouTube live streaming guide
* How to stream on multiple platforms at once
* Using beauty effects during a live stream

**Screen Mode**

* How to display game scenes clearly
* How to stream a portrait game
* Step-by-step guide to decorating a game screen

**VTuber Mode**

* How to choose between 2D and 3D avatars
* Adjusting the position of a 3D avatar
* How to change the avatar you're currently using

Tap any suggested question to send it instantly.

#### Related Questions

After each response, the assistant may display **related questions** that you can tap to continue exploring the topic. Up to 6 related questions can be shown.

🖼️ 응답 결과 하단에 연관 질문이 표시된 화면

***

### Viewing Sources

Each response may include reference links to the official documentation.

1. Tap **View Sources (n)** below the response to see the list of referenced pages.
2. Tap any link to open it in the in-app browser.

🖼️ 출처 보기 시트가 열린 화면

> During a live broadcast, tapping source links is restricted to maintain a stable streaming experience. A message will appear informing you that link navigation is not available while live.

***

### Recent Questions

You can revisit your previous questions at any time.

1. Tap the **history icon** on the left side of the input field.
2. A list of your recent questions will appear, sorted by most recent.
3. Tap any question to resend it and get a fresh response.

🖼️ 최근 질문 바텀 시트 화면

* Up to **300** recent questions are stored locally on your device.
* Questions are not synced across devices or operating systems.
* You can delete individual questions or tap **Delete All** to clear the entire history.

***

### Using AI Assistant During a Live Broadcast

The AI Assistant is fully available during a live stream, so you can look up answers in real time without ending your broadcast.

* The chat window is **not visible** to your viewers — it does not appear in the broadcast output.
* Source link navigation is **restricted** during a live to prevent interruptions.
* All other features — asking questions, viewing responses, related questions, and recent questions — work as usual.

***

### Troubleshooting with AI Assistant

When an error dialog appears during your broadcast, you can quickly get help from the AI Assistant.

1. When an error dialog with an error code is displayed, tap the **Ask AI** button.
2. The error dialog will close, and the AI Assistant chat window will open.
3. The error code is automatically sent as a query, and the assistant will provide guidance on how to resolve it.
4. When you close the chat window, you will return to the screen that was shown before the error occurred.

🖼️ 에러 다이얼로그에 Ask AI 버튼이 표시된 화면 → AI 응답 화면 (2장 나란히)

***

### Tips

* **Language**: The AI Assistant responds in your device's language setting.
* **Scope**: The assistant only provides information about the PRISM mobile app (iOS/Android). It does not cover PRISM Desktop or PRISM Lens.
* **Accuracy**: Responses are based on official documentation. If the assistant cannot find a relevant answer, it will let you know.
* **Network**: An internet connection is required. If you are offline, a message will inform you to reconnect before sending a question.


# Transcribing AI Script from the Broadcast

Android, iOS

After ending a live broadcast on the PRISM mobile app, you can use the AI script extraction feature to transcribe the audio from the broadcast. This feature leverages NAVER’s [CLOVA Speech](https://www.ncloud.com/product/aiService/clovaSpeech) technology.

The transcriptions can be saved and shared in 3 formats: TXT, SRT, and CSV. Please note that this feature currently supports only English and Korean.

{% hint style="warning" %}
This feature cannot be enabled in iOS screencast mode, due to iOS limitations.
{% endhint %}

The AI script extraction is processed within the PRISM app on your device, ensuring faster and more secure handling without relying on external servers.

***

Please follow the instructions below:

1. **End your broadcast in the PRISM mobile app.**
2. **Click 'Extract script'.**
3. **Select the language and script extraction will be processed immediately.** \
   If this is your first time trying this feature, click any language to download it first.

<figure><img src="https://miro.medium.com/v2/resize:fit:1400/1*x1giJKpcOchZXlcOLRpZnA.jpeg" alt=""><figcaption><p>The AI model language pack needs to be downloaded initially.</p></figcaption></figure>

<figure><img src="https://miro.medium.com/v2/resize:fit:1400/1*KhRVjKTbTwqklJ84iYrfwA.jpeg" alt=""><figcaption><p>If you click a certain language, the download will be started shortly.</p></figcaption></figure>

<div align="center"><figure><img src="https://miro.medium.com/v2/resize:fit:1400/1*iXrUUC8jpeeAVJxDyWr0ow.jpeg" alt=""><figcaption><p>The extracted scripts can be saved or shared directly to other apps.</p></figcaption></figure></div>

[Mobile](/mobile/overview), [Guides](/mobile/guides), [Features](/mobile/guides/features), [AI](/mobile/guides/features/ai)


# Watermark


# Hiding Watermark

Android, iOS

The watermark is set to appear for 10 seconds every 50 seconds by default. However, since some users prefer not to have the watermark appear at all, you can choose to hide it.

To hide the watermark, click the profile icon in the upper-right corner to access **My page**, navigate to **Settings**, and toggle **Conceal watermark** to disable it.

{% hint style="info" %}
PRISM watermark is always displayed when streaming via custom RTMP.
{% endhint %}

<figure><img src="https://1019928184-files.gitbook.io/~/files/v0/b/gitbook-x-prod.appspot.com/o/spaces%2FlISC5rfB4Hnmbsjf8phq%2Fuploads%2FmToMdVEl3Dsww1M8Lm8b%2FConceal%20watermarks.png?alt=media&amp;token=7372a6d9-b7d5-428e-a975-db7aeda1808a" alt=""><figcaption></figcaption></figure>

[Mobile](/mobile/overview), [Guides](/mobile/guides), [Features](/mobile/guides/features), [Watermark](/mobile/guides/features/watermark)


# Others


# Muting Microphone and Camera

Android, iOS

There may be times during a live broadcast when you need to turn off your microphone or camera.

To toggle the microphone or camera during a broadcast, tap the More button in the upper left corner of the screen. By default, both the microphone and camera are set to **On**.

{% hint style="info" %}
The PRISM logo will appear on the screen for the viewers as you turn off the camera.
{% endhint %}

<figure><img src="https://1019928184-files.gitbook.io/~/files/v0/b/gitbook-x-prod.appspot.com/o/spaces%2FlISC5rfB4Hnmbsjf8phq%2Fuploads%2FQkAxdVX3fhSCanfzeqk5%2FMute%20Mic%20and%20Camera.png?alt=media&amp;token=57e83e58-6f5c-4d42-b5bd-8af7948e9f96" alt=""><figcaption></figcaption></figure>

[Mobile](/mobile/overview), [Guides](/mobile/guides), [Features](/mobile/guides/features), [Others](/mobile/guides/features/others)


# Using Live Streaming Status Indicator

Android, iOS

Mobile live streaming often starts in places where the network is not stable, such as outdoors. That’s why we provide live streaming status indicator so users can check the current live streaming situation in more detail during live streaming.

The live streaming status indicator can be used by clicking the More button in the upper left corner in the LIVE mode of the app as shown in the image below.

<figure><img src="https://1019928184-files.gitbook.io/~/files/v0/b/gitbook-x-prod.appspot.com/o/spaces%2FlISC5rfB4Hnmbsjf8phq%2Fuploads%2FfOftqWI4KRDVTtC8GBKZ%2FLive%20Status%20Indicator%201.png?alt=media&amp;token=6df1a2c3-6f8b-4a5c-99d1-15937e436548" alt=""><figcaption></figcaption></figure>

It displays the framerate(fps), bitrate, audio volume, remaining battery information of the live streaming currently in progress. Please note that the live streaming status indicator is available not only in Camera mode, but also in VTuber modes.

[Mobile](/mobile/overview), [Guides](/mobile/guides), [Features](/mobile/guides/features), [Others](/mobile/guides/features/others)


# Thermal Protection Mode

Android

The heat generated by smartphones performing live streaming also affected the stability and quality of live streaming. Live streaming running on a smartphone is an operation that uses a lot of the device’s resources, so if you use the function for a long time, the heat will inevitably increase.

​We also provided guidance on how to improve this situation in the following page:

* [Improving Smartphone Overheating for Better Streaming](https://guide.prismlive.com/mobile/guides/error-solution/performance/improving-smartphone-overheating-for-better-streaming)

But also, The PRISM app offers Thermal Protection Mode. The PRISM app checks the smartphone’s thermal status in real time, and when it reaches a bad enough situation that can affect the live streaming quality, the **Overheating Protection Setting** alert is shown so that the streamer can maintain the live streaming stably.

The alert will guide you to select the options you want, including adjusting the resolution and fps and removing effects, filters and media sources to relieve heat.

<figure><img src="https://1019928184-files.gitbook.io/~/files/v0/b/gitbook-x-prod.appspot.com/o/spaces%2FlISC5rfB4Hnmbsjf8phq%2Fuploads%2FQAWmTrQp64ysvOt7bKWY%2FThermal%20Protection%201.png?alt=media&amp;token=fd2e5ff0-5a9e-4b1b-a7fc-2bf714ddfcb0" alt=""><figcaption></figcaption></figure>

<figure><img src="https://1019928184-files.gitbook.io/~/files/v0/b/gitbook-x-prod.appspot.com/o/spaces%2FlISC5rfB4Hnmbsjf8phq%2Fuploads%2Fbsp54IjQfYczieOJghBc%2FThermal%20Protection%202.png?alt=media&amp;token=dd411007-ca83-4305-82c4-b31dfe92a8ba" alt=""><figcaption><p>During live.</p></figcaption></figure>


# Using Voice Changer

## Using Voice Changer

{% tabs %}
{% tab title="English" %}
With **Voice Changer** in PRISM Live Studio, you can apply fun effects to your voice while you stream. From a high-pitched "chipmunk" tone to megaphone, echo, and a deep voice, you can transform how you sound to match your content or mood.

Effects are processed on your device, so Voice Changer works regardless of your network connection.

> **Supported versions**: Android 5.3.0 · iOS 3.12.0 or later

***

### Opening Voice Changer

You can open Voice Changer in two ways. Either one brings up the same **Select Voice Changer** sheet.

#### Option 1. From the More menu

1. Tap the **More (⋯)** button at the top of the broadcast screen.
2. Tap **Voice Changer** in the menu. (It sits right below *Audio Mixer*.)
3. The More menu closes and the **Select Voice Changer** sheet appears.

> Because this is a new feature, a **NEW** badge is shown next to the menu. (The badge will be removed in a future update.)

#### Option 2. From the Audio Mixer

1. Open the **Audio Mixer**.
2. Tap the **Voice Changer** item in the list.
   * The current state is shown on the right side of the item. It reads **Off** when no effect is applied, or the name of the selected effect (for example, *Echo*) when one is active.
3. The Audio Mixer closes and the **Select Voice Changer** sheet appears.

***

### Choosing an effect

At the bottom of the Select Voice Changer sheet, the effects are laid out in a **horizontally scrolling** list.

* The first item, **Off**, is the default. Select it to turn effects off and stream with your natural voice.
* Tap any other effect to select it. A selection indicator appears on its icon.

Here are some of the effects you can choose from. (The lineup may change in future updates.)

| Effect     | How it sounds                            |
| ---------- | ---------------------------------------- |
| Chipmunk   | Higher pitch for a cute, playful voice   |
| Echo       | Adds a reverberating echo                |
| Megaphone  | Sounds like speaking through a megaphone |
| Vibrato    | A trembling, wavering tone               |
| Electronic | A robotic, digital sound                 |
| Crisp      | Bright and clear                         |
| Soft       | Smooth and gentle                        |
| Vintage    | Like an old-time radio                   |
| Deep       | Lower pitch for a fuller, deeper voice   |

***

### Previewing with your own voice

Before applying an effect to your broadcast, you can record a quick sample to hear how it sounds.

1. Choose an effect, then tap **Record**.
2. **Recording..** appears along with an elapsed timer. Say whatever you'd like.
   * You can record for up to **1 minute**.
   * You can't change the effect while recording. (The effect buttons are dimmed.)
   * The recording captures your **natural voice**, without any effect applied.
3. When you stop, the state changes to **Saved** and the recording length is shown.
4. Tap the **Play** button to hear your recording **with the selected effect** applied.
   * While it plays, you can tap a different effect to compare instantly. Changing the effect restarts playback from the beginning.
   * To record again, tap **Re-record**.

> **Note for Android**: The first time you tap Play, **Converting** appears briefly before playback starts.

***

### Applying it to your broadcast

* When you select an effect during a live stream, the effect is applied to your microphone input **in real time** and delivered to your viewers.
* A brief message appears to confirm the change: **"Voice changer applied."** when you select an effect, or **"Voice changer turned off."** when you select *Off*.

***

### Good to know

* **Microphone permission is required.** You can't enter the Voice Changer screen without granting microphone permission. Please allow it when prompted.
* **Recording won't start if the mic is off.** If you tap Record while your microphone is muted, the message **"The microphone is off."** appears. Turn the mic on and try again.
* **Effects reset for each broadcast.** The selected effect is kept only for the duration of the current broadcast and resets to *Off* when the broadcast ends. (It also resets when you end a Connect stream or video recording.)
* **Not available in some modes.** Voice Changer is disabled in Connect modes (camera / screen / virtual) and in Photo mode.
* **Interruptions stop playback.** If a phone call, a voice assistant, or audio from another app starts while you are recording or playing, the recording or playback stops.
* **Independent of your network.** Voice Changer is processed on your device, so it isn't affected by your internet connection.
  {% endtab %}

{% tab title="Korean" %}
PRISM Live Studio의 **음성 변환** 기능을 사용하면 방송 중 내 목소리에 다양한 효과를 입힐 수 있어요. 다람쥐처럼 높은 톤부터 메가폰, 에코, 깊은 목소리까지, 상황이나 콘셉트에 맞게 목소리를 바꿔 방송에 재미를 더해 보세요.

효과는 기기 안에서 바로 처리되므로 네트워크 연결과 무관하게 사용할 수 있습니다.

> **지원 버전**: Android 5.3.0 · iOS 3.12.0 이상

***

### 음성 변환 화면 열기

음성 변환은 두 가지 경로로 열 수 있어요. 어느 쪽으로 열어도 같은 **‘음성 변환 선택’** 시트가 나타납니다.

#### 방법 1. 더보기 메뉴에서 열기

1. 방송 준비/방송 화면 상단의 **더보기(⋯)** 버튼을 탭합니다.
2. 메뉴 목록에서 **‘음성 변환’** 을 탭합니다. (‘오디오 믹서’ 바로 아래에 있어요.)
3. 더보기 창이 닫히고 **‘음성 변환 선택’** 시트가 나타납니다.

> 새로 추가된 기능이라 메뉴 옆에 **NEW** 배지가 표시됩니다. (다음 업데이트에서 배지는 사라집니다.)

#### 방법 2. 오디오 믹서에서 열기

1. **오디오 믹서**를 엽니다.
2. 목록에서 **‘음성 변환’** 항목을 탭합니다.
   * 항목 오른쪽에는 현재 상태가 표시됩니다. 효과를 쓰지 않을 때는 **‘사용 안 함’**, 효과를 선택했을 때는 선택한 효과 이름(예: ‘에코’)이 보여요.
3. 오디오 믹서가 닫히고 **‘음성 변환 선택’** 시트가 나타납니다.

***

### 효과 선택하기

‘음성 변환 선택’ 시트 아래쪽에는 효과 목록이 **좌우로 스크롤**되는 형태로 놓여 있습니다.

* 맨 앞의 **‘사용 안 함’** 이 기본값입니다. 효과를 끄고 원래 목소리로 방송하려면 이 항목을 선택하세요.
* 그 외 효과를 탭하면 해당 효과가 선택되고, 아이콘에 선택 표시가 나타납니다.

선택할 수 있는 효과 예시는 다음과 같아요. (효과 구성은 업데이트에 따라 달라질 수 있습니다.)

| 효과     | 느낌                 |
| ------ | ------------------ |
| 다람쥐    | 톤이 높아져 귀엽고 발랄한 목소리 |
| 에코     | 울림이 더해지는 목소리       |
| 메가폰    | 확성기로 말하는 듯한 목소리    |
| 비브라토   | 음이 떨리는 목소리         |
| 전자음    | 기계·디지털 느낌의 목소리     |
| 상쾌한    | 밝고 또렷하게 다듬은 목소리    |
| 부드러운   | 부드럽고 편안한 목소리       |
| 빈티지    | 옛날 라디오 같은 목소리      |
| 깊은 목소리 | 톤이 낮아져 묵직한 목소리     |

***

### 내 목소리로 미리 들어보기

방송에 적용하기 전에, 효과가 어떻게 들리는지 직접 녹음해서 확인할 수 있어요.

1. 효과를 하나 고른 뒤 **‘녹음하기’** 버튼을 탭합니다.
2. **‘녹음 중..’** 표시와 함께 경과 시간이 나타납니다. 하고 싶은 말을 녹음하세요.
   * 녹음은 **최대 1분**까지 가능합니다.
   * 녹음하는 동안에는 효과를 바꿀 수 없어요. (효과 버튼이 흐리게 표시됩니다.)
   * 녹음은 효과가 입혀지지 않은 **원래 내 목소리**로 저장됩니다.
3. 녹음을 멈추면 **‘음성 저장 됨’** 상태가 되고 녹음 길이가 표시됩니다.
4. **재생 버튼**을 탭하면 방금 녹음한 목소리가 **선택한 효과로** 들려요.
   * 재생 중에는 다른 효과를 눌러 바로 비교해 볼 수 있습니다. 효과를 바꾸면 녹음이 처음부터 다시 재생됩니다.
   * 다시 녹음하고 싶다면 **‘재녹음’** 을 탭하세요.

> **Android 참고**: 재생 버튼을 처음 누르면 잠시 **‘변환 중’** 이 표시된 뒤 재생이 시작됩니다.

***

### 방송에 적용하기

* 방송 중에 효과를 선택하면, 마이크로 들어오는 내 목소리에 **실시간으로 효과가 입혀져** 시청자에게 전달됩니다.
* 효과를 선택하면 **“음성 변환이 적용되었습니다.”**, ‘사용 안 함’ 을 선택하면 **“음성 변환이 해제되었습니다.”** 안내 메시지가 잠깐 표시됩니다.

***

### 알아두면 좋아요

* **마이크 권한이 필요해요.** 마이크 권한을 허용하지 않으면 음성 변환 화면에 들어갈 수 없습니다. 안내에 따라 권한을 허용해 주세요.
* **마이크가 꺼져 있으면 녹음되지 않아요.** 마이크를 끈 상태에서 녹음 버튼을 누르면 **“마이크 off 상태입니다.”** 안내가 표시됩니다. 마이크를 켠 뒤 다시 시도하세요.
* **효과는 방송마다 다시 선택해야 해요.** 선택한 효과는 방송이 진행되는 동안만 유지되며, 방송을 종료하면 ‘사용 안 함’ 으로 초기화됩니다. (커넥트 송출·비디오 촬영을 종료할 때도 초기화돼요.)
* **일부 모드에서는 사용이 제한돼요.** 커넥트(카메라/스크린/버추얼) 모드와 포토 모드에서는 음성 변환 메뉴가 비활성화됩니다.
* **통화나 다른 앱 소리가 끼어들면 멈춰요.** 녹음·재생 도중 전화 수신, 음성 비서 호출, 다른 앱의 오디오 재생 등이 발생하면 녹음·재생이 중단됩니다.
* **네트워크와 무관해요.** 음성 변환은 기기 안에서 처리되므로 인터넷 연결 상태의 영향을 받지 않습니다.
  {% endtab %}
  {% endtabs %}


# Using overlays.uno Scoreboard

## Using overlays.uno Scoreboard

{% tabs %}
{% tab title="English" %}

### Add professional sports scoreboards

Add professional **sports scoreboards** to your stream with **overlays.uno**, a partner service offering 130+ scoreboard overlays. Pick a scoreboard, add it to My Studio, and update the score in real time right from your phone.

> **Supported versions**: Android 5.3.0 · iOS 3.12.0 or later overlays.uno is provided through a partnership, so some features may be limited. An overlays.uno account is required.

### Connecting overlays.uno

1. In **My Studio**, open the widget list and tap **Scoreboard via overlays.uno** (at the bottom of the list).
2. Tap **Connect overlays.uno** and sign in on the overlays.uno page.
3. Once connected, your overlay list opens automatically. You stay signed in for next time.

### Adding a scoreboard

1. On the overlay list, browse your **My Overlays** from overlays.uno (shown in a 2-column grid). Use the sort button (**A to Z** / **Recent**) to reorder.
2. Tap a scoreboard to select it, then tap **Add selected source**.
3. The scoreboard is added to My Studio as an overlay and adapts to portrait or landscape automatically.

> Nothing in the list? Add overlays to **My Overlays** on the overlays.uno website first, then pull the list down to refresh.

### Controlling the score in real time

* On the overlay, tap **Controller** to open the control panel and update scores, teams, and settings live — before or during your broadcast.
* To control from a second device, choose **Use controller on another device** and scan the QR code (or copy the URL).

### Managing your scoreboard

* Tap **Edit** on the overlay to swap it for another scoreboard from your list.
* To disconnect, open the overlay list and tap **Logout**. Logging out removes the added overlay from My Studio.
  {% endtab %}

{% tab title="Korean" %}

### 스포츠 스코어보드를 방송에 추가하세요

**overlays.uno**(파트너 서비스)의 **스포츠 스코어보드**를 방송에 추가해 보세요. 130여 종의 스코어보드 오버레이를 제공하며, 스코어보드를 My Studio에 추가한 뒤 휴대폰에서 실시간으로 점수를 업데이트할 수 있습니다.

> **지원 버전**: Android 5.3.0 · iOS 3.12.0 이상 overlays.uno는 파트너십을 통해 제공되는 서비스로 일부 기능에 제한이 있을 수 있으며, overlays.uno 계정이 필요합니다.

### overlays.uno 연결하기

1. **My Studio**에서 위젯 목록을 열고, 맨 아래의 **overlays.uno 스코어보드**를 탭합니다.
2. **overlays.uno 연결하기**를 탭하고 overlays.uno 페이지에서 로그인합니다.
3. 연결되면 오버레이 목록이 자동으로 열립니다. 다음부터는 로그인 상태가 유지됩니다.

### 스코어보드 추가하기

1. 오버레이 목록에서 overlays.uno의 **My Overlays**를 확인합니다(2열 그리드). 정렬 버튼(**이름순** / **최신순**)으로 순서를 바꿀 수 있어요.
2. 원하는 스코어보드를 탭해 선택한 뒤 **선택된 소스 추가**를 탭합니다.
3. 스코어보드가 오버레이로 My Studio에 추가되며, 세로/가로 화면에 맞춰 자동으로 전환됩니다.

> 목록이 비어 있나요? 먼저 overlays.uno 웹사이트에서 **My Overlays**에 오버레이를 추가한 뒤, 목록을 아래로 당겨 새로고침하세요.

### 실시간으로 점수 제어하기

* 오버레이에서 **컨트롤러**를 탭하면 제어판이 열려 방송 전·중에 점수, 팀, 설정을 실시간으로 바꿀 수 있습니다.
* 다른 기기로 제어하려면 **다른 기기에서 컨트롤러 사용**을 선택해 QR 코드를 스캔하거나 URL을 복사하세요.

### 스코어보드 관리하기

* 오버레이에서 **편집**을 탭하면 목록의 다른 스코어보드로 교체할 수 있습니다.
* 연결을 끊으려면 오버레이 목록에서 **로그아웃**을 탭하세요. 로그아웃하면 추가된 오버레이가 My Studio에서 제거됩니다.
  {% endtab %}
  {% endtabs %}


# Reducing Background Noise (Noise Suppressor)

## Reducing Background Noise (Noise Suppressor)

{% tabs %}
{% tab title="English" %}

### Clean up your mic sound

Noise Suppressor cleans up your microphone so viewers hear your voice clearly — not the keyboard clatter, fan hum, or other background noise around you.

> **Android only**: This feature is available on **Android 5.3.0 or later**. It is not available on iOS.

### Turning it on

You can switch Noise Suppressor on or off from two places, and they stay in sync:

**From the More menu**

1. During broadcast setup or your live, tap the **More (⋯)** menu.
2. Tap **Noise suppressor** to turn it on or off.

**From the Audio Mixer**

1. Open the **Audio Mixer**.
2. Under **Voice effect**, toggle **Noise suppressor** on or off.

It is **off by default**. Once you turn it on, PRISM remembers your choice — even after you switch microphones, end a live, or restart the app. (Reinstalling the app resets it.)

### Good to know

* Noise Suppressor removes noise from **your microphone** before it reaches viewers. This is different from the noise cancelling on your earphones, which only changes what **you** hear.
* It sits in the same **Voice effect** group as Voice Changer, so you can combine it with your other audio settings.
  {% endtab %}

{% tab title="Korean" %}

### 마이크 소리를 깔끔하게

잡음 억제를 켜면 마이크 소리를 깔끔하게 다듬어, 키보드 소리·선풍기 소리·주변 소음 대신 여러분의 목소리가 또렷하게 전달됩니다.

> **Android 전용**: 이 기능은 **Android 5.3.0 이상**에서 사용할 수 있습니다. iOS에서는 제공되지 않습니다.

### 켜는 방법

잡음 억제는 두 곳에서 켜고 끌 수 있으며, 두 설정은 서로 연동됩니다.

**더보기 메뉴에서**

1. 방송 준비 중이나 라이브 중에 **더보기(⋯)** 메뉴를 탭합니다.
2. **잡음 억제**를 탭해 켜거나 끕니다.

**오디오 믹서에서**

1. **오디오 믹서**를 엽니다.
2. **음성 효과** 아래의 **잡음 억제** 스위치를 켜거나 끕니다.

기본값은 **꺼짐**입니다. 한 번 켜 두면 마이크를 바꾸거나, 라이브를 종료하거나, 앱을 다시 실행해도 설정이 유지됩니다. (앱을 삭제하면 초기화됩니다.)

### 알아두면 좋아요

* 잡음 억제는 시청자에게 소리가 나가기 전에 **내 마이크** 소리에서 잡음을 없앱니다. 내 귀에 들리는 소음을 줄이는 이어폰의 노이즈 캔슬링과는 다릅니다.
* 음성 변환과 같은 **음성 효과** 그룹에 있어, 다른 오디오 설정과 함께 사용할 수 있습니다.
  {% endtab %}
  {% endtabs %}


# VTuber


# Adopting 3D VRM VTuber

Android, iOS

3D VRM VTuber is a type of character live streaming where the streamer goes live using a fictional character instead of themselves, and uses a fully rigged 3D model in the VRM format to animate and interact with viewers in real time.

Since December 2016, when the Japanese YouTuber Kizuna AI began broadcasting using a virtual character, VTubing has rapidly spread within subculture communities. It has experienced even more significant growth entering the 2020s, and nowadays, it has become a mainstream aspect of the media entertainment market.

Meanwhile, live streaming has become one of the primary platforms for VTubers to interact with their fans. Their VTubing content can easily be found on major global live platforms like Twitch, YouTube, and CHZZK.

<figure><img src="https://miro.medium.com/v2/resize:fit:1400/1*vYtMCLBYxz2heaR5EvOU0A.png" alt=""><figcaption></figcaption></figure>

However, despite the significant growth of VTubing, it has largely been confined to PC environments. This is because the necessary technologies for VTubing — such as avatar players, facial and motion capture, and avatar streaming — have only been available on PCs.

PRISM Live Studio mobile app has support of a 3D VTuber feature, allowing anyone to easily engage in casual VTubing in a mobile environment.

***

## VTuber mode <a href="#id-0e94" id="id-0e94"></a>

The PRISM app supports three modes: Screen Live (ScreenCast), Camera Live, and VTuber mode. Select **VTuber** from the list of live types, which you can see in the center of the image on the left below. Here, we’ll use a VRM model-based 3D avatar, so make sure to select a **3D Avatar** from the avatar types.

<figure><img src="https://miro.medium.com/v2/resize:fit:1400/1*sU3wNvB6py7Uqj_WbLPmGA.jpeg" alt=""><figcaption></figcaption></figure>

### Supported Devices for 3D Avatar feature on iOS

{% tabs %}
{% tab title="EN" %}
On iOS, this feature is only available on devices with a TrueDepth Camera that supports Face ID. (As of 25-07-07)

Supported devices include:

* iPhone: 12 and later
* iPad: 10th generation and later
* iPad Pro (11-inch): 3th generation and later
* iPad Pro (12.9-inch): 5th generation and later
* iPad Air: 4th generation and later
* iPad mini: 6th generation and later
  {% endtab %}

{% tab title="한국어" %}
iOS 환경에서는 Face ID를 지원하는 TrueDepth 카메라가 탑재된 기기에서만 3D 아바타 기능을 이용하실 수 있습니다. (25년 7월 7일 기준)

지원기기는 다음과 같습니다:

* iPhone: 12 이상
* iPad: 10세대 이상
* iPad Pro (11인치): 3세대 이상
* iPad Pro (12.9인치): 5세대 이상
* iPad Air: 4세대 이상
* iPad Mini: 6세대 이상
  {% endtab %}
  {% endtabs %}

***

## Avatar selection <a href="#id-5667" id="id-5667"></a>

You can create their own avatars using VRoidStudio, or download avatars created by others from websites like VRoidHub or Booth to use with the PRISM app’s VTuber feature.

However, the PRISM team has also developed and provided basic 3D avatars to make it easier for you to start VTubing within the app. You can simply choose the avatar you want to use.

<figure><img src="https://miro.medium.com/v2/resize:fit:1400/1*B4zFoLKzHH5VzVyYrV1AZg.jpeg" alt=""><figcaption></figcaption></figure>

***

## Real-time facial expression capture <a href="#e11d" id="e11d"></a>

The PRISM app’s VTuber feature captures the user’s facial expressions in real-time using the smartphone’s front camera and applies them directly to the avatar. The VTuber feature also supports facial functions that enable avatars to display more natural expressions.

<figure><img src="https://miro.medium.com/v2/resize:fit:960/1*8ypxOnF58nnoelohRcWHqw.gif" alt=""><figcaption></figcaption></figure>

***

## Avartar settings <a href="#id-248f" id="id-248f"></a>

To help you achieve a more natural VTubing experience, the PRISM app’s VTuber feature offers various options. You can position your avatar at the right size and place on the screen, adjust the sensitivity of the avatar’s movements, and fine-tune the lighting’s color and intensity to create an avatar that blends seamlessly with the background.

<figure><img src="https://miro.medium.com/v2/resize:fit:1400/1*7dWqZc42KDrzlMg8Rnpmhg.jpeg" alt=""><figcaption></figcaption></figure>

***

## Emotion / Items / Background <a href="#id-9fad" id="id-9fad"></a>

The PRISM app’s VTuber feature applies the user’s facial expressions to their avatar in real-time, while also offering enhanced emotion features such as Joy, Happy, Angry, Sorrow, and Fun to maximize emotional connection with fans.

<figure><img src="https://miro.medium.com/v2/resize:fit:1400/1*aI9H0Y60_OLYUFNSWs4S3A.jpeg" alt=""><figcaption></figcaption></figure>

Additionally, it provides items like desks and microphones, which can be placed in front of the avatar to add personality to your stream, as well as various background images that can be placed behind the avatar to create an overall atmosphere.

<figure><img src="https://miro.medium.com/v2/resize:fit:1400/1*hsEo0zZK02dc3BcaAsrfHw.jpeg" alt=""><figcaption></figcaption></figure>

***

## VRoid Hub Integration <a href="#c3ec" id="c3ec"></a>

​The PRISM app’s VTubing feature supports importing VRM models stored on your mobile device. This allows you to easily bring in and use the same VRM models you’ve previously used in PC environments.

In addition, we’ve integrated the most widely-used VRM model distribution platform, VRoidHub, through a login system to make it easier for you to access and use VRM models.

You can easily download avatars you’ve created and registered on VRoidHub or use avatars made by others, and immediately use them for VTubing in the PRISM app.

<figure><img src="https://miro.medium.com/v2/resize:fit:1400/1*Y4IYcdWwMhLBWNrFIVnagg.jpeg" alt=""><figcaption></figcaption></figure>

[Mobile](/mobile/overview), [Guides](/mobile/guides), [VTuber](/mobile/guides/vtuber)


# Adopting PNG Tuber

Android, iOS

PNG Tuber is a type of character live streaming where the streamer goes live using a fictional character instead of themselves, and uses a set of images to represent the fictional character.

​Character live streaming began in 2016 with the unique advantage of utilizing a streamer’s character with a new identity to meet viewers, and has seen a dramatic increase in user volume since 2019.

<figure><img src="https://miro.medium.com/v2/resize:fit:1400/1*6TPE933_OIQqhu_OXk_nag.png" alt=""><figcaption><p>JellyBean, the leading PNG Tuber channel in the US with 5.84 million subscribers.</p></figcaption></figure>

However, since live streaming of characters, including PNG Tuber, requires special equipment or separate softwares, live streaming has been mainly conducted based on PC apps, and due to this situation, character live on mobile apps has not been familiar to us.

By using the PRISM app, anyone can easily become a PNG Tuber on the mobile app without any hassle and preparation.

***

## Flow of using the PNG Tuber <a href="#id-37c1" id="id-37c1"></a>

PNG Tuber is live streaming with a virtual character as the protagonist, but its purpose is the same as any other live stream to connect and interact with viewers.

Your character needs to express emotions that fit the story you’re telling, and PNG Tuber makes this possible by selecting and using a set of images for each emotion.

<figure><img src="https://miro.medium.com/v2/resize:fit:960/1*5zkwO0Hfg8KhveDf5RSqxw.gif" alt="" width="563"><figcaption><p>PNG Tubers express their emotions using a set of images for each emotion.</p></figcaption></figure>

The PRISM app also allows users to register their own set of PNG Tuber character images, but to make it easier and faster to get started with PNG Tuber, the app provides five default characters. And they have five set emotions by default: happy, joy, surprised, sad, and angry. And you can change your emotional expression by clicking on the individual emotion buttons as you livestream.\
​\
For each of these five emotions, the following four state images are being used:

* **Image with eyes open, mouth closed**
* **Image with eyes open, mouth open**
* **Image with eyes closed, mouth closed**
* **Image with eyes closed, mouth open**

{% hint style="info" %}
Your character’s eyes will automatically blink, and their mouth will recognize your speech and automatically change accordingly.
{% endhint %}

Therefore, if you want to prepare your own characters to use instead of the default characters provided by the PRISM app, we recommend that you prepare a total of 20 images (5 emotions x 4 states) as shown in the example above.

However, five emotions and four states for each emotion are sometimes not enough to connect with your audience. While you can add more than five emotions to the characters, the PRISM app takes it further by supporting an additional feature called motion.

<figure><img src="https://miro.medium.com/v2/resize:fit:864/1*igW3HXHNZinwkZMcX06jIw.gif" alt="" width="375"><figcaption><p>​This is one of the motions provided by the PRISM app.</p></figcaption></figure>

You can give your character repetitive movements through motion features that can be applied to each emotion. And the PRISM app has a total of five forms of motion. And you can even apply a different motion for when the mouth is open and closed.

There's a lot more to the PNG Tuber feature in the PRISM app than this. ​For example, you can set a background and change it on the fly while you’re live, and we also support integrations that allow you to use PNG Tuber not only for mobile streaming, but also for PRISM Windows Live Streaming.

<figure><img src="https://miro.medium.com/v2/resize:fit:960/1*A_Qu_LkA6Yyib2cLdBgXOQ.gif" alt=""><figcaption><p>PNG Tuber in PRISM app support various features.</p></figcaption></figure>

More details can be found in the section below.

***

## VTuber Mode <a href="#id-8116" id="id-8116"></a>

The PRISM app supports three modes: Screen Live (ScreenCast), Camera Live, and VTuber mode. Select **VTuber** from the list of live types, which you can see in the center of the image on the left below. Here, we’ll use a PNG Tuber, so make sure to select a **2D Avatar** from the avatar types.

<figure><img src="https://1019928184-files.gitbook.io/~/files/v0/b/gitbook-x-prod.appspot.com/o/spaces%2FlISC5rfB4Hnmbsjf8phq%2Fuploads%2FwYSwywVOHiaOjJTdRGU6%2Fpngtuber1.png?alt=media&amp;token=ea6e442d-ed5c-411d-8d03-1320d96d8a29" alt=""><figcaption><p>You should select VTuber mode and 2D Avaatar type to use PNG Tubers.</p></figcaption></figure>

***

## Vtuber Setting <a href="#id-272e" id="id-272e"></a>

When you enter the VTuber mode, you’ll see a character from one of the default characters provided by the PRISM app immediately set up on the screen. (The number and type of basic characters may change.)

When you look at the middle part of the picture on the left, you can see the Settings button, and once you click that button, you can enter the VTuber setting screen. On the VTuber setting screen, you can check the 5 default characters provided by the PRISM app by swiping.

<figure><img src="https://miro.medium.com/v2/resize:fit:1400/1*0VdpBl4kRyrp1w2Of3yItA.jpeg" alt=""><figcaption></figcaption></figure>

At the left end of the character list, you’ll find a card that allows you to add new characters (avatars).

At the top of the card, Preview and Source tabs are located, and you can register image sets for each emotion guide in the Source tab. This image set is for changing the shape of the eyes and mouth, and it is recommended to prepare one set consisting of 4 images as shown below:

* **Image with eyes open x mouth closed**
* **Image with eyes open x mouth open**
* **Image with eyes closed x mouth closed**
* **Image with eyes closed x mouth open**

<figure><img src="https://miro.medium.com/v2/resize:fit:1400/1*WxuOZHVvISG3oZxJlilGpQ.jpeg" alt=""><figcaption><p>이미지 수정 필요; new avatar 카드 위치 변경</p></figcaption></figure>

If you click each state of the source, it will switch to the media selection mode where you can attach images. And as shown on the screen, you can register each state image in the order you selected. The image setup process will be easier if you have saved the images in the same place.

<figure><img src="https://miro.medium.com/v2/resize:fit:1400/1*bfEUDt6V3dXPeB2uXHnDpg.jpeg" alt=""><figcaption></figcaption></figure>

If you switch to the preview tab after registering all 4 status images, you can check the status change in the corresponding emotion in the card. And, using the volume bar fixed on the left side of the card, you can set the voice volume value that reflects the shape of your mouth.

​At the very bottom of the screen, you can see the ‘Emotion’ text button. Once you click on it, you can enter the emotion setting screen where you can set the emotion list itself. Click the emotional emoticons at the bottom of the screen one by one and set the status images for each emotion.

<figure><img src="https://miro.medium.com/v2/resize:fit:1400/1*Nt6iYA1QoE2qoTej-bpoGA.jpeg" alt=""><figcaption></figcaption></figure>

***

## Emotion Setting <a href="#id-72fd" id="id-72fd"></a>

As mentioned earlier, the default characters provided by the PRISM app have five basic emotions: happiness, joy, surprise, sadness, and anger.&#x20;

However, you can make changes such as adding or deleting this emotion list of your own character, and you can do that in the emotion settings screen that appears on the screen.

{% hint style="warning" %}
You can't edit default character's emotion list provided by the PRISM app.
{% endhint %}

So, click the plus button to see a new emotion slot appear, then select and add a suitable emotion from the emotion emoji list at the bottom. You can see that an emoji has been added that looks greyed out.

<figure><img src="https://miro.medium.com/v2/resize:fit:1400/1*CVrTqW5gZXcJGHhcVLv6AA.jpeg" alt=""><figcaption></figcaption></figure>

You can also enter the emotion list editing mode by long-pressing the emotion list area.

Here you can delete previously registered emotions or adjust the order in which emotions are placed. When all adjustments are complete, click the **Done** button at the top right to complete the application.

<figure><img src="https://miro.medium.com/v2/resize:fit:1400/1*1sUCpXFwBVwb3T1lzPyl-A.jpeg" alt=""><figcaption></figcaption></figure>

***

## Placing character on the screen <a href="#e81c" id="e81c"></a>

PNG Tuber character overlays can be positioned by dragging and dropping, just like normal overlays available in the PRISM app. And you can also adjust its size and rotation using pinch & zoom.

So, after selecting your character, place it in the position and size that best suits your streaming screen area, and start streaming your character.

<figure><img src="https://miro.medium.com/v2/resize:fit:1132/1*r_lxtteaw1AH2eZ2LmL2sw.gif" alt=""><figcaption></figcaption></figure>

***

## Emotion and background <a href="#f8e3" id="f8e3"></a>

In order to quickly switch and utilize these set emotions during live streaming, it is recommended to keep the emotion menu open.

You can see Emotions, Items and Backgrounds buttons in the middle of the image on the left. If you click the button, the emotion list is exposed at the bottom of the screen. Choose appropriate emotions that fit the communication situation with viewers.

<figure><img src="https://1019928184-files.gitbook.io/~/files/v0/b/gitbook-x-prod.appspot.com/o/spaces%2FlISC5rfB4Hnmbsjf8phq%2Fuploads%2FPH460pcJG222COu7hQlk%2FPNG%20VTuber%201.png?alt=media&amp;token=9a12413a-2445-43b0-896f-ddf9c46ab65f" alt=""><figcaption></figcaption></figure>

You can also change the background using the Emotions, Items, and Backgrounds buttons as shown in the image above. You can register several backgrounds in advance and change them later, just like emotions.

If you register backgrounds that express various spaces, you will be able to create effects like scene transitions in movies or cartoons.

<figure><img src="https://1019928184-files.gitbook.io/~/files/v0/b/gitbook-x-prod.appspot.com/o/spaces%2FlISC5rfB4Hnmbsjf8phq%2Fuploads%2FzzQu2AFkbzwANdbAKTPG%2FPNG%20VTuber%202.png?alt=media&amp;token=00391ada-0aa5-42dc-948e-69220a4e76c3" alt=""><figcaption></figcaption></figure>

***

## Volume bar settings <a href="#id-3f0e" id="id-3f0e"></a>

In VTuber mode, you can see the volume bar on the left side of the screen.

You will remember that you registered 4 state images when registering emotions earlier. And half of the four state images were images with the mouth open, and the other half were images with the mouth closed.

Transitions between open and closed mouth images respond to the streamer’s voice volume and are handled automatically. And for now, you can set the volume of the voice that the processing responds to through the volume bar.

If you set the volume too low, the character may not open its mouth while speaking, and if you set the volume too high, the character may keep its mouth open all the time.

Therefore, set appropriate values in advance through testing, and proceed with live streaming while changing the appropriate settings according to the situation.

<figure><img src="https://miro.medium.com/v2/resize:fit:1400/1*drjtK2N7_zb-DJJXw5XUpw.jpeg" alt=""><figcaption><p>You can adjust the respond range of the PNG Tuber's mouth, or easily mute microphone.</p></figcaption></figure>

***

## Avatar Management <a href="#id-263c" id="id-263c"></a>

A More button is provided at the top right of each avatar card in the settings menu. If you click the button, you can duplicate the avatar, export the avatar file (extension .prismvt), or delete the avatar.

{% hint style="warning" %}
You can't duplicate or export default characters provided by the PRISM app.
{% endhint %}

<figure><img src="https://miro.medium.com/v2/resize:fit:1400/1*5RbV6KJ0uZ-NSD0v84091w.jpeg" alt=""><figcaption></figcaption></figure>

Additionally, if you export the avatar file that you created in the PRISM app, you can use it as-is on other devices by importing the file.

You can utlize this feature when you change devices or share avatar files with friends.

***

## Utilizing Avatars in the CONNECT function <a href="#id-89da" id="id-89da"></a>

Through the CONNECT function of the PRISM mobile app, the camera preview of the PRISM mobile app could be used as a video source in the PRISM Windows app.

In addition to this, the VTuber screen can also be used as a source in the PRISM Windows app.

As shown in the image below, select Vtuber Share in the CONNECT tab to use the PNG Tuber function in the PRISM Windows app.

<figure><img src="https://1019928184-files.gitbook.io/~/files/v0/b/gitbook-x-prod.appspot.com/o/spaces%2FlISC5rfB4Hnmbsjf8phq%2Fuploads%2FbJzguviqE6LhKfv0ENB0%2FPNG%20VTuber%203.png?alt=media&amp;token=ab77fa3b-3f34-4ebc-a912-1c0a4525bdc1" alt=""><figcaption></figcaption></figure>

***

## Default characters <a href="#a782" id="a782"></a>

​In the PNG Tuber function of the PRISM app, you can register and use the character image sets you have prepared yourself, as described above.

**< How to prepare your own character >**

* Draw them yourself using drawing tools.
* Request a professional who draws characters.
* Or you can draw it using an AI tool *(these have been released a lot recently!)*

However, those without experience might have difficulties to set up. PRISM app is providing 12 default PNG Tuber characters.

In this page we're going to show you only 3 characters. But you can check out remain characters in the PRISM app yourself, then start streaming PNG Tuber live using your favorite characters.

We haven’t named the characters yet. Names are being suggested in the discussions channel of the PRISM official Discord server below, so join the server and come up with cool names. Who knows your suggestion might be chosen!

<figure><img src="https://miro.medium.com/v2/resize:fit:680/1*82LW2-7gcwTI2FXOORheZA.png" alt=""><figcaption><p><a href="https://discord.gg/ZZYEfBS6GS">https://discord.gg/ZZYEfBS6GS</a></p></figcaption></figure>

<figure><img src="https://miro.medium.com/v2/resize:fit:1400/1*TC5MIdXIZA0VbyniHXAk0g.jpeg" alt=""><figcaption><p>Character 1</p></figcaption></figure>

<figure><img src="https://miro.medium.com/v2/resize:fit:1400/1*rpJQuvFZFkLtn64D8aU7uw.jpeg" alt=""><figcaption><p>Character 2</p></figcaption></figure>

<figure><img src="https://miro.medium.com/v2/resize:fit:1400/1*yrBSoZSOY3UvmdfM2_1ZkA.jpeg" alt=""><figcaption><p>Character 3</p></figcaption></figure>

[Mobile](/mobile/overview), [Guides](/mobile/guides), [VTuber](/mobile/guides/vtuber)


# Creating PNG Tuber Characters Using External Applications

Android, iOS

You can stream live with a virtual 2D character based on your own style using the PNG Tuber option in the PRISM app. It is a feature that allows creators to interact with their audience as a living character using a variety of facial expressions and gestures, and you can learn more about how to use it, including different emotions and specific gestures, at the following page:

* [Adopting PNG Tuber](/mobile/guides/vtuber/adopting-png-tuber)

We provide twelve default characters in the app to help you get up and running quickly, but a lot of people like to use their own characters for live streaming.

<figure><img src="https://miro.medium.com/v2/resize:fit:1400/1*sCF4meiOgM55Q_TlgF-H9w.png" alt=""><figcaption><p>PRISM app provides twelve default characters for PNG Tubers.</p></figcaption></figure>

To create your own VTuber character using PNG Tuber, we recommend that you first create an avatar image with four different facial expressions. There are several ways to create an avatar image:

* To draw directly with drawing tools
* Hire someone to draw your characters professionally
* Using an application that provides the ability to create a character
* Draw using the many available AI-based drawing tools

However, if you’re not familiar with image tools, you’ll probably have a hard time creating your own characters. With the help of external applications, you can easily create your own PNG Tuber characters.

In this page, we are going to create an avatar using several applications that can create characters.

***

## **VRM Posing Mobile App** <a href="#id-493c" id="id-493c"></a>

The VRM Posing Mobile app, powered by Pixiv and available for Android and iOS, allows users to create a variety of facial expressions and customize poses easily.

However, on the mobile version (not the PC version), you can only customize the characters you create on the Vroid Hub website, and you can't save them directly to your mobile device, so you'll have to move them or take photos.

### **How to Create Character Images with VRM Posing Mobile** <a href="#id-1f85" id="id-1f85"></a>

Once you’ve downloaded the app, launch it and you’ll find the **ADD** and **CHANGE** buttons in the top left corner, and you’ll be able to choose your character from the menu.

There are currently 10 characters available in the VRM Posing Mobile app. Select the character you want to use as your own PNG Tuber. After selecting a character, you’ll see it in a default pose like the one shown below.

<figure><img src="https://miro.medium.com/v2/resize:fit:1400/1*xHC5GGj87S-ojTns4oy_RA.jpeg" alt=""><figcaption><p>VRM Posing Mobile app provides 10 basic VRM characters.</p></figcaption></figure>

There are two areas we’ll focus on: poses and facial expressions. You can customize your poses and facial expressions using the **Select Pose** button and the **Blend Shape** button in the top left corner. VRM Posing Mobile app also has a 360-degree rotating camera and a number of tools to help you customize your VRoid character.

<figure><img src="https://1019928184-files.gitbook.io/~/files/v0/b/gitbook-x-prod.appspot.com/o/spaces%2FlISC5rfB4Hnmbsjf8phq%2Fuploads%2F7p0PVYyLeAnr4qxOeNCj%2Fvrmposingmobile1.png?alt=media&amp;token=a1838cbc-3c24-4993-abd8-b67c1a66c090" alt=""><figcaption><p><strong>Select Pose</strong> is for poses, <strong>Blend Shape</strong> is for facial expresions.</p></figcaption></figure>

The image below shows the **Blend Shape** mode, which is used for customizing the facial expression. You can easily create your character’s facial expressions using the Face Shape UI at the bottom right of the photo. Try creating different facial expressions by adjusting the various expression faders.

<figure><img src="https://miro.medium.com/v2/resize:fit:1400/1*-3NuMNPPsMu80LmIpHL5gg.jpeg" alt=""><figcaption><p>We adjusted just the eyes and mouth to create the expression shown in the photo above.</p></figcaption></figure>

The image below shows the **Select Pose** mode, which is used for choosing a pose. The VRM Posing Mobile app offers various pose presets, so try them out and find one you like.

<figure><img src="https://miro.medium.com/v2/resize:fit:1400/1*GzoJohJeQsKDUyxl3SSLaw.jpeg" alt=""><figcaption><p>The app offers various pose presets.</p></figcaption></figure>

Once you’ve created your character’s pose, register it in the settings menu of the PNG Tuber feature in the PRISM app by referring to the following method:

* [#id-4c8d](#id-4c8d "mention")

You’ll be able to stream with your own colorful avatar.

<figure><img src="https://miro.medium.com/v2/resize:fit:1400/1*7igkO_LvbWSUBsspVOO1QA.jpeg" alt=""><figcaption><p>Example of how to implement a pose and a facial expression at the same time</p></figcaption></figure>

***

## **ZEPETO App** <a href="#id-22ea" id="id-22ea"></a>

This article will show you how to create a PNG Tuber character using the ZEPETO app. The app is available for NAVER Z and supports both Android and iOS.

Powered by facial recognition, augmented reality (AR) and 3D technology, the ZEPETO app allows for endless customization of your avatar. You can create an avatar that looks like you and transfer it to the PRISM app. You can then use it as a character in the PNG Tuber feature.

<figure><img src="https://miro.medium.com/v2/resize:fit:1400/1*rTbVOQdibLiLphH4EZAg_A.jpeg" alt=""><figcaption><p>The ZEPETO App developed by NAVER Z</p></figcaption></figure>

### **How to Create Character Images with ZEPETO** <a href="#id-7296" id="id-7296"></a>

The ZEPETO app provides motion capture through camera mode. There are no built-in facial expressions in this feature, but you can use your own face to express different emotions and create avatar images that follow those emotions.

When you enter Camera mode, you’ll see the following background. You’ll also see a user interface that lets you capture video and photos separately.

<figure><img src="https://miro.medium.com/v2/resize:fit:1400/1*uMn_bXhOOKrIUVf4yvNaHA.png" alt=""><figcaption><p>ZEPETO's Camera mode</p></figcaption></figure>

The one we’re going to use is a photo. Change the background to transparent and start the front camera. The reason we need a transparent background is because the PNG Tuber feature in the PRISM application requires images with transparent areas other than the characters.

The next step is to capture your expressions. If you have a front-facing camera, you’ll see your avatar recognize and mimic your expressions. The photos you’ll need to create your avatar are the same as in the previous step, with four recommended expressions. Please try to capture the look you want to achieve.

<figure><img src="https://miro.medium.com/v2/resize:fit:1400/1*5C9d1d2V3swEX3VQxB9zmg.jpeg" alt=""><figcaption><p>Facial recognition by ZEPETO app, you can easily capture various expressions with your face.</p></figcaption></figure>

Create an avatar that looks like you with a variety of customization features. From body parts like eyebrows to shoes, accessories, and even the latest fashions, you can make your avatar unique.

<figure><img src="https://miro.medium.com/v2/resize:fit:540/1*dYcalajvzm_6M9hXkVY3vQ.jpeg" alt=""><figcaption><p>Make your avatar unique with customization.</p></figcaption></figure>

You can also use the motion capture feature to create your own sad, happy, depressed, and other emotional expressions and use them in the PRISM app. It’s a unique experience that will make you feel more connected to your avatar.

<figure><img src="https://miro.medium.com/v2/resize:fit:1400/1*lDpZfvYNDgKQ7zQkcaqkPw.png" alt=""><figcaption></figcaption></figure>

***

## **Create your own avatar** <a href="#id-4c8d" id="id-4c8d"></a>

It’s time to start creating your own avatars using PNG Tuber once you have a set of avatar images.

To begin, launch the PRISM app and select **VTuber** mode from the list of Live Select tabbed sections in the center of the picture on the left. Once you’ve selected the mode, click on the gear-shaped Settings button on the right. This will open the VTuber Settings page.

<figure><img src="https://miro.medium.com/v2/resize:fit:1400/1*IV1ba-aelEc8NZfXIi5k3A.png" alt=""><figcaption></figcaption></figure>

In the PNG Tuber setup screen, you’ll see some default characters that are ready to go, but since we’re going to set up our own character, we’re going to scroll to left, and on the card you’ll see a button that allows you to create a new avatar.

We’re going to create an avatar by adding a photo directly to the Source, so click the **Source** button. You’ll see an image like the one above right with a space for your avatar image.

<figure><img src="https://miro.medium.com/v2/resize:fit:1400/1*i-MVPolu7bSYfqwS1wzwQA.png" alt=""><figcaption><p>the image needs to be replaced</p></figcaption></figure>

Now register a set of images for the guide for each emotion, we need four sets of images. The image sets we refer to here are the emotion images, i.e. the state images for changing the shape of the eyes and mouth. We will guide you to prepare 4 sets as shown above:

* **Image with eyes open, mouth closed**
* **Image with eyes open, mouth open**
* **Image with eyes closed, mouth closed**
* **Image with eyes closed, mouth open​**

<figure><img src="https://miro.medium.com/v2/resize:fit:1400/1*ceVlNerfxWKuosFoVhRNfQ.jpeg" alt=""><figcaption><p>Each emotion needs four sets of images.</p></figcaption></figure>

To create your avatar, use the images below as a guide.

<figure><img src="https://miro.medium.com/v2/resize:fit:1400/1*AvY4Nhqxh-wQeHuScix4SQ.png" alt=""><figcaption></figcaption></figure>

You’ve now registered your PNG Tuber avatar. Your avatar will move its mouth and make various facial expressions as if it were actually speaking, depending on your voice and emotion choices.

<figure><img src="https://miro.medium.com/v2/resize:fit:640/1*8vdj32oJn5DaARsQtAjRHQ.gif" alt=""><figcaption><p>Example of a finished, voice-activated avatar.</p></figcaption></figure>

<figure><img src="https://miro.medium.com/v2/resize:fit:622/1*Ri4q04_lWAbNRaqO7sTFsA.gif" alt=""><figcaption><p>Example of a finished, voice-activated avatar.</p></figcaption></figure>

[Mobile](/mobile/overview), [Guides](/mobile/guides), [VTuber](/mobile/guides/vtuber)


# How to Use mocopi for Motion Capture

Android, iOS

## Enhance the 3D avatars in PRISM Live Studio with mocopi motion capture equipment.

### About mocopi®

mocopi is a mobile motion capture device developed by Sony, using six sensors to easily track full-body movements. Lightweight and portable, it connects with smartphones, making it possible to create VR/metaverse content or live broadcasts anytime, anywhere. \
\
[mocopi official website](https://xyn.sony.net/en/products/mocopi_pc)

<figure><img src="https://1019928184-files.gitbook.io/~/files/v0/b/gitbook-x-prod.appspot.com/o/spaces%2FlISC5rfB4Hnmbsjf8phq%2Fuploads%2FJeI12OEPhNNARqoM6A2b%2Fimage.png?alt=media&amp;token=e0dcdddc-2370-4b49-9152-1e0bd6ac07a9" alt=""><figcaption></figcaption></figure>

<figure><img src="https://1019928184-files.gitbook.io/~/files/v0/b/gitbook-x-prod.appspot.com/o/spaces%2FlISC5rfB4Hnmbsjf8phq%2Fuploads%2F1qY8Pad1IwamMea0HZ4u%2Fimage.png?alt=media&amp;token=0600030d-3d71-4d6d-b68f-74f0589fd588" alt=""><figcaption></figcaption></figure>

## Preparation

* One device running the **PRISM Live Studio mobile app**
* One device running the **mocopi smartphone app**
* **mocopi sensors and bands**
* **Wi-Fi network**

#### &#x20;

## Set up in the PRISM Live Studio mobile app

<figure><img src="https://1019928184-files.gitbook.io/~/files/v0/b/gitbook-x-prod.appspot.com/o/spaces%2FlISC5rfB4Hnmbsjf8phq%2Fuploads%2FEi6Mi0eSEhxb15JNDXE0%2Fimage.png?alt=media&amp;token=aa72df92-e828-4bd7-90ba-20367bc99cfe" alt=""><figcaption></figcaption></figure>

1. **PRISM mobile app Android v5.0.0** or **iOS v3.9.0** or later is required.
2. Open the **PRISM mobile app**, then select **VTuber Mode > 3D Avatar**.
3. Go to **3D Avatar > 3D Avatar Settings**, and turn **mocopi tracking** **ON**.
4. Check that the **IP Address** and **Port Number** are displayed.
   1. The mocopi smartphone app uses this IP address and port number to send your full-body motion data to the PRISM app, allowing your avatar to move in real time.
5. You’ve completed the setup for using the PRISM app with motion capture.

## Set up in mocopi smartphone app

The following steps explain how to set up the **mocopi sensors** and the **app**. You can also check the **official mocopi YouTube channel** for detailed instructions.

[mocopi official YouTube](https://www.youtube.com/watch?v=ArwYvo5HfVI)

<figure><img src="https://1019928184-files.gitbook.io/~/files/v0/b/gitbook-x-prod.appspot.com/o/spaces%2FlISC5rfB4Hnmbsjf8phq%2Fuploads%2FhmVJlOBB8rx17IGwUZc5%2Fimage.png?alt=media&amp;token=48910257-3566-43df-b714-b27ac51a1de8" alt=""><figcaption></figcaption></figure>

1. Open the mocopi smartphone app.
2. Pair the sensors with your smartphone by following the on-screen guide.

<div align="left"><figure><img src="https://1019928184-files.gitbook.io/~/files/v0/b/gitbook-x-prod.appspot.com/o/spaces%2FlISC5rfB4Hnmbsjf8phq%2Fuploads%2FqgbEiWSohiA53E2QOpwk%2Fimage.png?alt=media&amp;token=6ec2feda-7c83-494d-acb4-888fa874b121" alt=""><figcaption></figcaption></figure></div>

3. Connect the sensors and perform calibration.

<figure><img src="https://1019928184-files.gitbook.io/~/files/v0/b/gitbook-x-prod.appspot.com/o/spaces%2FlISC5rfB4Hnmbsjf8phq%2Fuploads%2FjvTQ6ylF0318cxv2NLdv%2Fimage.png?alt=media&amp;token=a2657ce7-9468-4787-affa-799f3e112398" alt=""><figcaption></figcaption></figure>

4. After successful calibration, the app will move to a screen where you can view your avatar and check how the tracking data is applied.\
   To send tracking data to the PRISM app as shown in the image, select Motion, then use the Save/Send toggle button to set the transmission mode.
5. Tap the menu icon in the top-right corner and select Settings.
6. Choose External service connection settings.
7. For Destination, select Stream support app.
8. Set the IP address to match the one displayed in the PRISM app under\
   VTuber Mode > 3D Avatar Setting > mocopi tracking.
9. Tap OK.
10. When the mocopi smartphone app transmits full-body motion data, it will be reflected in the 3D Avatar within the PRISM app.

You’re all set! Start your VTuber stream with lifelike motion. 🎉🎉


# Adding Camera Movement to Your 3D VTuber

## Adding Camera Movement to Your 3D VTuber

{% tabs %}
{% tab title="English" %}

### Make your VTuber stream more cinematic

Give your 3D VTuber stream a livelier, more cinematic feel with **Camera Movement**. Instead of a still camera, PRISM can slowly circle, follow, or glide toward your VTuber — adding motion and depth that keeps viewers engaged.

> **Available for**: 3D VTubers (Android 5.3.0 · iOS 3.12.0 or later). It does not appear in 2D mode.

### Where to find it

In **VTuber mode**, open your **3D VTuber**'s effects and go to the **Camera shot** tab. The camera movement options appear in that list.

> The effects panel has four tabs — emotion, motion, pose, and camera shot. Camera Movement lives under **camera shot**.

### The camera movements

The lineup may change as the feature evolves, but it includes movements such as:

* **Orbit** — the camera slowly circles around your VTuber, showing it from ever-changing angles.
* **Tracking** — the camera moves alongside your VTuber, keeping it steady in the frame.
* **Dolly in / out** — the camera glides closer for a more intimate look, or pulls back to reveal more of the scene.

### How to use it

1. Tap a movement to start it. It plays on a **loop** and keeps going until you turn it off.
2. **Tap the same movement again** to stop it. The camera stays right where it is — it doesn't snap back to the front.
3. **Tap a different movement** to switch instantly.

You can take over anytime with touch gestures (pinch to zoom, drag to move), and the camera responds to your hand right away.

### Good to know

* Camera Movement works **together with** your VTuber's emotion, motion, and pose — they don't interfere with one another.
* During a live stream it appears **exactly as your viewers see it**, and you can change it freely while live.
* Your choice is kept when you reopen the effects list, visit settings, or rotate the screen. It turns off when you switch between 2D and 3D, leave VTuber mode, enter Connect mode, end your live, or restart the app.
* If a movement can't play for some reason, the camera holds its position and a short message appears — just try again in a moment.
  {% endtab %}

{% tab title="Korean" %}

### VTuber 방송을 더 영화처럼

**카메라 무빙**으로 3D VTuber 방송을 더 생동감 있고 영화 같은 느낌으로 연출해 보세요. 멈춰 있는 카메라 대신, PRISM이 VTuber 주위를 천천히 돌거나, 따라가거나, 가까이 다가가며 움직임과 공간감을 더해 시청자의 몰입을 높여 줍니다.

> **지원 대상**: 3D VTuber (Android 5.3.0 · iOS 3.12.0 이상). 2D 모드에서는 표시되지 않습니다.

### 어디에 있나요

**VTuber 모드**에서 **3D VTuber**의 연출 패널을 열고 **카메라 샷** 탭으로 이동하세요. 카메라 무빙 옵션이 이 목록에 있습니다.

> 연출 패널에는 감정, 모션, 포즈, 카메라 샷 네 개의 탭이 있으며, 카메라 무빙은 **카메라 샷**에 들어 있습니다.

### 어떤 무빙이 있나요

제공되는 무빙은 기능이 발전하며 달라질 수 있지만, 다음과 같은 연출을 포함합니다.

* **오빗(Orbit)** — 카메라가 VTuber 주위를 천천히 돌며 여러 각도로 보여 줍니다.
* **트래킹(Tracking)** — 카메라가 VTuber와 나란히 움직이며 화면 안에 안정적으로 담아 줍니다.
* **달리 인 / 아웃(Dolly)** — 카메라가 가까이 다가가 친밀한 느낌을 주거나, 뒤로 물러나 장면을 더 넓게 보여 줍니다.

### 사용 방법

1. 원하는 무빙을 탭하면 재생이 시작됩니다. **반복 재생**되며, 끌 때까지 계속됩니다.
2. **같은 무빙을 다시 탭하면** 멈춥니다. 이때 카메라는 그 위치에 그대로 머무릅니다 — 정면으로 되돌아가지 않아요.
3. **다른 무빙을 탭하면** 곧바로 전환됩니다.

언제든 터치 제스처(핀치로 확대·축소, 드래그로 이동)로 직접 조작할 수 있고, 카메라는 손동작에 바로 반응합니다.

### 알아두면 좋아요

* 카메라 무빙은 VTuber의 감정·모션·포즈와 **함께** 사용할 수 있으며 서로 방해하지 않습니다.
* 라이브 방송 중에는 **시청자가 보는 그대로** 반영되며, 방송 중에도 자유롭게 바꿀 수 있습니다.
* 선택한 무빙은 연출 목록을 다시 열거나, 설정에 다녀오거나, 화면을 회전해도 유지됩니다. 2D↔3D 전환, VTuber 모드에서 나가기, 커넥트 모드 진입, 라이브 종료, 앱 재실행 시에는 해제됩니다.
* 어떤 이유로 무빙이 재생되지 않으면 카메라는 위치를 유지하고 짧은 안내가 표시됩니다 — 잠시 후 다시 시도해 주세요.
  {% endtab %}
  {% endtabs %}


# B2B


# B2B Product for Utilizing PRISM App for Corporate Services

All

The PRISM Live Studio mobile app was first released as a beta version in November 2017, followed by a full release in 2019. Thanks to your support and feedback, it has grown steadily and is now one of the most widely used live streaming apps, serving users in over 200 countries worldwide.

Throughout the development and operation of the app, we have received numerous partnership requests from companies and organizations interested in integrating PRISM Live Studio as a native streaming tool within their live platforms. However, our primary focus has been on enhancing the app’s functionality, performance, and stability, which has limited our ability to actively pursue these partnership opportunities.

We are confident that PRISM Live Studio is a high-quality solution that can benefit corporate businesses. You can find the **B2B PRISM Live Studio** product under the **Media** category in the service list of [NAVER Cloud Platform](https://www.ncloud.com/product). This product is separate from the existing Live Station service, but we are exploring ways to offer additional advantages when using them together.

<figure><img src="https://1019928184-files.gitbook.io/~/files/v0/b/gitbook-x-prod.appspot.com/o/spaces%2FlISC5rfB4Hnmbsjf8phq%2Fuploads%2F2k1j8Vdjr3vtYN6VM777%2Fb2b.png?alt=media&amp;token=bd52572f-1f54-4c53-bbf7-ddfb1473123e" alt=""><figcaption><p>Find the <strong>B2B PRISM Live Studio</strong> product in the <strong>Media</strong> category on NAVER Cloud Platform.</p></figcaption></figure>

By integrating the PRISM Live Studio mobile app into your live service, you gain several advantages compared to developing your own mobile streaming app:

* **Ease of implementation**\
  Developing a mobile streaming app requires significant investment in time and resources. Instead of building an app from scratch, you only need to develop the connection between your live service and PRISM Live Studio.
* **Adaptability to Platform Changes**\
  You don’t need to keep up with annual updates to Android and iOS operating systems, nor do you need to adjust for new devices or network environment changes.
* **Continuous Feature Updates**\
  We actively monitor market demands and continuously update the PRISM Live Studio app to reflect industry trends and user needs.
* **Operational Support**\
  In mobile environments, live streaming can face unexpected challenges. PRISM Live Studio can handle such issues.
* **Cost reduction**\
  All of the above benefits contribute to cost reduction. By leveraging PRISM Live Studio, your corporate services can enhance user satisfaction while minimizing operational expenses.<br>

It also has the following advantages compared to manually using the PRISM app on the app market through the custom RTMP function:

* **Enhanced App Functionality**\
  Manually setting up RTMP information can be inconvenient for users. The B2B product enables automated account integration and provides features such as viewer chat and status information.
* **Advanced Management Tools**\
  The PRISM Live Studio service offers in-depth analytics and statistics on streams.
* **Dedicated Service Support**\
  Our team provides troubleshooting assistance and proactive problem-solving for any issues encountered while using the PRISM Live Studio app.

The PRISM Live Studio team is committed to delivering solutions that precisely meet market needs. We welcome feedback from businesses and are eager to hear your thoughts during our product development process.

If you have any suggestions or are interested in utilizing our B2B products, please feel free to contact us anytime at <prismlive@navercorp.com>.

[Mobile](/mobile/overview), [Guides](/mobile/guides), [B2B](/mobile/guides/b2b)


# Connecting B2B Service Product Based on NAVER Cloud Platform

Android, iOS

Businesses can use the PRISM mobile app as a B2B product for their own services.

* [NAVER Cloud B2B Product](https://prismlivestudio.gitbook.io/home/mobile/announcement/general/naver-cloud-b2b-product)
* [NAVER Cloud Platform’s Media Product Group](https://www.ncloud.com/product/media)
* [B2B product plan for utilizing PRISM Live Studio mobile app for corporate services (medium)](https://medium.com/prismlivestudio/notice-b2b-product-plan-for-utilizing-prism-live-studio-mobile-app-for-corporate-services-49df1713f96f)

If you are considering utilizing the PRISM mobile app for your live service, please contact us at our representative email <prismlive@navercorp.com>.

***

For regular users to use the PRISM app, registration and login required signing up with a major social service account or using an email address.

However, for the B2B product, users can join and log in to the PRISM app by clicking the **NAVER Cloud B2B** button shown in the image. When users click the **NAVER Cloud B2B** button, they will sign up and log in to the PRISM app with their corporate live service account.

<figure><img src="https://miro.medium.com/v2/resize:fit:1400/1*BIR3wVFpfJIj-FHRNmPdjw.jpeg" alt=""><figcaption><p>Corporate live service users can use a dedicated login menu to their own live services.</p></figcaption></figure>

Once logged in, the corporate live service entry will be positioned at the front of the platform list for live streaming. Users can easily complete the account linking process for live broadcasting by clicking on the respective platform button.

<figure><img src="https://miro.medium.com/v2/resize:fit:1400/1*hDAY3o5GmdsTxcVHtdAehg.jpeg" alt=""><figcaption><p>Scroll the sheet to explore more options.</p></figcaption></figure>

Once the account linking for live streaming is complete, users can proceed to detailed settings for live broadcasts through a menu similar to the one shown in the picture.

If the corporate service supports the feature, users can select and utilize scheduled live streams from the corporate service, set the public scope, and choose the channel, all within the PRISM app.

[Mobile](/mobile/overview), [Guides](/mobile/guides), [B2B](/mobile/guides/b2b)


# Error Solution


# Streaming


# Media Loading Failed

{% hint style="danger" %}
Media loading has failed.
{% endhint %}

This post explains the causes of situations where you attempt to play, use, or edit a video file in the PRISM app, but the app fails to load the file properly. It also provides guidance on how to resolve the issue.

***

## 1. Background of Errors

Video files prepared in either of the following ways may encounter issues during the loading process:

* **Video files created by recording or editing within the PRISM app.**
* **Video files obtained from external sources, regardless of the PRISM app.**

Users can create and save video files using the PRISM app’s live streaming, video recording, and video editing functions.

However, there are cases where videos created within the PRISM app cannot be loaded back into the app. Additionally, videos downloaded from the internet or created using other apps on the device may also fail to load properly in the PRISM app.

<figure><img src="https://1019928184-files.gitbook.io/~/files/v0/b/gitbook-x-prod.appspot.com/o/spaces%2FlISC5rfB4Hnmbsjf8phq%2Fuploads%2Fzs315QqLiOEWRJ15xblK%2Fmedia_load_fail.png?alt=media&amp;token=e0c9a3be-0cbb-450b-938f-967cc0948261" alt=""><figcaption></figcaption></figure>

***

## 2. Causes of Errors

This loading issue can occur due to various reasons, including:

* **Files created in an incorrect format that does not comply with encoding standards (this accounts for the majority of errors, as videos are created in many different ways).**
* **Videos that are valid but cannot be processed by the device’s decoder.**
* **Insufficient memory on the smartphone.**
* **Failure to generate video thumbnails.**
* **Files that do not actually exist on the smartphone.**
* **Files with missing or corrupted data.**
* **Unknown causes.**

Although we’ve listed seven possible causes, there are many more that we may not have identified. Each issue can be further categorized into different sub-causes, making it challenging to pinpoint and resolve every problem.

Furthermore, replicating the exact conditions that lead to an error is often difficult, as many issues arise from specific interactions between a video file and the smartphone’s decoder.

Over time, we have analyzed and addressed various media loading failures. However, there are still errors we have not yet been able to fix. We sincerely apologize for any inconvenience and will continue working to resolve these issues.

***

## 3. How to Resolve Errors

If you experience this issue, you can try the following solutions:

**(1) Restart your smartphone**

Your device’s decoder may be in use by another app or experiencing an unknown error. Completely power off your smartphone, turn it back on, launch the PRISM app, and then try recording or reloading the video file again.

**(2) Re-encode the video**

As mentioned earlier, many files are created in formats that do not comply with encoding standards. However, re-encoding the file may allow it to load properly in the PRISM app.

Try opening the video using the default gallery app on your smartphone, making minor edits, and saving it again. Minor changes could include trimming the playback time or adjusting the color tone. During this process, the video is re-encoded and saved as a new file.

If the video does not load even in your smartphone’s default gallery app, this likely indicates a major issue with the file itself.


# Video Encoding Failed

{% hint style="danger" %}
Failed to encode video for live streaming. This may be a temporary problem with the device encoder, so please reboot the device and try again.
{% endhint %}

We are informing you about situations where live streaming fails to start due to video encoding failure.

***

To stream video to a live platform, the video recorded on a smartphone must be encoded into a specific video format. The encoded video data is then streamed to the live platform, which receives and plays it in a video player that viewers can watch.

However, the PRISM app was unable to generate the video data properly on your device. In such cases, the PRISM app displays the following error screen to the streamer.

<figure><img src="https://1019928184-files.gitbook.io/~/files/v0/b/gitbook-x-prod.appspot.com/o/spaces%2FlISC5rfB4Hnmbsjf8phq%2Fuploads%2FSGPIttDxV7aEhXAi2uzK%2F6005_01_n.jpg?alt=media&amp;token=37d92dfc-2786-404c-a3cb-52fc8e6fbed8" alt=""><figcaption><p>Android error code: 6005</p></figcaption></figure>

\
This issue is mainly caused by one of the following two reasons:

1. **The device cannot encode the video in the format requested by the PRISM app.**
2. **Video encoding is temporarily unavailable due to the device’s internal state.**

Here are more detailed explanations for each cause.

***

## 1. **The device cannot encode the video in the format requested by the PRISM app.**

The PRISM app encodes video using the encoder built into the smartphone. To do this, the app sends the video data along with specific settings to the device’s encoder. However, in some cases, the device’s encoder may not be able to process this properly.

Most devices running the PRISM app do not encounter this issue. However, since there are tens of thousands of Android devices worldwide, there can be differences in how each device’s encoder operates compared to the Android standard. As a result, encoding may fail.

Unfortunately, due to the vast number of manufacturers producing Android devices, identifying and troubleshooting this issue across all devices is difficult. Because of this, we regret to inform you that we are unable to provide a quick fix.

In such cases, we recommend using a different device where the PRISM app functions properly.

***

## 2. **Video encoding is temporarily unavailable due to the device’s internal state.**

However, video encoding errors can sometimes occur temporarily depending on the device’s state. The device’s built-in encoder is not exclusively used by the PRISM app. Other apps installed on the device may also be using the encoder while the PRISM app is running, which can lead to this error.

In such cases, improving the device’s condition may resolve the issue. If you encounter this error, please follow these steps:

1. Restart your smartphone.
2. Open the PRISM app and try live streaming again.
3. If the issue persists, try lowering the resolution: *(1080p > 720p > 480p > 360p)*

However, if the problem continues even at the lowest resolution, it is unlikely to be a temporary issue.

At that point, the issue is most likely due to the first reason mentioned above. In this case, we recommend using a different device where the PRISM app works properly.

***

* Android error code: 6005


# RTMP Connection Failed

{% hint style="danger" %}
The RTMP connection for streaming has failed or the live platform is not receiving RTMP data. Please make sure your RTMP address is valid or you have streaming permission
{% endhint %}

We will inform you about situations where the RTMP connection for streaming fails or the live platform does not receive RTMP data.

***

The PRISM app captures video from the smartphone camera, encodes it into video data, and streams it to the live platform using the RTMP protocol.

The process of transmitting video to the live platform via the RTMP protocol begins with a connection between the PRISM app's RTMP streaming engine and the live platform's RTMP data receiving server.

This error occurs when the PRISM app's RTMP streaming engine fails to establish a connection with the RTMP data receiving server.

<figure><img src="https://1019928184-files.gitbook.io/~/files/v0/b/gitbook-x-prod.appspot.com/o/spaces%2FlISC5rfB4Hnmbsjf8phq%2Fuploads%2F8IQfZUain2UsEp7RbzZP%2F5003_01_n.jpg?alt=media&amp;token=bbbdfbc6-ab63-4d79-a81e-1a95d6edb5b7" alt=""><figcaption><p>Android error code: 5003</p></figcaption></figure>

\
This error can arise due to several factors, including:

1. **An issue with the RTMP address (most common)**
2. **A problem between the PRISM app’s streaming engine and the live platform**
3. **Restrictions on the streamer’s live streaming rights on the platform**
4. **Network environment or connection issues**

***

## 1.  An issue with the RTMP address (most common)

This issue can be further divided into two cases:

**(1) Invalid RTMP address format**

An RTMP address consists of an RTMP Stream URL and an RTMP Stream Key.

For example, if the RTMP Stream URL is `rtmps://prismlive.com/rtmp/` and the RTMP Stream Key is `2twt-wwvu-gxqa-e97d`, the RTMP address is formed as follows:\
`rtmps://prismlive.com/rtmp/2twt-wwvu-gxqa-e97d`

In general, RTMP addresses cannot contain spaces or include web protocol references such as `https://`.

If this error persists, please verify that the RTMP address is in the correct format.

**(2) Valid RTMP address format, but the address does not exist**

Even if the RTMP address is correctly formatted, the connection may fail if the address does not correspond to an actual RTMP server.

For example, consider the following YouTube RTMP address:\
`rtmp://a.rtmp.youtube.com/live2/prismlivestudio`

While the format is correct, the actual YouTube RTMP Stream Key consists of a random character sequence, like this:\
`rtmp://a.rtmp.youtube.com/live2/2twt-wwvu-gxqa-e97d`

If this error persists, please check whether the RTMP address you are using is valid.

***

## 2. Issue between the PRISM app's streaming engine and the live platform

In some cases, even when a valid RTMP address is used, the PRISM app’s RTMP streaming engine may fail to connect to the live platform's RTMP data receiving server.

The PRISM app’s RTMP streaming engine has successfully connected to major live platforms such as Facebook, YouTube, and Twitch. However, since anyone can set up their own RTMP data receiving server, some platforms may not fully comply with RTMP standards.

If the issue lies with the live platform rather than the PRISM app, resolving it may require changes on the platform's side. As a result, troubleshooting can be difficult and time-consuming.

***

## 3. Restrictions on the streamer’s live streaming rights on the platform

Most live platforms manage streamer permissions for live streaming. Depending on their policies, they may impose restrictions when necessary.

If your streaming rights are restricted, your live broadcast may not appear on the live platform, even if you attempt to stream using a valid RTMP address.

Since this issue is handled internally by the live platform, you should contact the platform’s customer support to resolve it.

***

## 4. Network environment or connection issues

The connection between the PRISM app’s RTMP streaming engine and the live platform’s RTMP data receiving server depends on network conditions. If the network environment is unstable or insufficient, the RTMP connection may fail.

If this error persists, check your network status and ensure a stable connection for live streaming.

On the other hand, if the issue is with the network environment on the RTMP server’s side, the connection will still fail. Unfortunately, this is beyond the PRISM app’s control.

***

## 5. Outages on Streaming Platforms

Facebook, YouTube, Twitch, and Kick are major platforms where a large number of live streams are created. Nevertheless, outages can occasionally occur even on these platforms. In some cases, the issue may be limited to specific components related to live streaming, such as RTMP servers or API servers.

Depending on the scale of the outage, it may or may not be officially disclosed to the public, and the duration of each incident can vary.

Unfortunately, when such platform-side issues occur, there is nothing the PRISM app can do to address them directly. Therefore, if streaming through the PRISM app is not functioning properly, it is recommended to check the status of the streaming platform as well.

***

These are the five main causes of this error and possible solutions.

***

* Android error code: 5003


# RTMP Packet Transmission Failed

{% hint style="danger" %}
Failed to transmit RTMP packets for video streaming.
{% endhint %}

This guide explains the cause of the current error that occurred during your live streaming.

***

The PRISM mobile app includes a streaming module that handles RTMP transmission. This module streams your video data to live platforms such as Facebook, YouTube, Twitch, and Instagram.

To do this, the RTMP streaming module in the PRISM mobile app establishes a connection with the RTMP receiving module of the live platform and begins transmitting data. The current error means that while the connection was successfully established, the transmission of data packets has failed.

<figure><img src="https://1019928184-files.gitbook.io/~/files/v0/b/gitbook-x-prod.appspot.com/o/spaces%2FlISC5rfB4Hnmbsjf8phq%2Fuploads%2FWoJIoOC52iQMkWNOFDcl%2Fa_5004_01.jpg?alt=media&amp;token=1ff52272-7af2-4e27-b103-31f2f7247c64" alt=""><figcaption></figcaption></figure>

Known causes that can lead to this situation are as follows. Please review each cause and take any applicable actions. We hope this helps you.​

## 1. Expiration of Facebook Stream Key

The Stream Key obtained from Facebook’s Live Dashboard for Custom RTMP streaming expires once the stream has been published. Even if the stream hasn’t been published, the key will also expire if the streaming session from your app has been running and the preview remains visible on Facebook’s Live Dashboard for more than four hours.

<figure><img src="https://1019928184-files.gitbook.io/~/files/v0/b/gitbook-x-prod.appspot.com/o/spaces%2FlISC5rfB4Hnmbsjf8phq%2Fuploads%2FdwxHDVDEzs3lvQ7javYz%2Fimage.png?alt=media&amp;token=38fc4c94-2826-453d-90bb-924dbfac1056" alt="Facebook Live Dashboard"><figcaption></figcaption></figure>

If you attempt to start a live stream using an expired Facebook Stream Key, the same error will occur. To prevent this, you can obtain a newly generated Stream Key from Facebook’s Live Dashboard. Alternatively, you can enable the \[Persistent Stream Key] option there to use a single Stream Key continuously.

## 2. Data packet reception is blocked on the live platform for your account's RTMP address

Live platforms may impose usage restrictions on their users. For example, if a user starts live streams too frequently on YouTube, the platform may temporarily block the ability to start new streams. This also means that RTMP data transmission can be blocked. If you’ve encountered this error, please check whether there are any restrictions in place on your target live platform.​

## 3. There is an issue with your network bandwidth

A connection between the app and the live platform for RTMP streaming can be established using only a small amount of data. However, video data itself is usually quite large. So, even if the RTMP connection is successful, the actual video data packets may not be transmitted properly. Please check if there are any issues with your network bandwidth.

## 4. There is an issue with your network environment

RTMP streaming uses the TCP protocol to transmit data, typically over a specific port—most commonly port 1935, though this may vary. If you are in a location where a network firewall is blocking that port, data packet transmission will fail, leading to the current error. Please check your network environment for any such restrictions.

## 5. There is an issue with your device

The data packets sent via RTMP streaming are created using the encoder on your smartphone. If there is an issue with the encoder or your device is in an unstable state, it may not be able to produce proper data packets. If you suspect this is the case, please try rebooting your device and starting the live stream again. If you have another device available, try streaming from that one instead.


# Server Connection Failed

{% hint style="danger" %}
Failed to communicate with the PRISM server to start live streaming. This may be a temporary problem in network conditions, so please try again later.
{% endhint %}

We would like to inform you about an issue where live streaming could not start due to a communication failure with the PRISM server.

***

To begin a live stream, the PRISM app must connect to the PRISM server. This connection is essential because once streaming starts, the PRISM server collects live broadcast data, such as viewer count, likes, and chat messages, from the target streaming platform.

However, we have confirmed that in some cases, the PRISM app may fail to connect to the PRISM server due to network restrictions on certain users' networks. When this happens, the app displays the following error message to the streamer.

<figure><img src="https://1019928184-files.gitbook.io/~/files/v0/b/gitbook-x-prod.appspot.com/o/spaces%2FlISC5rfB4Hnmbsjf8phq%2Fuploads%2FooaQ5LV83kbTnkMbJnsI%2F1006_01n.jpg?alt=media&amp;token=aab41edf-dffc-4a7e-9277-9ba2fe687be7" alt=""><figcaption><p>Android error code: 1006</p></figcaption></figure>

The PRISM server’s domain, which the app communicates with, is ‘naver.com’. Since the PRISM app is used on countless smartphones worldwide, it attempts to connect to the PRISM server through this domain.

However, the network path between the app and the server passes through various network devices in different countries. Some of these devices may not properly recognize the ‘naver.com’ domain due to incorrect settings.

Unfortunately, resolving this issue is challenging because numerous companies manage these network devices globally.

***

That said, we have also observed that this issue can sometimes be temporary. The PRISM app may attempt a different network route when retrying the connection, potentially resolving the problem on its own.

Currently, this error occurs only in a limited number of cases. If you encounter this issue, please completely close the PRISM app and try again after a few minutes or hours.


# Streaming Is Not Working

{% hint style="danger" %}
Live streaming is not working due to insufficient network bandwidth for streaming or incorrect RTMP address.
{% endhint %}

We are providing information about situations where streaming cannot proceed due to insufficient network bandwidth or an incorrect RTMP address.

***

This error occurs when the connection between the PRISM app’s RTMP streaming engine and the live platform’s RTMP receiving server is lost for more than 10 minutes.

<figure><img src="https://1019928184-files.gitbook.io/~/files/v0/b/gitbook-x-prod.appspot.com/o/spaces%2FlISC5rfB4Hnmbsjf8phq%2Fuploads%2F20AsDIKmUPb6Jwoduin8%2F5007_01_n.jpg?alt=media&amp;token=6949b857-d0d8-4734-85df-b8326b699dd9" alt=""><figcaption><p>Android error code: 5007, iOS error code: -1001 / -1</p></figcaption></figure>

\
This issue can be categorized into two cases:

1. **The connection was lost during live streaming and could not be restored for more than 10 minutes.**
2. **The connection could not be established for more than 10 minutes from the start of the live stream (i.e., the connection was never established).**

Let’s go through the details.

***

## 1. **The connection was lost during live streaming and could not be restored for more than 10 minutes.**

This issue is usually caused by network instability. Live streaming requires a stable and high-bandwidth network to handle the continuous transmission of large amounts of video data in real time.

Even if you are using a network with sufficient bandwidth, external factors may temporarily reduce the available bandwidth. For example, if someone else on the same network is transferring large files, it could affect your stream. To prevent issues, it’s important to check your network conditions before starting a live stream.

If you are unable to improve your network conditions immediately, you can try adjusting your live streaming settings as a temporary solution. Higher resolutions require more bandwidth due to the larger data size. If your network is unstable, lowering the resolution can help maintain a more stable stream.

Additionally, enabling the "Adaptive" option in the PRISM app’s streaming settings can help. This feature automatically adjusts the video data transmission rate based on current network conditions.

<figure><img src="https://1019928184-files.gitbook.io/~/files/v0/b/gitbook-x-prod.appspot.com/o/spaces%2FlISC5rfB4Hnmbsjf8phq%2Fuploads%2FZ1PHBTC1mmjBkrfqf1fN%2F5007_02_n.jpg?alt=media&amp;token=ecf20182-5d63-4312-a4f4-ea5f47c4f7e0" alt=""><figcaption></figcaption></figure>

By default, the PRISM app has the "Adaptive" option enabled when installed. If you have changed this setting, we recommend switching it back to "Adaptive" to optimize your streaming performance.

***

## 2. The connection could not be established for more than 10 minutes from the start of the live stream (i.e., the connection was never established).

If the connection was never established, the issue may also be related to network conditions. Please refer to the previous section for troubleshooting network problems.

In addition, this issue may be caused by one of the following reasons:

1. **The RTMP address format is invalid.**
2. **The RTMP address format is valid, but the address does not actually exist.**
3. **A connection issue between the PRISM app’s streaming engine and the live platform.**
4. **Restrictions on the streamer’s live streaming rights on the platform.**

Let’s go over each case in more detail.

**(1) The RTMP address format is invalid.**

An RTMP address consists of an RTMP Stream URL and an RTMP Stream Key.

For example, if the RTMP Stream URL is:\
`rtmps://prismlive.com/rtmp/`

And the RTMP Stream Key is:\
`2twt-wwvu-gxqa-e97d`

Then, the RTMP address should be formatted as follows:\
`rtmps://prismlive.com/rtmp/2twt-wwvu-gxqa-e97d`

In general, RTMP addresses cannot contain spaces or include web protocols such as `https://`.

If this error persists, please check that the RTMP address is correctly formatted.

**(2) The RTMP address format is valid, but the address does not actually exist.**

Even if the RTMP address is correctly formatted, the connection may fail if the address does not correspond to an actual RTMP server.

For example, consider the following YouTube RTMP address:\
`rtmp://a.rtmp.youtube.com/live2/prismlivestudio`

While the format is correct, YouTube RTMP Stream Keys typically consist of random characters, such as:\
`rtmp://a.rtmp.youtube.com/live2/2twt-wwvu-gxqa-e97d`

If this error persists, please check whether the RTMP address you are using is correct.

**(3) A connection issue between the PRISM app’s streaming engine and the live platform.**

In some cases, even when a valid RTMP address is used, the PRISM app’s RTMP streaming engine may fail to connect to the live platform's RTMP receiving server.

The PRISM app’s RTMP streaming engine has successfully connected to major live platforms such as Facebook, YouTube, and Twitch. However, since anyone can set up their own RTMP receiving server, some platforms may not fully comply with RTMP standards.

If the issue is due to the live platform itself rather than the PRISM app, resolving it may require changes on the platform’s side. As a result, troubleshooting may be difficult and time-consuming.

**(4) Restrictions on the streamer’s live streaming rights on the platform.**

Most live platforms manage streamer permissions for live streaming. Depending on their policies, they may impose restrictions when necessary.

If your streaming rights are restricted, your live broadcast may not appear on the live platform, even if you attempt to stream using a valid RTMP address. Since this issue is controlled by the live platform, you will need to contact their customer support to resolve it.

***

* Android error code : 5007
* iOS error code : -1001 / -1


# Stream May Be Terminated on the Live Platform

{% hint style="danger" %}
Live streaming may have been terminated on the live platform due to issues such as instability of transmission, violation of platform policy, or exceeding the maximum streaming timeout. Information on chats, likes, and viewers will not provided from this point on.
{% endhint %}

We will inform you about a situation where the live broadcast you are streaming is terminated on the target live platform and the changes in the PRISM app after that.

***

Live broadcasts streamed through various streaming apps, including the PRISM app, may be terminated by live platforms for various reasons.

The PRISM app checks in real-time whether your live stream is still on air on the live platform while your stream continues.

When an exceptional condition is confirmed, such as your live stream being stopped, the following information will be displayed on the app screen to help you understand the situation and resolve it.

<figure><img src="https://1019928184-files.gitbook.io/~/files/v0/b/gitbook-x-prod.appspot.com/o/spaces%2FlISC5rfB4Hnmbsjf8phq%2Fuploads%2FBsGZXWytkNHGdGtzI1Br%2F4912_01_n.jpg?alt=media&amp;token=28e03015-0e6e-4ebf-81a6-ae16442ce9a5" alt=""><figcaption></figcaption></figure>

This guidance aims to prevent a situation where the streamer doesn’t realize that the live broadcast has ended on the live platform and continues streaming.

**One thing to note is that once such a dialog is displayed, the PRISM app considers the live stream to be stopped and will not update live broadcast information, such as viewer chat, viewer count, and like count.**

In this case, it is better to check the live broadcast status on the platform using a separate device. If you see any issues, please restart your live stream.

The main reasons for the termination of live broadcasting on individual platforms, rather than the user’s explicit termination of the stream, are as follows:

***

## 1. In case the streaming process on the device was not normal

\
This case can be further divided into two situations:

**(1) A case where the network bandwidth currently used by the smartphone device is insufficient.**&#x20;

Smartphones use wireless networks such as WiFi or mobile data, which may not always be reliable. Due to persistently low or temporarily insufficient bandwidth, it may not be possible to stream live video from the device to the target platform.

Live platforms also have policies that automatically terminate the live stream if they don’t receive a live video fragment from the device for a certain period.

Each platform has different criteria for how long they wait for the video to be received, and this can change at any time. Therefore, it is difficult for us to provide specific guidance on this.

If the network bandwidth you are using is insufficient, it will be difficult to maintain a stable live stream. Please refer to the following guide to ensure a more stable and sufficient network:

[<mark style="color:blue;">**\[10 Tips for Better Stability and Quality\]**</mark>](/mobile/guides/error-solution/performance/10-tips-for-better-stability-and-quality)

**(2) A case where the smartphone device cannot produce streaming video normally due to heat or other issues.**

Live streaming is a relatively heavy task for smartphones, as they have to handle several processes simultaneously, such as receiving video from the camera, encoding the video, and sending data to the live platform.

During extended live streaming, various parts of the smartphone (like the camera, screen, CPU, and modem) can get hot, leading to deterioration in video quality and device functionality.

In severe cases, the device may not be able to produce the required amount of video in time. As a result, the live platform may not receive the video correctly, and the broadcast could be terminated, similar to the issue caused by network problems.

If your live stream is terminated by the platform for no apparent reason, and your device is overheating at the time, please refer to the following guide to cool down your smartphone and ensure optimal streaming conditions:

[<mark style="color:blue;">**\[Improving Smartphone Overheating for Better Streaming\]**</mark>](/mobile/guides/error-solution/performance/improving-smartphone-overheating-for-better-streaming)

***

## 2. In case the live broadcast is terminated due to the community policy of the live platform.

Platforms like YouTube, Facebook, and Twitch have their own community safety policies. The platform monitors live streams to ensure community safety. Monitoring can be done by operators or automated AI technologies, so errors may occur in their processing.

Violent or sexual content may be reported by viewers, leading to the termination of the live stream. Live streams that persist in showing still or objectively meaningless images may also be restricted.

If your live stream is terminated, please check whether you are violating the community policy of the target platform. If the live stream is stopped despite no violation, you can contact the platform’s customer service for further assistance.

***

## 3. In case the live broadcast is terminated due to the maximum streaming time limit of the live platform.

Each live platform, such as YouTube, Facebook, and Twitch, has its own maximum live streaming time limit.

\
PRISM app streams may also be terminated when the platform’s time limit is reached. Here are some examples of these time limits:

* Streaming to Facebook is up to 8 hours.  \
  [Facebook Help](https://www.facebook.com/help/409713772701330)
* There is no maximum time limit for streaming to YouTube. However, they only support auto-archiving for live streams under 12 hours. YouTube also warns that videos may not be archived if the stream exceeds 12 hours.  \
  [YouTube Support](https://support.google.com/youtube/answer/6247592)
* Streaming to Twitch is up to 24 hours.  \
  [Twitch Help](https://help.twitch.tv/s/article/broadcast-guidelines)
* Streaming to Band is up to 2 hours.  \
  [Band Help](https://band.us/band/62396709/post/91) <br>

These platforms have different time limit policies, which may be adjusted at any time.

If your live stream ended and it was quite long, please check whether the termination was due to the streaming time limit of the live platform.

***

* Android error code: 4912
* iOS error code : 0 / 15


# Stream Has Ended

{% hint style="danger" %}
Stream has ended by the destination platform due to streaming instability or policy violations, or exceeding the time limit.
{% endhint %}

We will inform you about situations where the live broadcast you are streaming is terminated by the target live platform and the streaming in the PRISM app is also stopped.

***

Live broadcasts that are actually being streamed can be terminated by the live platform for various reasons. Therefore, the PRISM app checks in real time whether the current live broadcast is being maintained normally on the target live platform while the streamer’s live streaming is in progress.

When it is clearly confirmed that the current live stream is no longer in the OnAir state, such as when the streamer’s live broadcast is terminated, the following information is displayed on the app screen, and streaming in the PRISM app is also automatically stopped.

<figure><img src="https://1019928184-files.gitbook.io/~/files/v0/b/gitbook-x-prod.appspot.com/o/spaces%2FlISC5rfB4Hnmbsjf8phq%2Fuploads%2FGYd6YmiNMKr8LilZqGvR%2Fstopped_by_platform_n.jpg?alt=media&amp;token=5b4667f1-da64-48cd-9629-a119ba9febb0" alt=""><figcaption></figcaption></figure>

This process is to prevent a situation where the streamer continues to live stream unknowingly, even though the live broadcast has obviously ended on the live platform.

The main reasons why streamers’ live broadcasts are forcibly terminated on individual live platforms are as follows:

1. **In case the streaming processing on the device was not normal**
2. **In case the live broadcast is terminated according to the community policy of the live platform**
3. **In case the live broadcast is terminated according to the maximum streaming time limit of the live platform**

***

## 1. **In case the streaming processing on the device was not normal**

This case can be further divided into two situations.

#### (1) **A case where the network bandwidth currently used by the smartphone device is insufficient**

Smartphones use wireless networks such as WiFi or mobile data networks, which may not be reliable by their nature.

Due to persistently low or temporarily low bandwidth, it may not be possible to stream live video created by the device to the target live platform.

Live platforms also have a policy to forcibly terminate the live broadcast if they do not receive a live video fragment from the device for a certain period of time.

Live platforms have different criteria for the maximum time they will wait to receive video again, and this criterion can change at any time. Please understand that it is difficult for us to provide specific guidance on this matter.

It is difficult to maintain stable live broadcasting if the network bandwidth you are using is insufficient. Please refer to the following guide to secure a more stable and sufficient network:

[<mark style="color:blue;">**\[10 Tips for Better Stability and Quality\]**</mark>](/mobile/guides/error-solution/performance/10-tips-for-better-stability-and-quality)

#### (2) **A case where the smartphone device cannot produce streaming video normally due to heat, etc.**

In fact, live streaming is a rather heavy task for a smartphone, as it has to handle multiple tasks simultaneously, such as receiving video from the camera, encoding the video, and sending data to a live platform.

When live streaming lasts a long time, various parts of the smartphone device become hot. Heat builds up in areas such as the camera, screen, CPU, and modem, which can eventually lead to a deterioration in video quality and device functionality.

In severe cases, the device may not be able to produce the amount of video it should within the set timeframe. In this case, the live platform may not receive the video normally, and the live broadcast may be terminated, just as in the case of network issues we introduced earlier.

If the live broadcast is terminated by the platform for no particular reason and your device is very hot at that time, please refer to the following guide to ensure your device is in optimal condition for streaming:

[<mark style="color:blue;">**\[Improving Smartphone Overheating for Better Streaming\]**</mark>](/mobile/guides/error-solution/performance/improving-smartphone-overheating-for-better-streaming)

***

## 2. **In case the live broadcast is terminated according to the community policy of the live platform**

Individual live platforms such as YouTube, Facebook, and Twitch have their own policies for community safety. The platform will monitor users’ live streams to maintain community standards. Monitors for live streaming are sometimes handled by operators or automated AI technologies. Therefore, errors may occur in their processing.

Violent or sexual content may be reported by viewers, leading to the termination of the live broadcast. Live broadcasts that persist with still or objectively meaningless images may also be subject to restrictions.

If your live streaming is terminated, please check whether you are violating the community policy of the target live platform. Additionally, if live broadcasting is stopped from the platform even though there is no violation, you can contact the platform’s customer support and take action.

***

## 3. **In case the live broadcast is terminated according to the maximum streaming time limit of the live platform**

Individual live platforms such as YouTube, Facebook, and Twitch have their own maximum time limits for live streaming.

Additionally, live broadcasts streamed from the PRISM app may be forcibly terminated due to their time limit. Examples of time limits are:

* Streaming to Facebook: up to 8 hours.\
  [Facebook Help](https://www.facebook.com/help/409713772701330)
* There is no maximum time limit for streaming to YouTube. However, auto-archiving is only supported for live streaming videos under 12 hours. YouTube also warns that videos may not be archived at all if the streaming duration exceeds 12 hours.\
  [YouTube Support](https://support.google.com/youtube/answer/6247592)
* Streaming to Twitch: up to 24 hours.\
  [Twitch Help](https://help.twitch.tv/s/article/broadcast-guidelines)
* Streaming to Band: up to 2 hours.\
  [Band Help](https://band.us/band/62396709/post/91)

These various live platforms have different time limit policies, which can also be adjusted at any time.

So, if your live streaming has ended and the length was rather long, please check whether the termination was due to the maximum streaming time limit of the live platform.

***

* Android error code : 4913
* iOS error code : 0 / 15


# Check Channel Integration or Title Settings

{% hint style="danger" %}
Live Broadcast to PRISM Live has stopped due to: The broadcast channel has not been set. Please connect a platform on the PRISM Live app.
{% endhint %}

{% hint style="danger" %}
Live Broadcast to PRISM Live has stopped due to: Please enter the title.
{% endhint %}

We will inform you about situations where live streaming using the ScreenCast function in the PRISM app does not start properly.

***

The PRISM app provides the ScreenCast function, allowing you to live stream your smartphone’s screen or gameplay. The PRISM iOS app utilizes the screen recording feature supported by the iOS platform to enable the ScreenCast function.

However, since screen recording on iOS operates independently of the PRISM app, you must complete the live streaming settings in the PRISM app before starting screen recording.

Due to this, the current error message appears in the following two cases:

1. **When the live streaming platform's channel is not integrated or set up in the PRISM app.**
2. **When the target platform requires a title, but no title is set in the PRISM app.**

<figure><img src="https://1019928184-files.gitbook.io/~/files/v0/b/gitbook-x-prod.appspot.com/o/spaces%2FlISC5rfB4Hnmbsjf8phq%2Fuploads%2ForlMw5pLUnc4TkKaJgEy%2Fios_screencast_fail_n.png?alt=media&amp;token=d8c1b131-e80a-4ab1-a42d-88add54a6ae7" alt=""><figcaption></figcaption></figure>

We’ll walk you through each situation.

***

## 1. **When the live streaming platform's channel is not integrated or set up in the PRISM app.**

To start live streaming on a platform, you must integrate the platform’s channel in the PRISM app by logging in and setting the integrated channel as the streaming destination.

For live streaming using the Custom RTMP setting, logging in for channel integration is not required, but you must select the pre-configured streaming item as the destination.

Clicking the **Go Live** button in the PRISM iOS app initiates ScreenCast, leading to the iOS platform's screen recording start screen. Before tapping the yellow **Go Live** button, ensure the channel information is properly set in the app.

***

## 2. When the target platform requires a title, but no title is set in the PRISM app.

Among popular live streaming platforms, Facebook does not require a title, but platforms like YouTube and Twitch do. Therefore, if you want to live stream to a platform that requires a title using the ScreenCast function, please set the title in the PRISM app beforehand.

Titles set in the PRISM app and used at least once for live streaming are automatically saved in the app and remain even after restarting. This ensures that your next live stream will use the saved title automatically.

***

* iOS error code : 0 to 7 / 17


# Error Information


# Getting Details of Live Streaming Errors

Android, iOS

Mobile live streaming often takes place where the network is not stable, live streaming may ends unexpectedly. ​Moreover, due to changes and circumstances in the live platforms that interact with the PRISM app, live streaming may not start or end unintentionally. The PRISM app displays detailed errors to users in situations like this.

Users can see more clearly the errors that occur in live streaming through the improved live streaming error display in our app, and can use the information provided to solve the problem themselves or contact us with more information.

<figure><img src="https://miro.medium.com/v2/resize:fit:1400/1*RIsDDus-MzpCxGwKeKkTxg.jpeg" alt=""><figcaption></figcaption></figure>

For more information about handling errors, please refer to the page below:

[Solutions for Various YouTube Error Situations](/mobile/guides/error-solution/youtube/solutions-for-various-youtube-error-situations)

[Mobile](/mobile/overview), [Guides](/mobile/guides), [Error Solution](/mobile/guides/error-solution), [Error Information](/mobile/guides/error-solution/error-information)


# End-of-live Broadcast Status Notifications

Android, iOS

​During live streaming on the PRISM app, your live broadcast may be terminated on the target live platform.

The reasons are so diverse that it is difficult to list them all, but some representative examples are as follows:

* **A case where your broadcast was stopped on the live platform because streaming was not stable for a certain period of time due to an issue in the network.**
* **A case where your broadcast was stopped on the live platform due to community violation or report.**
* **A case exceeding the maximum streaming time limited by the live platform.**

While streaming from the PRISM app to the live platform, the PRISM app checks in real time whether your live stream is stable or not on the live platform. And when the app discover that the live stream is not on Air, it will inform you via a dialog as shown in the image above.

If you see a notification like this, please check the status of the live stream on a separate device. And If your live stream was actually stopped, click the **OK** button to close the dialog and then use the **End** button at the top right of the app to end the streaming.

<figure><img src="https://miro.medium.com/v2/resize:fit:1400/1*mZBy7nasvZoCw47P2OwQlA.png" alt=""><figcaption><p>You can find out more details through the Get Help button.</p></figcaption></figure>

Please note that we will continue to add features within the PRISM app that will inform streamers of the live broadcast status on the live platform they are streaming on.

[Mobile](/mobile/overview), [Guides](/mobile/guides), [Error Solution](/mobile/guides/error-solution), [Error Information](/mobile/guides/error-solution/error-information)


# Performance


# How to Reduce Overheating on Your Phone

Android, iOS

Live streaming causes the device to heat up, which adversely affects the quality of the live stream.\
So, we prepared some tips to prevent your device from overheating.

***

## How to reduce overheating on your phone for the best quality live stream. <a href="#cc3d" id="cc3d"></a>

{% embed url="<https://www.youtube.com/watch?v=nZCTvYiGorI>" %}

And we also provide this content as an article, so you can refer to the link below.

[**\[Mobile Guide\] 9 ways to improve overheating smartphones that compromise live streaming quality**](https://medium.com/prismlivestudio/mobile-9-ways-to-cool-down-your-smartphones-heat-that-ruins-live-streaming-quality-5fae83a71054)

[Mobile](/mobile/overview),  [Guides](/mobile/guides),  [Error Solution](/mobile/guides/error-solution)


# Improving Smartphone Overheating for Better Streaming

Android, iOS

As the weather gets hotter, the temperature of the smartphone performing live streaming also rises.

And when the temperature of the phone rises like this, the performance of each module in the device, such as the CPU, GPU, and network module, decreases overall, which lowers the quality of your live streaming.

That’s why we’ll guide you through 9 ways to reduce the heat of live streaming, which especially requires the full power of your smartphone, to make your live streaming more stable.

## Removal of the battery charger <a href="#faaa" id="faaa"></a>

Charging the battery is one of the factors that increase the heat of the phone the most, so please fully charge the battery in advance and start live streaming with the charger disconnected.

If you need to live streaming for a long time, starting it with the charger disconnected and then reconnecting the charger when the battery is exhausted is a way to minimize the heat generated by the charger.

## Removal of the smartphone case <a href="#id-4870" id="id-4870"></a>

The smartphone cools itself by dissipating heat through its body, so the phone case blocks the heat dissipation, which eventually increases the heat of the phone.

That’s why we recommend that you take off your phone’s case for +a while during live streaming.

## Adjusting the screen brightness <a href="#id-2593" id="id-2593"></a>

The display of a smartphone is one of the elements that generates significant heat. Adjusting the screen brightness to a slightly lower level during live streaming can effectively reduce the heat generated by the phone. This adjustment can also help slow down battery drainage.

However, if you adjust the brightness of the screen too dark, it may be difficult to observe the live streaming screen, so please check the appropriate level through tests in advance.

## Use of cool patches and cool packs <a href="#id-3519" id="id-3519"></a>

Cool patches and cool packs, which are easily available in the market, can also help lower the heat of your phone.

If you attach it to the back of the phone in an appropriate size, it will help to lower the heat. However, do not forget that it should be removed in a timely manner as it may block the heat dissipation when effectiveness is exhausted.

​Of course, fan-generated wind can also help reduce heat, but it's important to note that the noise from the fan might be picked up during your live stream.

## Sufficient smartphone cooling <a href="#b8b2" id="b8b2"></a>

There are cases in which live streaming is started while the phone is already overheating due to prolonged test streaming. In this situation, as soon as you start streaming live, you may experience degradation of its quality due to heat.

So, if the phone is overheating due to test streaming, please allow the device to cool sufficiently to the normal temperature level before starting your new live streaming.

## Reboot your device <a href="#d2bb" id="d2bb"></a>

​Please reboot your smartphone right before live streaming. It can close the apps running in the background of the device at once, which can help reduce heat and improve the condition of the phone.

This is one of the most recommended methods, and if you’ve ever had issues with live streaming, remember to reboot your device.

## Reduce the use of media overlays <a href="#efb6" id="efb6"></a>

Media overlay that shows images, videos, and webpages together on live streaming video has the effect of enriching live streaming. However, since this requires additional computation to the device, it may generate additional heat.

So, if your phone gets very hot during live streaming, please note that reducing the use of media overlays can help ensure stable quality.

## Reduce the use of effects <a href="#id-6b8c" id="id-6b8c"></a>

The PRISM mobile app provides various types of effects. There are effects that can be done without the device’s calculations, and there are effects that require additional calculations from the device, such as an effect that recognizes a streamer’s face. The latter effects require continuous computation of the device because the user’s face needs to be recognized in real time, which may cause heat.

So, if your phone gets hot during live streaming, reducing the effects you are using one by one will help to lower the heat.

## Use of high-performance smartphones

Live streaming is a very heavy task for a smartphone. This is because it requires three processes to run simultaneously: capturing video from the camera, applying various effects, and streaming the video to the live platform's server. So it requires a lot of computation of the device, which can cause the device to overheat.

In general, it is advantageous to use a high-performance smartphone for heat issues. However, even if it is a high-performance device, there are devices that are sensitive to heat, so it is recommended that you check carefully and prepare the device.

[Mobile](/mobile/overview), [Guides](/mobile/guides), [Error Solution](/mobile/guides/error-solution)


# 10 Tips for Better Stability and Quality

Android, iOS

If you have ever experienced a lack of stability or quality in live streaming using our PRISM mobile app, please refer to the following tips to make better live streaming.

***

## Lower the resolution and frame rate

Smartphones still lack hardware performance, such as CPU and memory, compared to desktops.

To perform live streaming, smartphones must simultaneously handle several tasks: 1) capturing video from the built-in camera, 2) displaying the video on the screen, 3) encoding the video, and 4) streaming the encoded video chunks over the network. Additionally, because smartphones rely on wireless networks, which are often unstable, insufficient network bandwidth can make it impossible to stream the video chunks to the live platform.

If your stream isn’t running smoothly, try lowering the resolution and frame rate gradually. Higher resolutions and frame rates put more strain on smartphones. For instance, under similar conditions, 720p is typically more stable than 1080p, and 30fps is more stable than 60fps.

***

## Turn on the **Adaptive bitrate** option of the PRISM app <a href="#id-4f3e" id="id-4f3e"></a>

This feature is also known as ABP (Adaptive Bitrate Publish). Even when the network bandwidth is insufficient, it maintains the resolution but gradually reduces the video quality to decrease the size of the video. With the reduced video size, the stream is transmitted to the server more reliably, even under poor network conditions, allowing viewers to enjoy your video stably.

You can enable or disable this option by:

1. **Click the button labeled 720p at the channel card.**
2. **Select the 'Video quality' option at the 'Stream Quality' layer.**
3. **Set the 'Adaptive' value to On.**

<figure><img src="https://1019928184-files.gitbook.io/~/files/v0/b/gitbook-x-prod.appspot.com/o/spaces%2FlISC5rfB4Hnmbsjf8phq%2Fuploads%2FT1yRfMS9CSu0WX4NMrtx%2Ftips.png?alt=media&amp;token=9ed62a52-cbbd-4673-8ab9-f92bcaeaaebe" alt=""><figcaption></figcaption></figure>

***

## Stream where the network is stable

When the **Adaptive bitrate** option is set to **Off**, the bandwidth used to generate a 1-second video chunk for each resolution is as follows.

* 1080p : 0.1 \~ 4Mbps or 0.1 \~ 6Mbps
* 720p : 0.1 \~ 2.5Mbps or 0.1 \~ 4Mbps
* 480p : 0.1 \~ 2.0Mbps
* 360p : 0.1 \~ 1.5Mbps

The network bandwidth at the place where you live streaming must exceed this capacity.\
​\
However, if the **Adaptive bitrate** option is set to **On**, there is no problem with streaming video because the app adjusts the size of the video chunks by itself.\
​\
Of course, even if the video streams smoothly with the help of the **Adaptive bitrate** option, if the network is insufficient, viewers can watch the video of poor quality.

***

## Use WiFi whenever possible

The results of measuring network performance using the Speedtest.net app, which can be downloaded from the app market, are as follows:

**WiFi**

* Download : 134.4 Mbps
* Upload : 154.2 Mbps

**Data network such as LTE**

* Download : 89.2 Mbps
* Upload : 17.8 Mbps

​\
As shown, WiFi offers significantly better upload bandwidth compared to data networks. Upload speed is particularly important for live streaming since it involves transmitting video from the smartphone to the server. Keep in mind that the upload speed of data networks is typically only 1/5 to 1/10 of their download speed. For high-quality live streaming, we recommend having at least twice the network bandwidth specified in: [#stream-where-the-network-is-stable](#stream-where-the-network-is-stable "mention")

While indoor live streaming usually doesn't require a network check, it’s highly recommended to check network conditions for outdoor streaming or in crowded areas. This is because data network availability might be insufficient in such environments.

***

## Check QoS policy when using unlimited data plans <a href="#id-9bcf" id="id-9bcf"></a>

In general, the following policies apply to unlimited data plans.\
*“The use of data is unlimited, but if it exceeds 100GByte per day, the maximum speed may be limited for the day only. (For example, maximum 100Mbps).”*\
​\
Since the maximum is 100Mbps, the network is actually limited to a lower speed than that, especially the upload speed will be much lower.

If, despite using the unlimited data plan, the quality of a live broadcast deteriorates after a certain point, we can suspect this as the cause of it.

***

## Close other apps before start live streaming <a href="#id-029e" id="id-029e"></a>

Other apps running in the background can consume your smartphone’s CPU and memory resources, eventually depleting the resources needed for live streaming.

***

## Avoid excessive use of overlays and effects

You can overlay images, videos, and web widgets in our PRISM mobile app, and use various effects such as color filters.

However, these require additional resources from your smartphone, so depending on your smartphone’s performance, the quality of your live broadcasts may be affected.\
​\
This is because the encoding and transmission of video uses the device’s resources such as CPU and memory, which may incur additional burdens.\
​\
However, this doesn’t always happen, so remember this tip only if you’re experiencing problems with the quality of your live streaming.

***

## Long streams can overheat your smartphone

The heat can reduce CPU performance and cause delays in live streaming processing.

Removing your smartphone case for a while during live streaming can help reduce heat generation.​

If you're interested in reducing your smartphone's heat, please refer to the following page:

* [How to Reduce Overheating on Your Phone](/mobile/guides/error-solution/performance/how-to-reduce-overheating-on-your-phone)
* [Improving Smartphone Overheating for Better Streaming](/mobile/guides/error-solution/performance/improving-smartphone-overheating-for-better-streaming)

***

## Use latest high-end smartphone <a href="#id-1e24" id="id-1e24"></a>

This is because, as mentioned above, your smartphone has to do several things at the same time for live streaming.&#x20;

They can also handle live streaming faster and with less heat, even with the same usability.

***

## Mobile streaming tips with video

Ryan Moyer of Wild4Games shares tips for mobile streaming using the PRISM app.

> [*Tips to Dominate Mobile Streaming with PRISM Live Studio*](https://www.youtube.com/watch?v=TV4LPuKRw1M)

{% embed url="<https://youtu.be/TV4LPuKRw1M>" %}

[Mobile](/mobile/overview), [Guides](/mobile/guides), [Error Solution](/mobile/guides/error-solution)


# Facebook


# Facebook Streaming Needs Setup And Permissions

This post provides guidance on resolving issues when live streaming to Facebook fails to start properly.

***

If you integrate your Facebook account with the PRISM app, you can live stream to your Facebook timeline or page. However, if your profile or the page you are streaming to does not meet Facebook’s basic requirements, streaming will not start.

To stream to a timeline or page, it is essential to grant the necessary permissions to the app. Additionally, if you want to stream to a page you didn’t create, you must configure additional settings within that page.

Streaming may also fail if Facebook has restricted your live streaming feature. In this case, the issue cannot be resolved through this post, and you must contact Facebook’s customer service for assistance.

***

This post covers the following five topics:

1. **Facebook streaming requirements**
2. **Facebook account integration**
3. **Streaming to a Timeline**
4. **Streaming to Pages**
5. **Streaming to Groups (Currently not supported)**

***

## 1. **Facebook Streaming Requirements**

The following requirements take effect on June 10, 2024, due to changes in Facebook’s Open API policy:

* Your profile must be at least 60 days old to go live on Facebook. This applies to both timeline and page streaming.
* You must have at least 100 followers to go live from your profile. This requirement applies to profiles using Professional Mode as well as page streaming.
* **Professional Mode:** [Facebook Help](https://www.facebook.com/business/help/2680340558863560)

If your Facebook profile does not meet these requirements, streaming via the PRISM app will not work. Please try again after meeting both requirements.

***

## 2. **Facebook account integration**

This guide explains how to integrate your Facebook account with the PRISM app. Please refer to the explanations accompanying the attached images.

<figure><img src="https://1019928184-files.gitbook.io/~/files/v0/b/gitbook-x-prod.appspot.com/o/spaces%2FlISC5rfB4Hnmbsjf8phq%2Fuploads%2FJFBXNMhSJ9etATkly3We%2F4602_01_n.jpg?alt=media&amp;token=18ba749c-908f-4f44-b386-af5a50ea8a01" alt=""><figcaption></figcaption></figure>

Click the **\[Ready]** button in the **\[LIVE]** tab of the PRISM app. If no channels are currently integrated, you will see a list of available platforms.

<figure><img src="https://1019928184-files.gitbook.io/~/files/v0/b/gitbook-x-prod.appspot.com/o/spaces%2FlISC5rfB4Hnmbsjf8phq%2Fuploads%2FhY88jbxgSN8ncbjoJJBf%2F4602_02_n.jpg?alt=media&amp;token=ce672149-bcd3-4bf5-971e-b7f40343242b" alt=""><figcaption></figcaption></figure>

Click the **\[Facebook]** icon to open the Facebook menu, then click the **\[Connect Facebook]** button (blue background) to log in and connect your Facebook account.

<figure><img src="https://1019928184-files.gitbook.io/~/files/v0/b/gitbook-x-prod.appspot.com/o/spaces%2FlISC5rfB4Hnmbsjf8phq%2Fuploads%2FbuQXioT4lUpm1wYWRsOm%2F4602_03_n.jpg?alt=media&amp;token=97e92457-b10e-493b-9338-14a7e8f1dd40" alt=""><figcaption></figcaption></figure>

This screen requests permission for the PRISM app to stream to Facebook. The necessary permissions are pre-selected by default, so click the **\[Continue as]** button to proceed.

<figure><img src="https://1019928184-files.gitbook.io/~/files/v0/b/gitbook-x-prod.appspot.com/o/spaces%2FlISC5rfB4Hnmbsjf8phq%2Fuploads%2FDgWQ1MUp49dvTOvRcOMR%2F4602_04_n.jpg?alt=media&amp;token=d08d1487-f75b-469f-a0e0-5e6d778a0228" alt=""><figcaption></figcaption></figure>

This screen allows you to set the audience visibility for your live stream. You can adjust privacy settings within the PRISM app after integration, but the settings selected here will take priority. To ensure your selected audience visibility applies correctly, choose **\[Public]** and click the **\[Continue as]** button.

When streaming to timelines or pages, you will only be able to see viewer comments within the PRISM app if both the audience setting on this screen and the privacy setting in the PRISM app are set to **\[Public]**.

<figure><img src="https://1019928184-files.gitbook.io/~/files/v0/b/gitbook-x-prod.appspot.com/o/spaces%2FlISC5rfB4Hnmbsjf8phq%2Fuploads%2FMJDw6BSxDsz8MKA9LSgk%2F4602_05_n.jpg?alt=media&amp;token=310f4fe9-6c6c-4db7-b409-42972d5447c1" alt=""><figcaption></figcaption></figure>

Once these steps are completed, your Facebook account is successfully integrated with the PRISM app. Click the **channel card** (shown in the left-side image) to access Facebook streaming settings, where you can configure streaming options for your page.

To stream to a page, click the **\[Choose where to post]** section (shown in the right-side image).

<figure><img src="https://1019928184-files.gitbook.io/~/files/v0/b/gitbook-x-prod.appspot.com/o/spaces%2FlISC5rfB4Hnmbsjf8phq%2Fuploads%2FudWeYY3xeH3gmRfH89RQ%2F4602_06_n.jpg?alt=media&amp;token=e6c07a32-e432-44e9-85ce-f275a793e888" alt=""><figcaption></figcaption></figure>

Navigate to the **\[Choose where to post]** menu and select **\[Page]**. The app will then request permission to stream to the selected page.

<figure><img src="https://1019928184-files.gitbook.io/~/files/v0/b/gitbook-x-prod.appspot.com/o/spaces%2FlISC5rfB4Hnmbsjf8phq%2Fuploads%2F6OP4GlPVWJHhbQovB8lW%2F4602_07_n.jpg?alt=media&amp;token=9afd1a14-53a1-41f4-a351-1c274609f7d0" alt=""><figcaption></figcaption></figure>

Once all required permissions are granted, a list of available pages will appear, allowing you to choose where to stream.

***

## 3. **Streaming to Timeline**

<figure><img src="https://1019928184-files.gitbook.io/~/files/v0/b/gitbook-x-prod.appspot.com/o/spaces%2FlISC5rfB4Hnmbsjf8phq%2Fuploads%2FdhBrcs5356LNt0HnDaTx%2F4602_08_n.jpg?alt=media&amp;token=6e7339aa-092e-4bc8-a71e-ac3a3067717f" alt=""><figcaption></figcaption></figure>

After selecting **Timeline**, click the **\[Go Live]** button to start streaming live on your Facebook timeline.

***

## 4. **Streaming to Pages**

As of December 16, 2023, Facebook has introduced new restrictions on live streaming to Pages.

<figure><img src="https://1019928184-files.gitbook.io/~/files/v0/b/gitbook-x-prod.appspot.com/o/spaces%2FlISC5rfB4Hnmbsjf8phq%2Fuploads%2FWWESNzG5SF5HshinNx2Q%2F4602_09_n.png?alt=media&amp;token=1308fd29-3c5f-4820-b2d9-04d782005617" alt="" width="563"><figcaption><p>You can verify this change by using the <strong>Live Video</strong> feature on the Facebook website.</p></figcaption></figure>

\
Due to Facebook’s updated policy, the PRISM app is currently unable to process live streaming for newly created Pages or Pages without an established presence. Please note that this is a restriction imposed by Facebook’s policy, and the PRISM app has no control over it.

Facebook does not officially disclose the exact timeframe required for a Page to be eligible for live streaming or the level of engagement needed. However, it is estimated that a Page must be at least **60 days old** and have at least **100 followers** to qualify.

<figure><img src="https://1019928184-files.gitbook.io/~/files/v0/b/gitbook-x-prod.appspot.com/o/spaces%2FlISC5rfB4Hnmbsjf8phq%2Fuploads%2FdMc9Ec96NODDmThIXoFh%2F4602_10_n.jpg?alt=media&amp;token=c7430708-d00e-44d1-836d-10d4ad7cf619" alt=""><figcaption></figcaption></figure>

Once you integrate your Facebook account with the PRISM app, any Pages you have created will appear in the app’s list. Even if you didn’t create the Page yourself, it will still be displayed in the list if you have an **Admin** or **Editor** role.

However, simply following a Page will not make it appear in the list. If you have a **Moderator**, **Advertiser**, or **Analyst** role, the Page may appear in the list of streaming targets, but you **will not** be able to stream due to Facebook’s platform policy.

If you attempt to stream without the necessary permissions, you will receive the following error message:

**“(#200) Subject does not have permission to create live video on this Page.”**

This means that to stream to a Page, you must either create the Page yourself or be assigned an **Admin** or **Editor** role by the Page manager.

<figure><img src="https://1019928184-files.gitbook.io/~/files/v0/b/gitbook-x-prod.appspot.com/o/spaces%2FlISC5rfB4Hnmbsjf8phq%2Fuploads%2FsKJWl75s61CrYOSeBNZC%2F4602_11_n.jpg?alt=media&amp;token=0025efa4-c83f-4e78-9a5b-9a713b10a149" alt=""><figcaption></figcaption></figure>

Page Admins can grant **Admin** and **Editor** roles through the Page settings.

<figure><img src="https://1019928184-files.gitbook.io/~/files/v0/b/gitbook-x-prod.appspot.com/o/spaces%2FlISC5rfB4Hnmbsjf8phq%2Fuploads%2FilNs8k073zMPqZZpT59G%2F4602_12_n.jpg?alt=media&amp;token=4a089d71-9541-4bdf-8c9b-ffc15c5a8f62" alt=""><figcaption></figcaption></figure>

Go to the \[Page Roles] section under the \[Settings] menu.

<figure><img src="https://1019928184-files.gitbook.io/~/files/v0/b/gitbook-x-prod.appspot.com/o/spaces%2FlISC5rfB4Hnmbsjf8phq%2Fuploads%2FbAUpOFychytVztvqXUZJ%2F4602_13_n.jpg?alt=media&amp;token=0496ab1a-9766-4f86-b830-25ae1ada5727" alt=""><figcaption></figcaption></figure>

You can assign a specific Facebook user as an \[Admin] or \[Editor] by using the \[Assign new Page role] option on the right side. Once a user is assigned as an \[Admin] or \[Editor], they will be able to stream live to the Page.

Lastly, please note that live streams to the Page will be shown in the Videos tab of the Page.

***

## 5. Streaming to Groups (Currently not supported)

The PRISM app has supported streaming to groups for a long time, but unfortunately, starting April 24, 2024, streaming to groups from the PRISM app will no longer be supported due to changes in Facebook’s Open API policy.

[**\[Introducing Facebook Graph API v19.0 and Marketing API v19.0\]**](https://developers.facebook.com/blog/post/2024/01/23/introducing-facebook-graph-and-marketing-api-v19/)

> Deprecating Facebook Groups API\
> (January 24, 2024)
>
> ***The Facebook Groups API is deprecated in v19 and in 90 days will be removed from all versions**. This deprecation includes all Permissions (publish\_to\_groups, groups\_access\_member\_info) and Reviewable Features (Groups API) associated with the Facebook Groups API.*

If previous versions of the PRISM app fail to adapt to these changes in external platform APIs, consider re-integrating Facebook within the PRISM app if streaming to timelines and pages, rather than groups, causes issues.

However, this change does not mean that streaming to Facebook groups is completely impossible within the PRISM app. Facebook group streaming through the PRISM app is still possible by following these steps:

1. Access the Facebook website.
2. Navigate to the target group for streaming on the Facebook website.
3. Click \[Create Post].
4. Click on the More button and select \[Live Video].
5. Go to the \[Create live video] menu.
6. Click the \[Go Live] button.
7. Select \[Streaming Software] as the video source.
8. Copy the \[Stream Key] and configure it in the PRISM app’s Custom RTMP settings.
9. The PRISM app provides Facebook’s \[Server URL] as a preset.
10. Save the Custom RTMP settings and choose the streaming destination platform.
11. Click the \[Go Live] button on the live preparation screen to start streaming.
12. Confirm the streaming preview in the Facebook \[Create live video] menu.
13. Click the \[Go live] button at the bottom left to start broadcasting live.

***

* Android error code: 4602
* iOS error code: 200


---

[Next Page](/llms-full.txt/1)