Optimizing Live Streaming Performance
Windows
When live streaming on a low-spec PC, there is a risk of app crashes, stuttering, or frequent screen interruptions. To ensure stable transmission, consider the following tips when using the app on a low-spec PC:
Check if other programs are running while transmitting.
Verify whether your PC meets the required specifications.
Adjust PRISM app settings, including sources, scenes, and encoder configurations.
Checking other programs
Running multiple programs during live broadcasting can significantly impact CPU, GPU, and memory usage, reducing overall system performance.
To optimize performance, close resource-intensive programs using the Task Manager before starting your broadcast.
Checking PC specification
When launching PRISM Live Studio, the app inspects whether your PC meets the required specifications. If you are using a low-spec PC, a notification message will appear in the lower right corner of the screen.
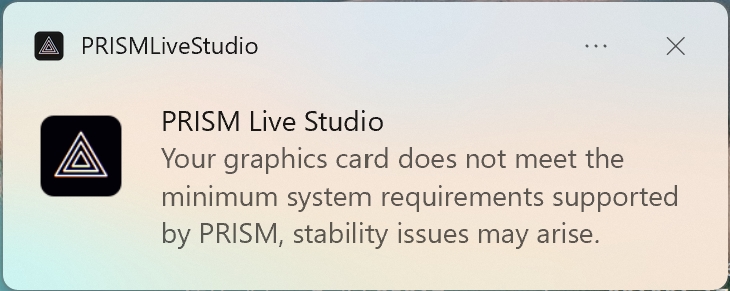
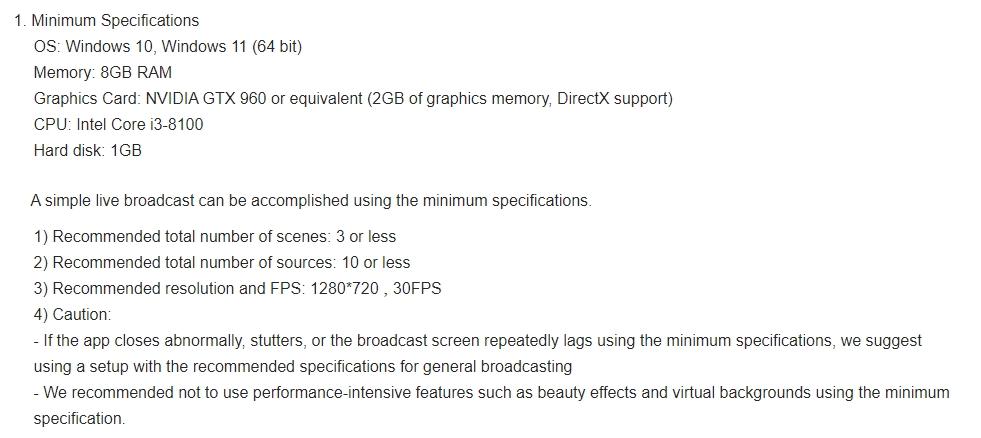
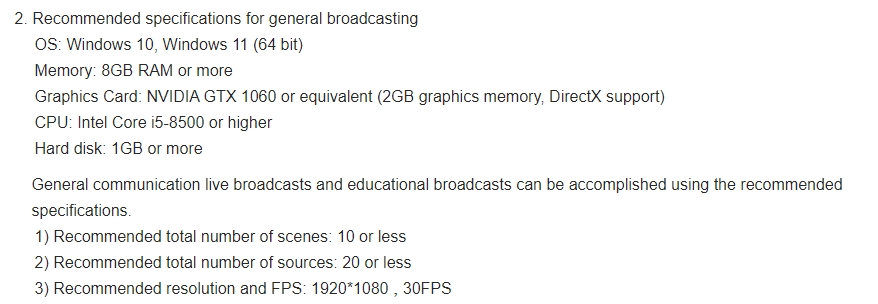
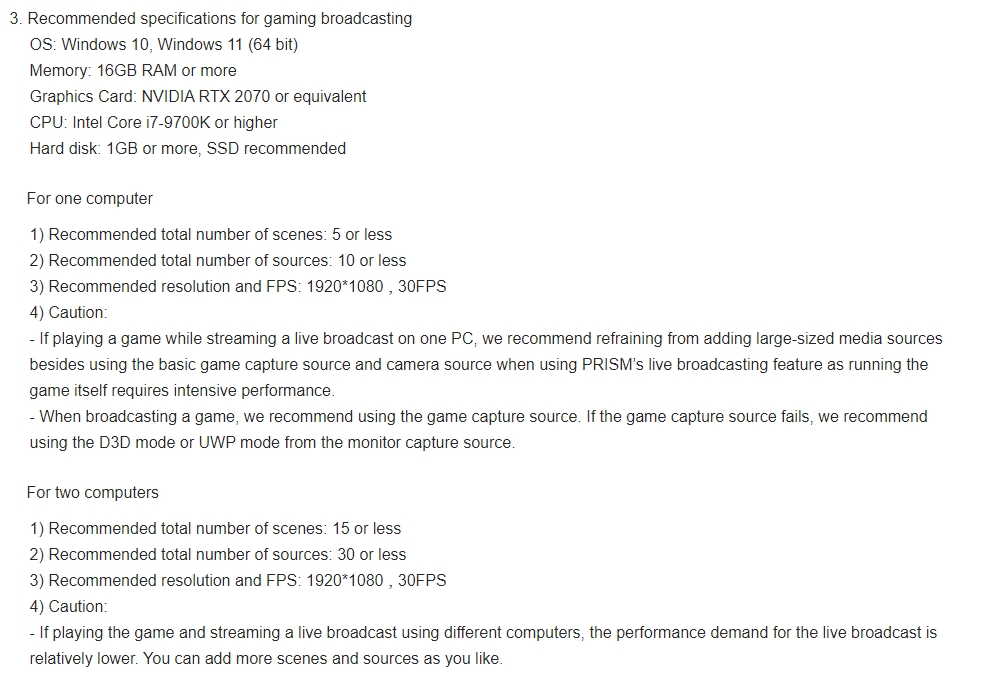
For recommended system requirements for stable transmission, check the image below or visit Help > Install and Start > System requirements.
Checking PRISM app settings
Even if your PC meets the required specifications, transmission issues may still occur depending on the number of sources, scenes, and other settings. If you experience transmission delays, consider adjusting the settings as outlined in the table below. The table details the impact of different sources and settings on CPU and GPU usage.

As shown, no specific recommendations are needed when the performance impact is low. However, this does not mean you can add an unlimited number of “low” impact items, as excessive additions can still result in high performance consumption. To optimize settings:
Open Task Manager and monitor CPU/GPU usage while adding sources one by one.
Adjust settings accordingly to prevent performance degradation.
Source
For detailed instructions on using each source, refer to the Sources pages, or visit Help > Prepare Scene and Source > Add Source.

Video Capture Device
A Video Capture Device source allows real-time transmission using a connected camera. The higher the resolution and FPS, the more GPU resources are consumed. Additionally, adding multiple video capture sources will increase both CPU and GPU load.
We recommend the following settings:
Match the device resolution to the output resolution. If the output resolution is 1080p but the camera resolution is set to 4K, the captured video will be downscaled to 1080p, leading to unnecessary resource consumption.
Adjust FPS settings based on PC performance. If your PC has limited processing power, set FPS to 30 or lower.
Enable the ‘Disable if invisible’ option in the properties window of unused sources. This prevents hidden sources from consuming unnecessary CPU/GPU resources.
Display Capture
A Display Capture source allows real-time screen sharing. The performance impact varies based on the capture method:
• Windows 10 (1903 and later) capture uses less GPU but higher CPU.
• DXGI Desktop Duplication capture consumes less CPU but requires moderate GPU usage.
For optimal performance, set the capture method to DXGI capture in the source properties window.

Display Capture (Part)
The Display Capture (Part) source allows you to capture and share a specific portion of your monitor in real time. However, performance issues may arise if the PRISM app and the monitor are using different graphics cards. Additionally, higher screen resolutions will result in increased GPU consumption.
We recommend the following:
Use Windows 10 or a later version.
Ensure that the PRISM app and the monitor use the same graphics card.
To check which graphics card your monitor is using:
Right-click on an empty area of the desktop > Display Settings > Advanced Display > Check Graphics Card Information.
To check which graphics card the PRISM app is using:
Right-click on an empty area of the desktop > Display Settings > Graphics > Select PRISM app from the list > Click Options > Check the graphics card.
For more details on configuring graphics cards, refer to the following page:
Game Capture
Adding a Game Capture source allows you to capture a game’s screen and render it in real time within PRISM.
We recommend the following:
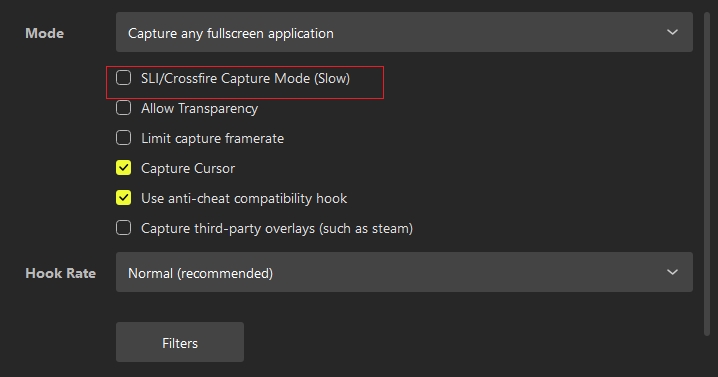
Disable the ‘SLI/Crossfire Capture Mode (Slow)’ option if you have only one graphics card. This option is found in the Game Capture source properties window.
Ensure that the game and PRISM app use the same graphics card.
To verify and adjust settings:
Right-click on an empty area of the desktop > Display Settings > Graphics > Select PRISM app from the list > Click Options > Check the graphics card.
For more details on configuring graphics cards, refer to the following page:
Window Capture
The Window Capture source allows you to capture a specific application window instead of the entire screen.
We recommend the following settings:
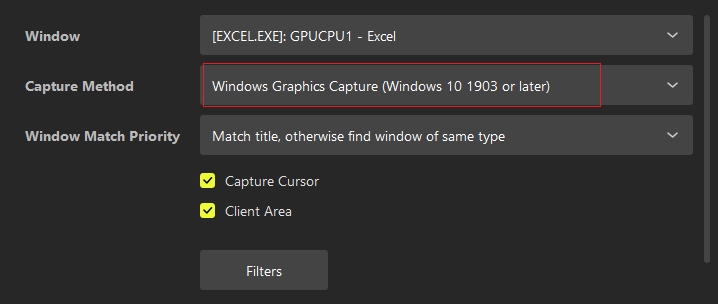
Set the capture method to ‘Windows Graphics Capture (Windows 10 1903 or later)’. This option is available in the Window Capture source properties window.
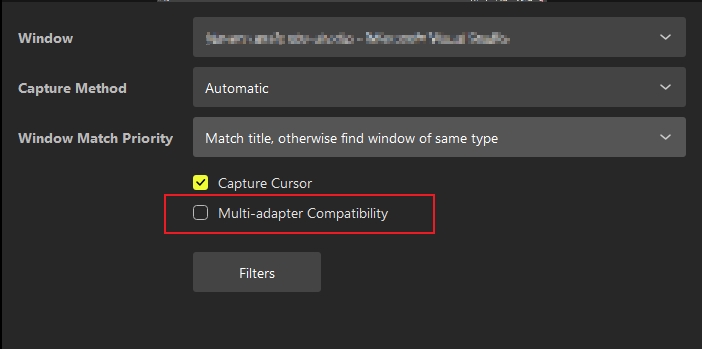
Disable the ‘Multi-adapter Compatibility’ option when using BitBlt as the capture method and if you have only one graphics card.
Browser
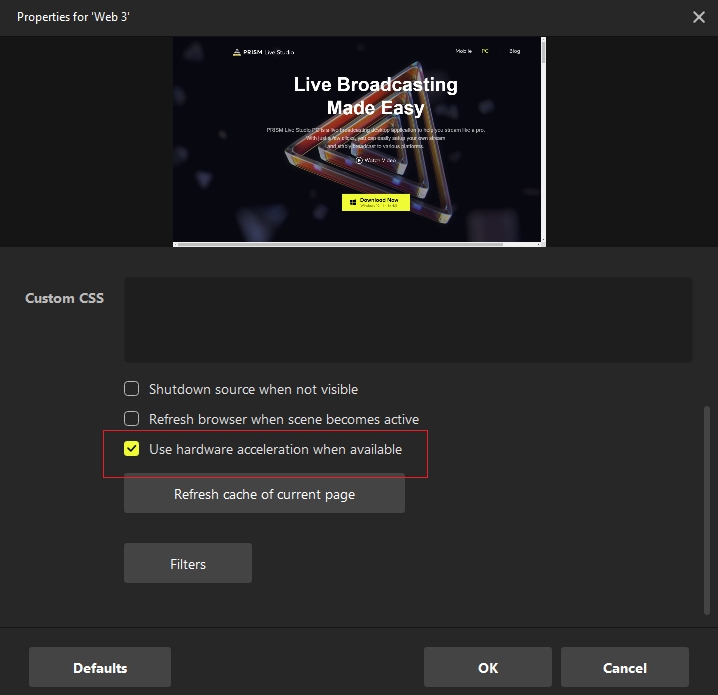
The Browser source enables you to embed live content from web pages into your broadcast. However, adding multiple browser sources can significantly increase GPU usage, even if the ‘Use hardware acceleration when available’ option is disabled.
We recommend the following:
Minimize the use of browser sources whenever possible.
Enable the ‘Use hardware acceleration when available’ option.
Media source
The Media Source allows you to add and play video or audio files stored on your device. Larger files consume more CPU, and enabling hardware decoding can also increase GPU usage.
We recommend the following:
Match the media resolution to the transmission resolution. For example, if a 2K video is played while the broadcast resolution is set to 1080p, the video will be downscaled during transmission. To avoid unnecessary quality loss, it’s best to convert videos to the correct resolution before adding them to PRISM.
Enable the ‘Use hardware decoding when possible’ option in the source properties window. This setting is particularly useful for large videos when the GPU is more powerful than the CPU.
Image
Image files (JPG, PNG, GIF) added through the Image Source can be used in your broadcast. However, adding many images or using high-resolution files increases CPU/GPU usage.
We recommend the following:
Reduce the use of large, high-resolution images.
Pre-compress images to match or stay below the output resolution. Even if an image is in higher resolution than the broadcast output, it will still be compressed to match the output resolution, potentially causing quality loss.
Image Slide Show
The Image Slide Show source allows you to create automated or manually controlled slideshows for your broadcast. Adding too many images can increase CPU load when loading the slideshow, while GPU usage may also rise.
We recommend the following:
Avoid adding an excessive number of images in the source properties window.
Pre-compress images to match or stay below the output resolution.
Add images before broadcasting or recording rather than during the session. Adding images during a live broadcast may cause sudden spikes in CPU usage, affecting stream quality.
Scene
Adding a Scene Source allows you to combine existing scenes and sources into a single source. However, using too many scene sources—especially when the exposure method is set to Real-time screen—can increase CPU consumption.
We recommend the following:
Limit the number of scene sources used.
Adjust the scene exposure method based on the number of scenes. When using 10 or more scenes, set the exposure method to Text or Thumbnail in Settings > General > Display Method.

PRISM Lens & PRISM Mobile
The PRISM Mobile source utilizes PRISM Lens, which provides features such as beauty effects and virtual backgrounds. These features can significantly impact GPU and CPU performance, especially when used at higher resolutions or higher FPS settings.
We recommend the following:
Use effects sparingly. Features such as beauty effects and virtual backgrounds are resource-intensive, so use them only when necessary.
Match the source resolution to the transmission resolution. For example, if a 2K video is played while the broadcast resolution is set to 1080p, the video will be downscaled, leading to quality loss. It is recommended to pre-convert the video to match the transmission resolution before adding it to PRISM app.
Enable the ‘Hardware’ option for decoding in PRISM Lens settings. You can find this option in Settings > General > Decoding Method.

PRISM Sticker
PRISM Stickers allow you to decorate the broadcast screen with various animated stickers. However, loading unused stickers consumes GPU/CPU resources.
We recommend adding stickers before broadcasting or recording, rather than during the session, as used stickers can be loaded with lower performance costs.
GIPHY Sticker
The GIPHY Sticker source provides access to a variety of free animated stickers. The performance impact depends on the number of images displayed, the number of frames in each animation, and the window size.
We recommend using a reasonable number of stickers based on your PC’s performance.
Music Playlist
You can add and play local music files stored on your PC, as well as free music provided by PRISM.
To prevent unnecessary performance issues, it is recommended to avoid using excessively large audio files.
Audio Visualizer
The Audio Visualizer feature renders real-time visual effects based on audio input, consuming GPU resources.
For optimal performance, we recommend using the default template with the default values in the source properties window.
Background Template
Background Templates allow you to add motion-based backgrounds to your scene. The MY tab in the source properties window lets you upload your own images for virtual backgrounds.
We recommend the following:
Avoid adding large, high-resolution videos. A 4K video will consume a large amount of CPU and GPU resources. A video smaller than 2K is recommended for smoother performance.
Scene
You can view the list of scenes and list of sources in the image below. The scene thumbnail preview allows you to view all sources included in that scene.

Scenes
The Scenes List displays the currently active scenes. The more scenes you have, the more CPU/GPU resources will be consumed.
We recommend setting up an appropriate number of scenes based on your broadcasting needs.
Scene Sets
A Scene Set lets you group multiple scenes and sources into one collection, which can then be saved, imported, and exported in PRISM app. However, larger scene sets with many scenes and sources will result in higher CPU/GPU usage.
To optimize performance:
Reduce the number of scenes and sources in your saved scene collection file.
For more information about using Scene Sets, please refer to the following page:
Sources
The Sources List displays all sources added to each scene. The more sources you include, the higher the CPU/GPU consumption.
We recommend the following:
• Limiting the number of sources per scene.
• Removing unnecessary sources from the source list.
Scene Thumbnail
The Scene Thumbnail feature provides a live preview of all sources included in each scene. Since this function increases CPU and GPU load, we recommend limiting its usage.
To optimize performance:
djust the scene exposure method based on the number of scenes. When using 10 or more scenes, set the exposure method to Text or Thumbnail in Settings > General > Display Method.

Encoder settings
PRISM supports various encoder types, including software encoding (x264/AV1) and hardware encoding (NVIDIA/AMD). In Settings, select the Output tab and set Output Mode to Advanced. And in the Streaming section, locate the Video Encoder option. The exact name may vary depending on your graphics card manufacturer.

For x264 or x265 encoding, we recommend adjusting the CPU Usage Preset(higer = less CPU)option to veryfast. If you select veryslow for this option, it uses a lot of CPU resources. Scroll down to find CPU Usage Preset option.
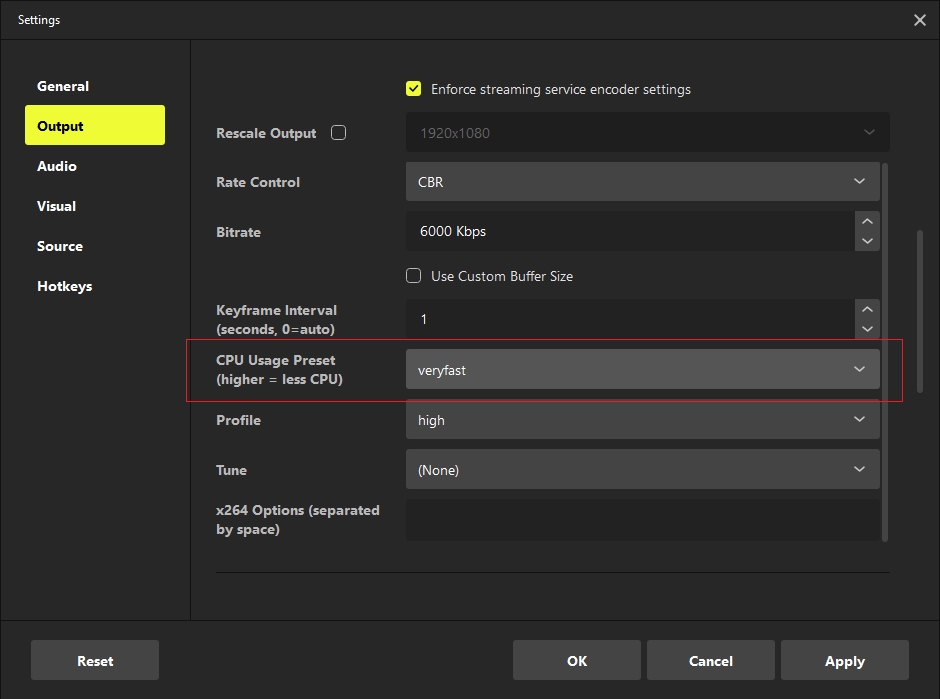
Output settings
For optimal performance, we recommend lowering the broadcast resolution, bitrate, and FPS settings. Higher resolution, bitrate, and FPS settings can put strain on both your PC and network bandwidth.
To adjust these settings, go to Settings, select the Output tab and set Output Mode to Advanced. And in the Streaming section, scroll down to locate the Bitrate option.
You can set resolution and FPS in Settings > Video tab.


If you are using a dedicated graphics card, we recommend selecting Hardware (NVIDIA/AMD) in the encoder options. To adjust these settings, go to Settings, select the Output tab and set Output Mode to Advanced. And in the Streaming section, locate the Video Encoder option. The exact name may vary depending on your graphics card manufacturer.

Others
Beauty Effect in PRISM Lens
The Beauty Effect feature enhances facial appearance by smoothing skin and adjusting facial features.
Since this feature is GPU-intensive, we do not recommend enabling it on low-spec PCs.
Virtual Background in PRISM Lens
The Virtual Background feature allows you to remove or replace the camera background. This feature mainly relies on GPU resources.
We recommend the following:
Avoid using Virtual Backgrounds on multiple lenses simultaneously.
Close the PRISM Lens window after setting the Virtual Background. The app and the effect will remain active while running in the background.
Do not use images larger than 2K when importing backgrounds.
Prefer background blur instead of virtual background images. Background blur consumes fewer resources than full virtual backgrounds.
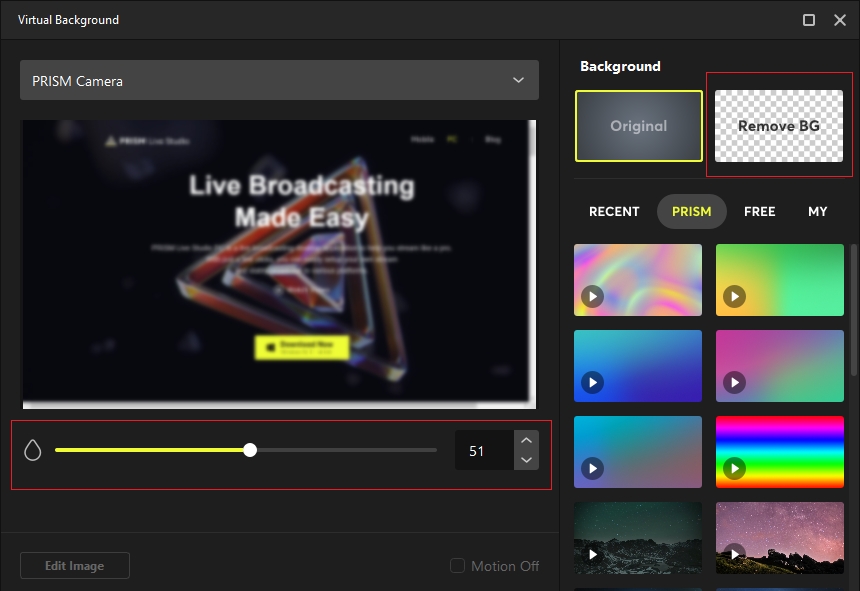
Drawing mode
The Drawing Mode feature allows users to draw directly onto the broadcast screen. This feature mainly relies on GPU resources.
We recommend the following:
Testing performance on your PC before prolonged use.
Using for simple figures rather than complex drawings.
For more information about using Drawing mode, please refer to the following page:
Multiview
The Multiview feature allows you to view multiple scenes, including the EDIT screen, LIVE screen, and scene list, in a single interface. Although this feature not requires large GPU processing, we recommend minimizing the use of Multiview on low-spec PC.
To use Multiview, navigate the Menu > View > multiview.
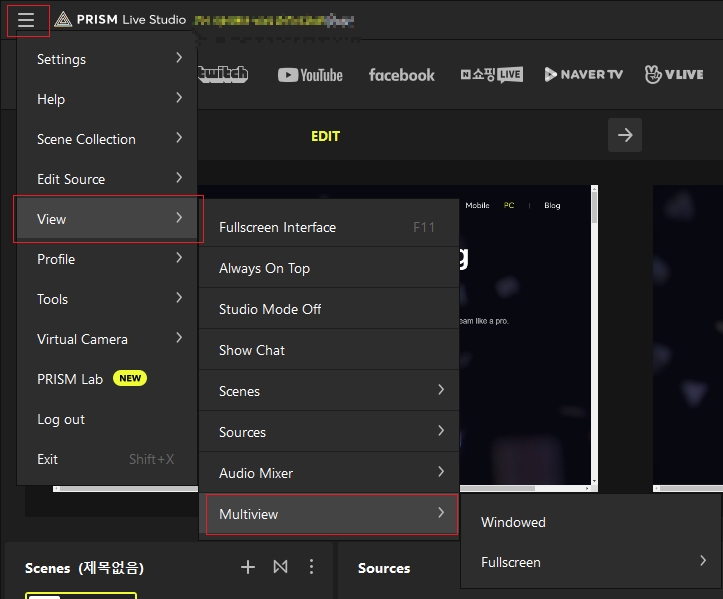

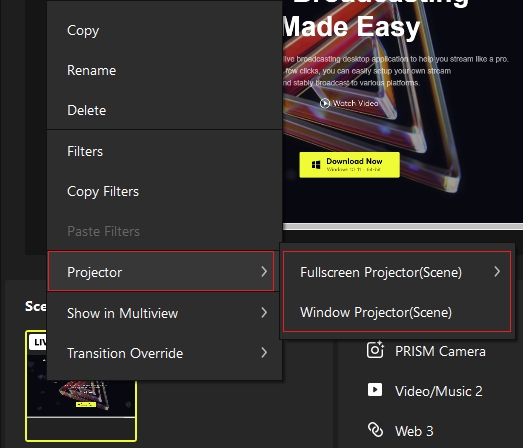
Source Projector
The Source Projector feature displays the LIVE screen and selected scenes in a separate window. As the number of projected scenes increases, so does GPU consumption. If using a low-spec PC, we recommend minimizing the use of Source Projector.
There are two ways to access Source Projector:
Right-click the LIVE screen in Studio Mode.
Right-click a scene in the Scenes tab.
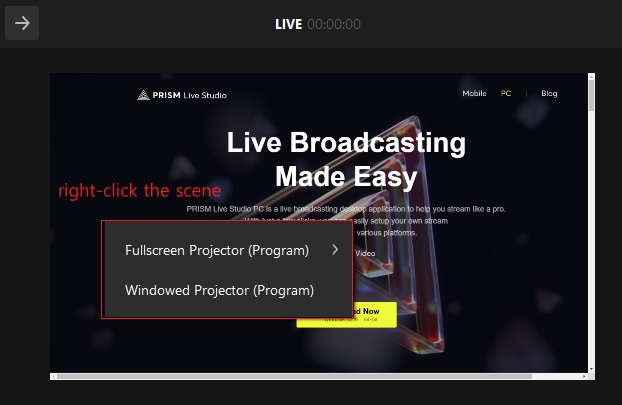
Last updated
Was this helpful?

